The Association of Model Submariners.

Would you like to react to this message? Create an account in a few clicks or log in to continue.

* THE FORUM FOR ALL THOSE INTERESTED IN BUILDING AND OPERATING MODEL SUBMARINES *


Join the AMS - Registered Forum users can become members of the AMS and it's free ...... To join send an email with your name , address and phone number to amstreasure@googlemail.com


For a guide to past events see the "Shows and Events" section.
Bournville MBC on Sunday 11th August 2024, 10.00 i
::::

Papplewick Pumping Station Sub Weekend, 14th & !5th Sept 2024

P~~~

$$$

Who is online?

In total there are 8 users online :: 0 Registered, 0 Hidden and 8 Guests :: 1 Bot

None


Most users ever online was 180 on Tue Nov 05, 2019 6:03 am

Latest topics

» Robbe Seawolf V2
PIC and Arduino microprocessors - Page 3 EmptyYesterday at 9:21 pm by geofrancis

» 868/915 Mhz as a viable frequency for submarines.
PIC and Arduino microprocessors - Page 3 EmptySun Sep 08, 2024 10:55 pm by geofrancis

» WW2 mini sub build
PIC and Arduino microprocessors - Page 3 EmptyThu Sep 05, 2024 8:15 am by david f

» Trumpeter 1/144 PLAN Type 092 Xia Class SSBN
PIC and Arduino microprocessors - Page 3 EmptyTue Aug 06, 2024 5:42 am by redboat219

» UHF radio control for submarines (openLRS, LoRa, FSK etc. on 458Mhz and 433Mhz )
PIC and Arduino microprocessors - Page 3 EmptySat Jul 27, 2024 9:05 am by david f

» David Forrest's R class
PIC and Arduino microprocessors - Page 3 EmptyFri Jul 19, 2024 1:00 pm by david f

» Futaba -868/915mhz equipment
PIC and Arduino microprocessors - Page 3 EmptySun Jun 09, 2024 10:47 pm by tsenecal

» Darnell type 21 submarine, need some help
PIC and Arduino microprocessors - Page 3 EmptySun Jun 09, 2024 9:35 am by Deep Diver (Fred)

» bladder bags
PIC and Arduino microprocessors - Page 3 EmptyTue May 28, 2024 8:30 am by Deep Diver (Fred)

Statistics

Our users have posted a total of 12493 messages in 1987 subjects

We have 1019 registered users

The newest registered user is Flyboy21

+6
tsenecal
profesorul
John Wrennall
bwi
Harry.Brash
david f
10 posters

    PIC and Arduino microprocessors

    avatar
    tsenecal
    Guest


    Posts : 316
    Join date : 2015-04-01

    PIC and Arduino microprocessors - Page 3 Empty Re: PIC and Arduino microprocessors

    Post  tsenecal Fri Nov 13, 2015 11:06 pm

    John Wrennall wrote:Cheers for your information on stepper motors Tim

    Its always good to get feedback like this before needlessly delving deeper into a subject.
    The friction from the O-ring had already given me a few doubts.

    I have already ordered some cheap (£5.00) unipolar motors and controllers for experimentation purposes, looks like they may end up as Christmas decorations.....


    i did the same thing, thinking the controllers could be used on the better stepper motors. wrong.

    something like these?

    http://www.ebay.com/itm/2pcs-DC-5V-Stepper-Motor-28BYJ-48-ULN2003-Driver-Test-Module-Board-for-Arduino-/321779670958?hash=item4aeb901fae:g:ARcAAOxyBgpSacgM


    they are sitting in a box with all the other stepper motor stuff
    John Wrennall
    John Wrennall
    AMS member


    Posts : 157
    Join date : 2011-11-16
    Age : 78
    Location : Leyland

    PIC and Arduino microprocessors - Page 3 Empty Re: PIC and Arduino microprocessors

    Post  John Wrennall Sun Nov 15, 2015 6:54 pm


    Exactly the same. 5 sets for £9.98 from Ebay

    david f
    david f
    AMS Treasurer


    Posts : 2409
    Join date : 2010-11-10
    Age : 74
    Location : Cumbria

    PIC and Arduino microprocessors - Page 3 Empty Re: PIC and Arduino microprocessors

    Post  david f Sat Nov 28, 2015 1:10 pm

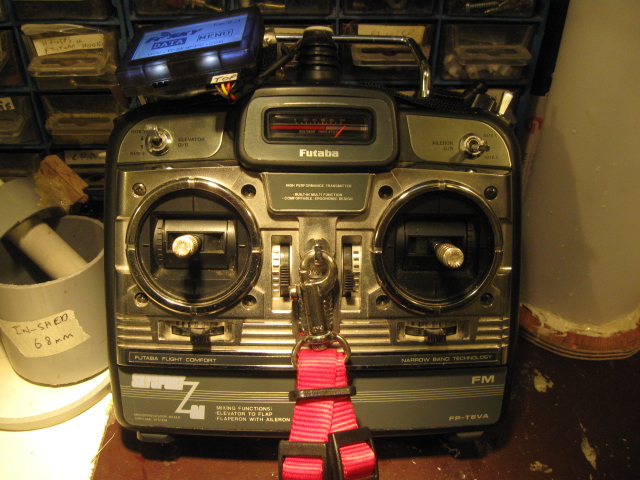
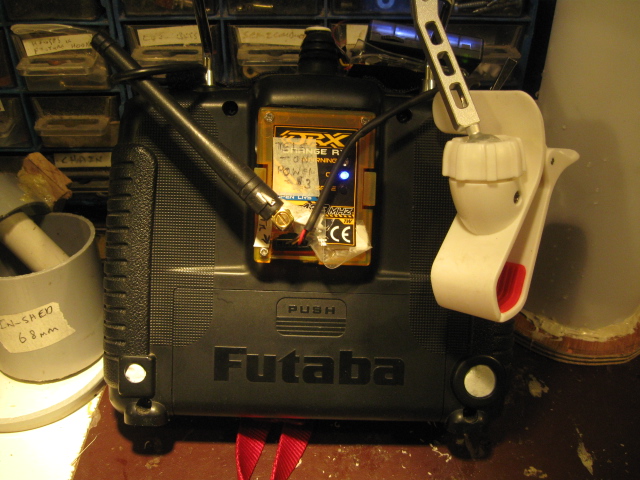
    Well I have just put the Arduino to some useful work - converting one of Brian's 35Mhz transmitters (Futaba Skysport 6A) to 458MHz. (John W showed the way on here in the 458MHz thread.)

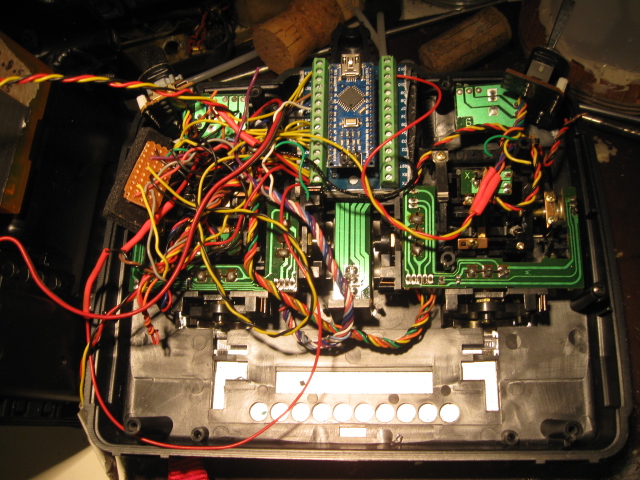
    The Arduino Nano does the work of converting the stick inputs (I have retained the case and pots) and feeding it into an Orange 458Mhz TX module. I used the Funduino breakout board for the Nano for about £2.50 on ebay. This made the connection easier but the pin alignment is a little confusing. My main error was connecting the ppm output to the wrong pin. The ppm signal is easily picked up on a scope (which I am lucky to have) so I could find the right pin.

    I have only just got it working but it looks very promising. I still have to decide what to do about some of the aircraft features e.g exponential. I think I will use the "Flaps" pot for control of the proportional piston tank.

    (Gosh John is posting a reply as I write this. Good point John. Do read the excellent instructions by Phil Green.) I will not post a photo yet because it is a bit of a "rat's nest"- even by my standards!

    Cost of this TX amounts to about £18! I am using the China sourced Nanos which are a bit "like fuses". Two have died already but on the plus side they only cost about £2.50 each. So this is still a remarkably cheap project.

    Many thanks to Phil Green for all his work on this project.
    Phil Green's software follows just bung it in as a sketch in the Arduino Nano:


    // 7 channel encoder by Phil Green

    // Simple, minimal six channel PPM encoder. Four propo, one toggle-switched with servo-slow (ch6), one momentary button  (ch5)
    // Please do not use bootloader, startup delay messes things up and can strip servo gears.
    // Connections:
    // Pots wired between ground and regulated 5v from Arduino. Wipers connected as follows:
    // A0=aileron, A1=elevator, A2=rudder, A3=throttle.  A6=expo, A7=rates. D10=mixer, D11=ch5 button, D12=hip-hop group, (and also ch6 toggle switch)
    // Features
    // Stick calibration - hold button in, switch on, still holding button move sticks and trims to extreme corners. Centralise trims, release button.
    // Variable expo & rates on ch1, 2 & 4. Elevon mixer on ch1 & ch2, 75% aileron, 25% elevator.
    // Flick toggle 3x for range test.  Servo reversing by holding sticks over on power up (saved to eeprom). Servo-slow on channel 6 toggle.
    // Scope trigger on D10.   Thanks to Paul Luby for his expo maths!
    // Phil_G on most forums, philg@talk21.com  http://www.singlechannel.co.uk

    int sw_mix = 10; // mixer switch
    int sw_btn = 11; // pushbutton channel 5
    int sw_tog = 12; // toggle channel 6
    int ppm = 13, ppmPulse = 300, neutralPulse = 1200, raw, flips, ch, calibrated=1, startup=1, stickcalHi[]={0,0,0,0}, stickcalLo[]={1023,1023,1023,1023};
    float ch0val, chtemp, channel[]={1200,1200,1200,1200,1200,1200,8000};  // last is sync
    float lastch6, cchannel6, slow, sweep, rate =0, expo = 0;
    byte reverse[]={0,0,0,0,0,0}, rangetest=0, flip=0;
    unsigned int framecounter=0;

    #include <EEPROM.h>

    void setup()  {
           noInterrupts();
     pinMode(ppm, OUTPUT);
     pinMode(sw_mix, INPUT_PULLUP); // set to OUTPUT for scope trigger
     pinMode(sw_btn, INPUT_PULLUP);
     pinMode(sw_tog, INPUT_PULLUP);
           }

    void loop() {
          while (startup==1 && digitalRead(sw_btn) == 0) {
             // calibrate sticks
              calibrated=0;
              for (int stick=0; stick <4; ++stick) {
                raw=analogRead(stick);
                if (raw > stickcalHi[stick]) stickcalHi[stick] = raw;
                if (raw < stickcalLo[stick]) stickcalLo[stick] = raw;
                }
           }
           if (startup==1 && calibrated==0) {
             for (ch=0; ch<4; ch++) {EEPROMWriteInt(ch*4,stickcalLo[ch]); EEPROMWriteInt(ch*4+2,stickcalHi[ch]);}
             calibrated=1;
             }  
           if (startup==1) {
             for (ch=0; ch<4; ch++) {stickcalLo[ch]=EEPROMReadInt(ch*4); stickcalHi[ch]=EEPROMReadInt(ch*4+2); reverse[ch]=EEPROM.read(ch+16) & 1; }
             reverse[3]=0;   // no throttle reverse for safety
             slow=digitalRead(sw_tog)==0 ?500:-500;  // initial channel 6 value
             }
           
            for (ch=0; ch<4; ch++) {channel[ch] = map(analogRead(ch),stickcalLo[ch],stickcalHi[ch],-500,500); channel[ch] = constrain(channel[ch], -600, 600);}
      channel[4]=digitalRead(sw_btn)==0 ?500:-500;  // channel 5

            if (digitalRead(sw_tog) == 0) {
              cchannel6 = 500;
              if (slow < 500) slow+=2;
              }
            if (digitalRead(sw_tog) == 1) {
              cchannel6 = -500;  
              if (slow > -500) slow-=2;
              }
            channel[5]=slow;
      ch0val=channel[0];

            // check for reversing, stick over on power-up, not throttle though.
           if (startup==1) {
             for (ch=0; ch<3; ch++) {
               if (channel[ch] > 450 || channel[ch] < -450) { reverse[ch] ^=B00000001; EEPROM.write(16+ch,reverse[ch]);}
               }
            }
           
           // end of once-only startup routines
           startup=0;

           // read expo pot
           expo = map(analogRead(A6),0,1023,100,300); expo/=100;
           // read rates pot
           rate = map(analogRead(A7),0,1023,100,10);
           rate/=100;
           for (ch=0; ch<3; ch++) {
             if (channel[ch] <0) {channel[ch]=abs(channel[ch])/500; channel[ch]=pow(channel[ch],expo)*-500; }
             else
             channel[ch]=(pow(channel[ch]/500,expo)*500);
             channel[ch]*=rate;
             }

          // do timed stuff
           if (cchannel6 != lastch6) {++flips; framecounter=0;}
           if (framecounter < 12 && flips >5) {
             rangetest ^= 1; // this flags the 3 flicks 'active'
             framecounter=12;
             }
           if (framecounter > 11) flips=0;
           lastch6=cchannel6;

           // format the frame
           channel[6]=0; // 6th element is sync
           for (ch=0; ch<6; ch++) {
             channel[ch]+=neutralPulse;
             if (reverse[ch] ==1) channel[ch] = 2400-channel[ch];
             channel[6]+=channel[ch];
           }
           channel[6] = 15500-channel[6];
           chtemp=channel[3]; channel[3]=channel[2]; channel[2]=chtemp; // change channel order to Futaba AETR

           if (rangetest==1) {
             channel[2]=700; // throttle low
             if (framecounter==50) {
               framecounter=0;
               flip^=1;
               }
             channel[0]=flip==0 ?800:1600;
             if (ch0val < -50 || ch0val > 50) rangetest=0;
           }
           
           // check if mixer switched in
           if (digitalRead(sw_mix) == 0) {
            channel[0]*=.75;
            channel[1]*=.25;
            chtemp=channel[1];
            channel[1]=channel[0]+600-channel[1];
            channel[0]+=chtemp;
            }

     //send ppm frame, last channel holds sync value
           for (int ch=0; ch<7; ch++) {
             digitalWrite(ppm, HIGH);
             delayMicroseconds(ppmPulse);
             digitalWrite(ppm, LOW);
             delayMicroseconds(channel[ch]);
             }
           if (framecounter<255) ++framecounter;
           
    // scope trigger pin 10, ensure mixer switched off, then temp define as OUTPUT in setup
    //      digitalWrite(10, HIGH);
    //  delayMicroseconds(100);
    //      digitalWrite(10, LOW);
          }

    // This function will write a 2 byte integer to the eeprom at the specified address and address + 1
    void EEPROMWriteInt(int p_address, int p_value)
         {
         byte lowByte = p_value%256;
         byte highByte = p_value/256;
         EEPROM.write(p_address, lowByte);
         EEPROM.write(p_address + 1, highByte);
         }

    //This function will read a 2 byte integer from the eeprom at the specified address and address + 1
    unsigned int EEPROMReadInt(int p_address)
         {
         byte lowByte = EEPROM.read(p_address);
         byte highByte = EEPROM.read(p_address + 1);
         return lowByte + highByte*256;
         }


    Last edited by david f on Sun Nov 29, 2015 2:02 pm; edited 9 times in total

    John Wrennall
    John Wrennall
    AMS member


    Posts : 157
    Join date : 2011-11-16
    Age : 78
    Location : Leyland

    PIC and Arduino microprocessors - Page 3 Empty Re: PIC and Arduino microprocessors

    Post  John Wrennall Sat Nov 28, 2015 1:34 pm

    Phil Green's code just posted by David F is originally from:-

    Code and schematics from the following:-
    http://www.singlechannel.co.uk/

    ARCHIVE tab

    P16 and P 17 for schematic and Arduino C code

    Its definitely worth reading Phil's write-up as the coding includes features such as single channel control which is not normally associated with submarines.
    david f
    david f
    AMS Treasurer


    Posts : 2409
    Join date : 2010-11-10
    Age : 74
    Location : Cumbria

    PIC and Arduino microprocessors - Page 3 Empty Re: PIC and Arduino microprocessors

    Post  david f Sat Dec 05, 2015 12:59 pm

    Some more details on the modified transmitter (One of Brian's) The last photo shows the Arduino Nano sitting up near the top of the case. A bit less of a rat's nest than it was and I have used the breakout board with screw terminals.

    You will need something like a voltmeter continuity tester to identify the wires for the pots (My opening up of my Futaba 9C shows that in modern TXs they have stopped even colour coding leads!)

    I didn't use the trims (which were separate pots) and I used a spring loaded switch for the stick calibration switch, so no need for any extra switches etc.

    PIC and Arduino microprocessors - Page 3 Img_5411

    PIC and Arduino microprocessors - Page 3 Img_5412

    PIC and Arduino microprocessors - Page 3 Img_5415

    PIC and Arduino microprocessors - Page 3 Img_5416

    I am very impressed with the software from Phil Green. Things like the stick reversal routine  work beautifully. (I used the non-reversible throttle output for my piston tank. I didn't want to get full and empty confused!)

    A lot of the "aircraft" features like rates etc. aren't used and you end up with a simple TX. TX's have too many features for model submariners in my opinion. We just need lots of channels.

    So a seemingly very workable TX (not yet pond tested) for about £20. My thanks to Phil Green, Tim S and John W for pioneering all this.

    A nice video of the man himself - Phil Green demonstrating the features. ( He is using it with a 2.4 GHz module rather than a 433/458 MHz module.

    https://www.youtube.com/watch?v=r9ZGZUQClS8
    avatar
    tsenecal
    Guest


    Posts : 316
    Join date : 2015-04-01

    PIC and Arduino microprocessors - Page 3 Empty Re: PIC and Arduino microprocessors

    Post  tsenecal Thu Dec 10, 2015 9:39 pm

    for those that are interested in following along, i have started documenting my FrSky 433mhz hub construction over on subpirates.com

    http://www.subpirates.com/showthread.php?5271-Custom-Frsky-Telemetry-Hub


    Tim
    avatar
    tsenecal
    Guest


    Posts : 316
    Join date : 2015-04-01

    PIC and Arduino microprocessors - Page 3 Empty Re: PIC and Arduino microprocessors

    Post  tsenecal Thu Dec 10, 2015 9:43 pm

    david f wrote:
    A lot of the "aircraft" features like rates etc. aren't used and you end up with a simple TX. TX's have too many features for model submariners in my opinion. We just need lots of channels.

    So a seemingly very workable TX (not yet pond tested) for about £20. My thanks to Phil Green, Tim S and John W for pioneering all this.

    A nice video of the man himself - Phil Green demonstrating the features. ( He is using it with a 2.4 GHz module rather than a 433/458 MHz module.

    https://www.youtube.com/watch?v=r9ZGZUQClS8


    I agree with you on all the mixes and dual rates that airplane TXs offer, but alot of the other functions, like exponential and end points and reversing, as well as some simple mixes (like tank steering) are usable by us. I also like the newer systems like the Taranis, where you can map any stick or switch or knob to any pin on the reciever. that makes layout on the transmitter a joy.
    John Wrennall
    John Wrennall
    AMS member


    Posts : 157
    Join date : 2011-11-16
    Age : 78
    Location : Leyland

    PIC and Arduino microprocessors - Page 3 Empty Re: PIC and Arduino microprocessors

    Post  John Wrennall Thu Dec 17, 2015 5:00 pm

    Tim
    while looking for some arduino coding, I came across the following link to a stepper motor
    being used for ballast control.

    Its not a normal submarine but thought you would be interested.

    http://www.instructables.com/id/Underwater-Glider/

    (operational video at end)

    It also uses a rotating-weight roll control on a servo

    John
    avatar
    tsenecal
    Guest


    Posts : 316
    Join date : 2015-04-01

    PIC and Arduino microprocessors - Page 3 Empty Re: PIC and Arduino microprocessors

    Post  tsenecal Thu Dec 17, 2015 7:08 pm

    very interesting, especially the movie at the end.

    theirs does seem to move in a test video with no skipping.

    does anybody know the dimensions of the piston head on a 60ml syringe?

    the one big question i have... what size nema stepper motor did they use? based on the photos, i would guess its a nema 17 size motor, which is larger than either the nema 11 or nema 14 i used. i don't have room for that size motor, i have a 4"x11" tube, and need 500ml of ballast. theirs is 18" x 4", and their total ballast amongst 4 syringes appears to be 200ml. it looks like they have 3 60ml and 1 20ml. I assume the 20ml is something of a trim tank, since they are using the larger stepper to move the 3 big syringes, and a smaller stepper to move the single 20ml syringe.

    makes me wonder if a single double o-ring 3.75" piston has more friction than 3 smaller pistons. has me scratching my head and thinking i need to do some more testing.

    very interesting...
    david f
    david f
    AMS Treasurer


    Posts : 2409
    Join date : 2010-11-10
    Age : 74
    Location : Cumbria

    PIC and Arduino microprocessors - Page 3 Empty Re: PIC and Arduino microprocessors

    Post  david f Sat Dec 19, 2015 3:50 pm

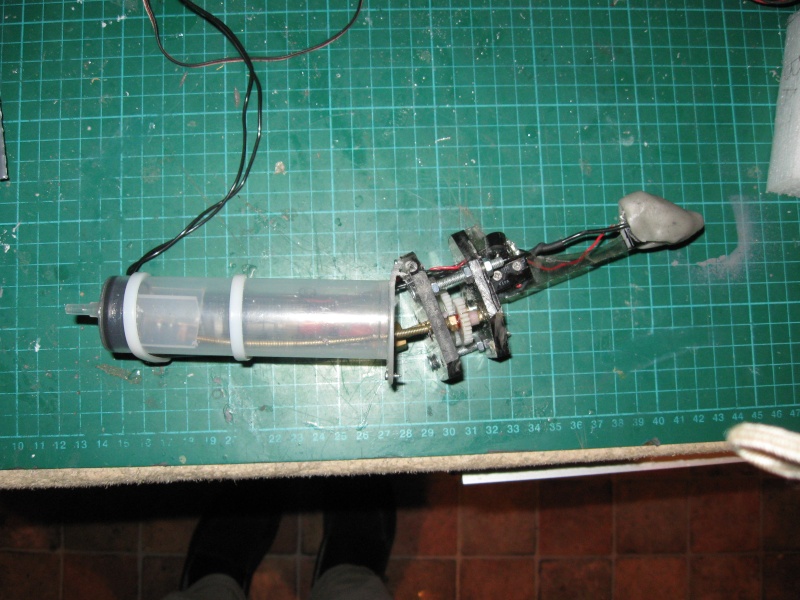
    It is interesting and I am intrigued that they managed to make a go of using syringes. I gave up on them after distressing results- see photo below!

    PIC and Arduino microprocessors - Page 3 Img_0811

    I think they have too much friction and in the end they are designed to be used once only!

    These were original trials for the Resurgam model and, in the end, I made my own on a lathe and they were much "beefier" with a bigger volume and hence better. I have just updated the piston tank section with my experiences.

    https://www.theassociationofmodelsubmariners.com/t537p120-piston-ballast-systems#9881

    But all credit to them for using syringes and stepper motors. (I can't find the video though, Tim)
    avatar
    tsenecal
    Guest


    Posts : 316
    Join date : 2015-04-01

    PIC and Arduino microprocessors - Page 3 Empty Re: PIC and Arduino microprocessors

    Post  tsenecal Sat Dec 19, 2015 9:00 pm

    david,

    so, we have a conundrum then?  i have had no luck with stepper motors, and you have had no luck with syringes, yet here we both see a youtube video of a group of students using stepper motors to drive syringes?

    someone seems to be out to make us look bad
    david f
    david f
    AMS Treasurer


    Posts : 2409
    Join date : 2010-11-10
    Age : 74
    Location : Cumbria

    PIC and Arduino microprocessors - Page 3 Empty Re: PIC and Arduino microprocessors

    Post  david f Tue Dec 22, 2015 12:27 pm

    Students can achieve anything they want on the internet, Tim!

    Seriously though syringes seem to work OK at first with but then get stiffer and stiffer. I wonder if there is some lubricant in the syringe just for one-off use?

    Nigel says that he used whiskey as an effective syringe lubricant but maybe this was a festive story!

    David
    avatar
    tsenecal
    Guest


    Posts : 316
    Join date : 2015-04-01

    PIC and Arduino microprocessors - Page 3 Empty Re: PIC and Arduino microprocessors

    Post  tsenecal Tue Jan 05, 2016 8:49 pm

    i discovered something while browsing the arduino forum for stepper motor advice.

    most of them have driver circuits that can use up to 35 volts.

    it appears i may have been using much too few volts... starting at 12v and going up from there. apparently the more volts, the more torque.
    david f
    david f
    AMS Treasurer


    Posts : 2409
    Join date : 2010-11-10
    Age : 74
    Location : Cumbria

    PIC and Arduino microprocessors - Page 3 Empty Re: PIC and Arduino microprocessors

    Post  david f Wed Jan 06, 2016 4:39 pm

    That's good. I'm sure that going from 12 to 35 volts will give a lot more ooomph to the whole thing.
    John Wrennall
    John Wrennall
    AMS member


    Posts : 157
    Join date : 2011-11-16
    Age : 78
    Location : Leyland

    PIC and Arduino microprocessors - Page 3 Empty Re: PIC and Arduino microprocessors

    Post  John Wrennall Mon Jan 11, 2016 3:51 pm


    For anyone who wants to get to grips with Arduinos or who just wants to know more about them and their capabilities then the Magazine "Everyday Practical Electronics" has just started a "Teach-in 2016" to introduce the Arduino.

    The February 2016 issue, just out, contains Part 1 (12 pages) and covers from basics up to getting 4 programs up and running.

    Have Fun....

    John
    david f
    david f
    AMS Treasurer


    Posts : 2409
    Join date : 2010-11-10
    Age : 74
    Location : Cumbria

    PIC and Arduino microprocessors - Page 3 Empty Re: PIC and Arduino microprocessors

    Post  david f Tue Jan 12, 2016 1:35 pm

    That's very good news.

    It was a series of articles in EPE some years ago that going me going with PICs.

    I am fast coming to the conclusion that Arduinos are best for we amateurs. PICs are good for commercial, large scale production.

    I like the way that Arduinos just plug in and work and also the very large (and growing) open source user base.

    Talking of which, Tim is giving a teach-in on his development of Arduino for Telemetry on SubPirates.

    http://www.subpirates.com/showthread.php?5271-Custom-Frsky-Telemetry-Hub&p=53552#post53552

    I was initially a little bit cool on the use of Telemetry (Must be getting old!) but I had the Charlie class on the Barrow pond this Sunday. Using the FRSky sensor hub I was getting battery voltage, motor temperature and amps back for the first time ever. It IS useful information - 37 deg C and 3.6 amps maximum if you are interested. So yet another spin off from openLRS UHF technology and now I know why my 4aH battery only lasts about half an hour!
    david f
    david f
    AMS Treasurer


    Posts : 2409
    Join date : 2010-11-10
    Age : 74
    Location : Cumbria

    PIC and Arduino microprocessors - Page 3 Empty LCD 16x2 serial

    Post  david f Fri Jan 22, 2016 12:22 pm

    These LCDs are very useful and I have used them a lot with PICs. The problem is that they normally involve a lot of connections which is a pain to solder and also use up all the outputs on the processor.

    I've just tried this one with an Arduino Nano which uses only 4 connections and costs only about £6 (Not a lot more than a bare LCD)

    The photo shows it being tested using a TMP36 temperature sensor and I need to turn the heat on!


    PIC and Arduino microprocessors - Page 3 Image210

    Serial LCD 1602 16x2 Module with IIC/I2C adapter for Arduino, Raspberry Pi etc

    Bought on ebay from alictronix, a UK supplier.


    The code follows (Cobbled together for testing so don't judge me too harshly!):


    //Compatible with the Arduino IDE 1.0
    //Library version:1.1

    #include <Wire.h>
    #include <LiquidCrystal_I2C.h>

    LiquidCrystal_I2C lcd(0x27, 16, 2); // set the LCD address to 0x27 for a 16 chars and 2 line display


    //#define aref_voltage 3.3 // we tie 3.3V to ARef and measure it with a multimeter!

    void setup()
    {
    // If you want to set the aref to something other than 5v
    // analogReference(EXTERNAL);
    }

    void loop()
    {

    // read the input on analog pin 0:
    int sensorValue = analogRead(A0);
    // Convert the analog reading (which goes from 0 - 1023) to a voltage (0 - 3300mV):
    float voltage = sensorValue * 5.0 / 1023.0;
    float temperature = (voltage - 0.5) * 100; // For TMP36 temperature sensor


    lcd.init(); // initialize the lcd
    // Print a message to the LCD.
    lcd.backlight();
    lcd.setCursor(1, 0);
    lcd.print("Temp Deg C");
    lcd.setCursor(2, 1);

    // print out the value you read:
    lcd.println(temperature);
    http://lcd.print("Alictronix!");
    }
    avatar
    tsenecal
    Guest


    Posts : 316
    Join date : 2015-04-01

    PIC and Arduino microprocessors - Page 3 Empty Re: PIC and Arduino microprocessors

    Post  tsenecal Tue Feb 16, 2016 5:44 am

    A subcommittee member named Pedro Gomez started a thread on subcommittee.com concerning some trouble he has been having trying to create a Robbe multi-switch decoder.  I finally got around to posting my version of a decoder, in response to his ongoing thread.

    I also went ahead and started a thread about it over on subpirates, since my code is really a multi-prop decoder, not a multi-switch decoder...  if need be, suppose i could post it here as well.

    the two other threads:

    http://subcommittee.com/forum/showthread.php?32808-Multiswitch-de-Robbe-y-Arduino

    http://www.subpirates.com/showthread.php?5285-Arduino-based-Robbe-multi-prop-decoder

    note the fancy low budget youtube video i included :)
    david f
    david f
    AMS Treasurer


    Posts : 2409
    Join date : 2010-11-10
    Age : 74
    Location : Cumbria

    PIC and Arduino microprocessors - Page 3 Empty Re: PIC and Arduino microprocessors

    Post  david f Fri Mar 18, 2016 4:18 pm

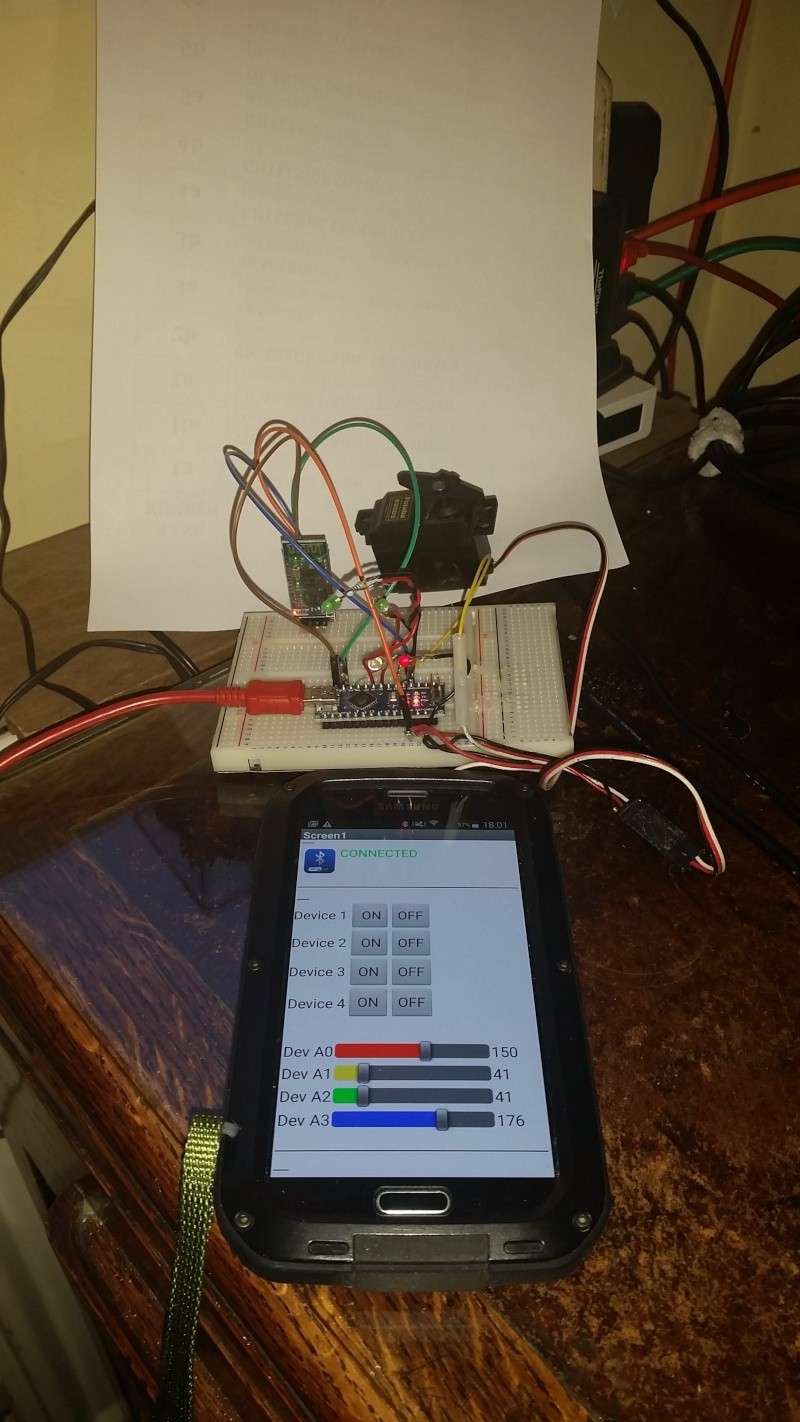
    Control your sub with your Smart phone!

    PIC and Arduino microprocessors - Page 3 20160310

    Well almost!

    I have been trying out a Bluetooth module wired up to an Arduino Nano and it works rather well using the app on the phone (I used a Samsung Galaxy 5)

    All the details on here (Thanks to mjrovai for doing all the hard work):

    http://www.instructables.com/id/Connecting-stuff-Via-Bluetooth-Android-Arduino/

    The phone can do on/off on 4 channels or proportional on the same 4 channels - using on screen sliders. I couldn't get the first sketch to work but the main sketch works fine with my Nano. Connect TX and RX on the Bluetooth module to D10 and D11 on the Nano.

    The refresh rate for the servos seems a little high - the servos whine but work OK. Response rate a little slow - so no fast models!

    But it will respond to voice commands in Spanish! (If you want English search the sketch for the Spanish command strings and insert "Torpedo Los!" or the like!

    (4.57 Greenwich Mean Time) By golly Tim I was just posting this and you've commented already!

    I was just about to say that it was sort of moving in the direction of Tim's "glass screen" tablet transmitter but it can't penetrate water and only has 30  foot range!

    Where it may just be useful is:

    - controlling things in the home.
    - maybe a very, cheap , small surface model. (Assuming you already have the phone only £10 for the receiver end.)
    - might just use it for ancillary, surface features on a sub (Mast raise etc.)

    Overall good fun for Arduino enthusiasts and a pointer of where things are going. But yes hard to see in bright sunlight. Now over to Tim!

    David


    Last edited by david f on Sat Mar 19, 2016 9:47 am; edited 7 times in total
    avatar
    tsenecal
    Guest


    Posts : 316
    Join date : 2015-04-01

    PIC and Arduino microprocessors - Page 3 Empty Re: PIC and Arduino microprocessors

    Post  tsenecal Fri Mar 18, 2016 4:31 pm

    very interesting setup....  but i have a couple questions:

    1) doesn't bluetooth have a range of 30 feet or so?
    2) isnt it also 2.4ghz?, so i am guessing that submarines will lose signal about 2" below the surface...

    this is what i started working on a while ago, and have kind of dropped...  touch screens need to be REALLY BRIGHT to see in direct sunlight, and the lack of any tactile feedback means you are staring at the screen instead of the model:

    http://www.rcgroups.com/forums/showthread.php?t=2191827

    specifically look at video #3 & post #6

    currently, the tablet backpack uses a usb dongle built by a Colorado company called Mile High Wings, http://milehighwings.com/

    but, my intention is to convert that over to a usb interface to an arduino, for two reasons: 1) more than 8 channels can be packed into a PWM signal, and 2) the s-port on the back of some 433mhz TX modules can feed telemetry data back to the host tablet, for displaying the telemetry data on the tablet screen.
    John Wrennall
    John Wrennall
    AMS member


    Posts : 157
    Join date : 2011-11-16
    Age : 78
    Location : Leyland

    PIC and Arduino microprocessors - Page 3 Empty Re: PIC and Arduino microprocessors

    Post  John Wrennall Sat Mar 19, 2016 7:29 pm

    Hi all

    https://archive.org/stream/arduino_books/Arduino%20Cookbook#page/n0/mode/2up


    The above link is to an Arduino cookbook for anyone interested in coding the arduino

    or just learning more. Packed with useful information.

    (May also be a solution to insomnia if you read too much at once)

    Enjoy

    John
    avatar
    Tom(ADMIN)
    AMS Forum Owner


    Posts : 3026
    Join date : 2010-11-05
    Age : 64
    Location : Nevada, USA

    PIC and Arduino microprocessors - Page 3 Empty Re: PIC and Arduino microprocessors

    Post  Tom(ADMIN) Sun Mar 20, 2016 12:26 am

    John,

    They also allow you to download a variety of books on Arduino.
    https://archive.org/details/arduino_books
    John Wrennall
    John Wrennall
    AMS member


    Posts : 157
    Join date : 2011-11-16
    Age : 78
    Location : Leyland

    PIC and Arduino microprocessors - Page 3 Empty Re: PIC and Arduino microprocessors

    Post  John Wrennall Mon Mar 21, 2016 3:46 pm

    Tom

    If I start to read all those, I'll have even less time for building.....

    Seriously though, I'm hoping the learning curve will begin to shallow off soon.
    avatar
    John.redearth
    Guest


    Posts : 16
    Join date : 2012-11-30
    Age : 71
    Location : Melbourne Australia

    PIC and Arduino microprocessors - Page 3 Empty Re: PIC and Arduino microprocessors

    Post  John.redearth Tue Jan 10, 2017 6:15 am

    Hi

    Just been reading through and thought I should update the part on stepper motors. like others on here I have been trying to get them to work with pistons, and the result is a complete failure. Should have read this blog first!

    Instead I am trying a couple of laser distance sensors that peer at the pistons as they travel, using standard brushed, and powerful, motor drivers for the pistons. So far this is looking promising. The sensors get to 1 ml accuracy. Good enough for a nice control script.

    Will let you know!

    John
    John Wrennall
    John Wrennall
    AMS member


    Posts : 157
    Join date : 2011-11-16
    Age : 78
    Location : Leyland

    PIC and Arduino microprocessors - Page 3 Empty Re: PIC and Arduino microprocessors

    Post  John Wrennall Fri Jan 13, 2017 10:34 pm

    Hi all

    The Magazine "Everyday Practical Electronics" has just completed a "Teach-in 2016" to introduce the Arduino.

    The February 2017 issue, just out, contains Part 1  of a NEW series on a similar device, a Micromite

    Basically its a PIC micro-controller with sufficient memory to hold a Basic program and run it with a built in interpreter.

    Whether it will challenge the Arduino only time will tell.

    Have Fun....

    John

      Current date/time is Wed Sep 18, 2024 6:03 am