This project came about because of a conversation with John Wrennall and a modeller at Haydock Park 2019 who mentioned that some Arduinos now have built in WiFi built in.
Well I think he was referring to these:
Node Mcu ESP8266 Development Board 12E WIFI CH340G v3 USB ESP12 ESP-12 NodeMcu
Quite cheap (about £5 on ebay) and quite small. You can use the standard Arduino IDE software.
This is a very useful "How- to" guide:
https://robotzero.one/sending-data-esp8266-to-esp8266/
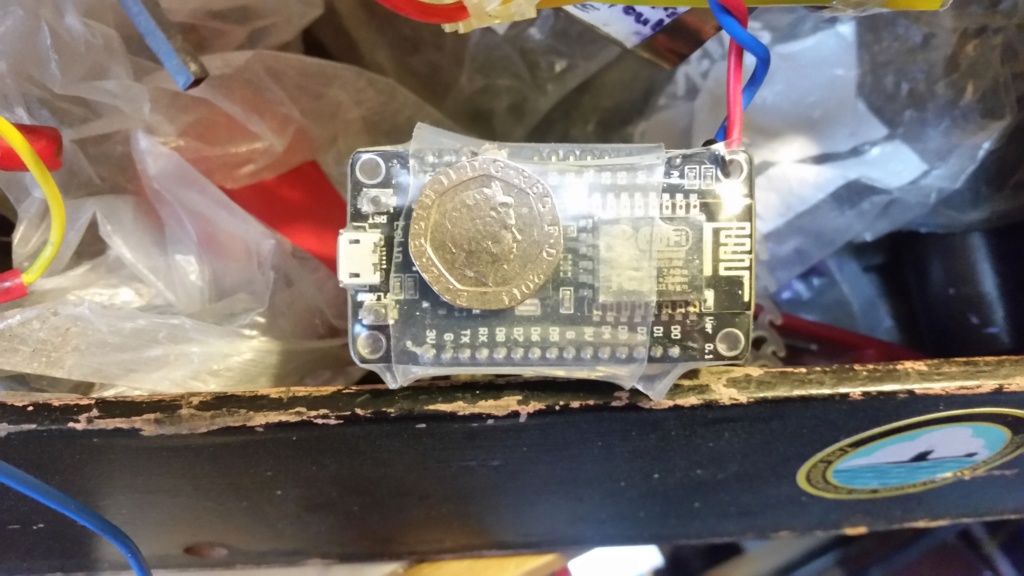
This shows the transmitter (the 20p coin is for scale!) In my case the 12v battery voltage is reduced by a voltage divider to give a 3.3 v input as a maximum input. You can see the aerial on the right of the board.

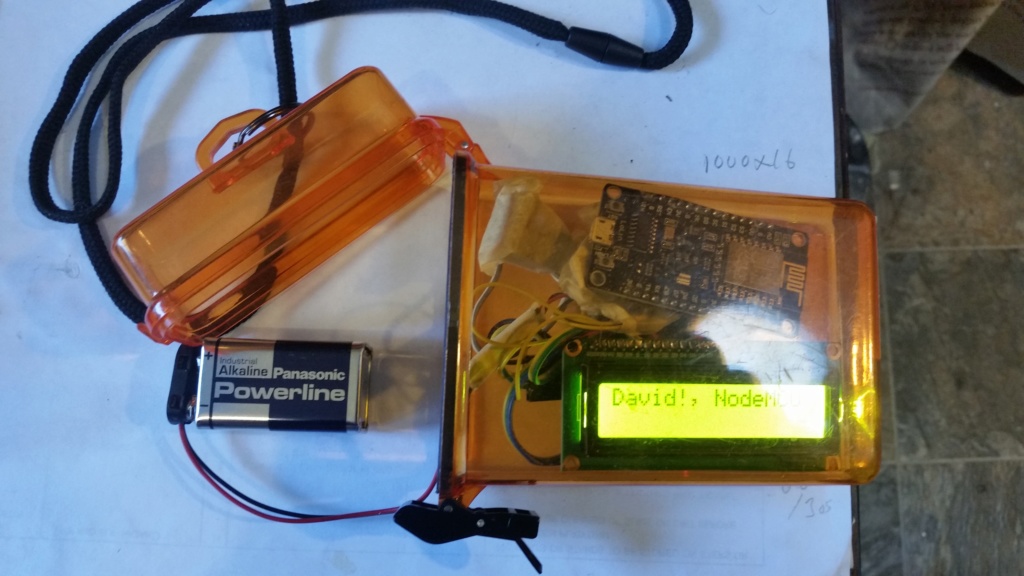
This is the receiver in a waterproof box.

Conclusion.
This works very well on the bench and would work well on a surface boat but I have tried it 3 times in my submarine and it doesn't give reliable, useful readings. I think that the very poor transmission of 2.4Ghz through water is the problem.
I enclose the software (I will also put it up on my Github) for any one interested. I will also put a link to Model Boat Mayhem because people with surface models may find a simple remote battery sensor useful.
The telemetry option for openLRS developed by Tim Senecal is still the best option for submariners, I think.
TRANSMITTER SOFTWARE:
#include <ESP8266WiFi.h>
//#include <U8g2lib.h>
// TX software
//RDF - Voltage input from divider to A0. 4.7kohms and 15k ohms for 12 v battery and 3.3 v input.
//U8g2 Constructor List - https://github.com/olikraus/u8g2/wiki/u8g2setupcpp#introduction
//U8G2_SSD1306_128X64_NONAME_F_SW_I2C u8g2(U8G2_R0, /* clock=*/ 5, /* data=*/ 4);
const char *ssid = "davido";
const char *password = "password";
const int analogInPin = 0; // Analog input pin that the potentiometer is attached to
int sensorValue = 0; // value read from the potentiometer
int outputValue = 0; // value sent to server
void setup() {
Serial.begin(115200);
delay(10);
// We start by connecting to a WiFi network
Serial.println();
Serial.println();
Serial.print("Connecting to ");
Serial.println(ssid);
/* Explicitly set the ESP8266 to be a WiFi-client, otherwise, it by default,
would try to act as both a client and an access-point and could cause
network-issues with your other WiFi-devices on your WiFi-network. */
WiFi.mode(WIFI_STA);
WiFi.begin(ssid, password);
while (WiFi.status() != WL_CONNECTED) {
delay(500);
Serial.print(".");
}
Serial.println("");
Serial.println("WiFi connected");
Serial.println("IP address: ");
Serial.println(WiFi.localIP());
Serial.begin(115200);
// u8g2.begin();
// u8g2.setFont(u8g2_font_logisoso62_tn);
// u8g2.setFontMode(0); // enable transparent mode, which is faster
}
void loop() {
// read the analog in value:
sensorValue = analogRead(A0);
sensorValue = sensorValue / 6; // Put divider constant in to get volts directly x 10
// map to range. The pot goes from about 3 to 1023. This makes the sent value be between 0 and 999 to fit on the OLED
outputValue = map(sensorValue, 3, 1023, 0, 999);
// print the results to the Serial Monitor:
Serial.print("sensor = ");
Serial.print(sensorValue);
Serial.print("\t output = ");
Serial.println(outputValue);
char intToPrint[5];
itoa(outputValue, intToPrint, 10); //integer to string conversion for OLED library
//u8g2.firstPage();
// u8g2.drawUTF8(0, 64, intToPrint);
// u8g2.nextPage();
// Use WiFiClient class to create TCP connections
WiFiClient client;
const char * host = "192.168.4.1";
const int httpPort = 80;
if (!client.connect(host, httpPort)) {
Serial.println("connection failed");
return;
}
// We now create a URI for the request
String url = "/data/";
url += "?sensor_reading=";
url += intToPrint;
Serial.print("Requesting URL: ");
Serial.println(url);
// This will send the request to the server
client.print(String("GET ") + url + " HTTP/1.1\r\n" +
"Host: " + host + "\r\n" +
"Connection: close\r\n\r\n");
unsigned long timeout = millis();
while (client.available() == 0) {
if (millis() - timeout > 5000) {
Serial.println(">>> Client Timeout !");
client.stop();
return;
}
}
Serial.println();
Serial.println("Closing connection");
Serial.println();
Serial.println();
Serial.println();
delay(500);
}
THIS IS FOR THE RECEIVER:
#include <ESP8266WiFi.h>
#include <ESP8266WebServer.h>
//#include <U8g2lib.h>
#include <LiquidCrystal_I2C.h>
#include <Wire.h>
// RX software
// Using nodeMCU guide from here https://robotzero.one/sending-data-esp8266-to-esp8266/
// Original changed to display on a standard 16x2 LCD (I had plenty available!)
// Use LCD instructions from here https://www.instructables.com/id/I2C-LCD-on-NodeMCU-V2-With-Arduino-IDE/
// Select LCD address 0x3F and 0x27 are common
//LiquidCrystal_I2C lcd(0x3F, 16, 2); // Set address for LCD
//LiquidCrystal_I2C lcd(0x27, 16, 2); // Set address for LCD
LiquidCrystal_I2C lcd(0x27, 2, 1, 0, 4, 5, 6, 7, 3, POSITIVE); // Set the LCD I2C address
// LiquidCrystal_I2C library - https://github.com/fdebrabander/Arduino-LiquidCrystal-I2C-library
const char *ssid = "davido";
const char *password = "password";
ESP8266WebServer server(80);
void handleSentVar() {
Serial.println("handleSentVar function called...");
if (server.hasArg("sensor_reading")) { // this is the variable sent from the client
Serial.println("Sensor reading received...");
int readingInt = server.arg("sensor_reading").toInt();
char readingToPrint[5];
itoa(readingInt, readingToPrint, 10); //integer to string conversion for OLED library
Serial.print("Reading: ");
Serial.println(readingToPrint);
Serial.println();
server.send(200, "text/html", "Data received");
lcd.clear();
lcd.print(" Volts: ");
delay(200);
lcd.print(readingToPrint);
delay(1000);
lcd.clear();
server.send(200, "text/html", "Data received");
}
}
void setup() {
delay(1000);
Serial.begin(115200);
Serial.println();
Serial.print("Configuring access point...");
//Use predefined PINS consts for 16 x 2 LCD
Wire.begin(D2, D1);
//lcd.begin();
lcd.begin(16, 2); // initialize the lcd for 16 chars 2 lines, turn on backlight
lcd.home();
lcd.print("David!, NodeMCU");
WiFi.softAP(ssid, password);
IPAddress myIP = WiFi.softAPIP();
server.on("/data/", HTTP_GET, handleSentVar); // when the server receives a request with /data/ in the string then run the handleSentVar function
server.begin();
}
void loop() {
server.handleClient();
}
Well I think he was referring to these:
Node Mcu ESP8266 Development Board 12E WIFI CH340G v3 USB ESP12 ESP-12 NodeMcu
Quite cheap (about £5 on ebay) and quite small. You can use the standard Arduino IDE software.
This is a very useful "How- to" guide:
https://robotzero.one/sending-data-esp8266-to-esp8266/
This shows the transmitter (the 20p coin is for scale!) In my case the 12v battery voltage is reduced by a voltage divider to give a 3.3 v input as a maximum input. You can see the aerial on the right of the board.

This is the receiver in a waterproof box.

Conclusion.
This works very well on the bench and would work well on a surface boat but I have tried it 3 times in my submarine and it doesn't give reliable, useful readings. I think that the very poor transmission of 2.4Ghz through water is the problem.
I enclose the software (I will also put it up on my Github) for any one interested. I will also put a link to Model Boat Mayhem because people with surface models may find a simple remote battery sensor useful.
The telemetry option for openLRS developed by Tim Senecal is still the best option for submariners, I think.
TRANSMITTER SOFTWARE:
#include <ESP8266WiFi.h>
//#include <U8g2lib.h>
// TX software
//RDF - Voltage input from divider to A0. 4.7kohms and 15k ohms for 12 v battery and 3.3 v input.
//U8g2 Constructor List - https://github.com/olikraus/u8g2/wiki/u8g2setupcpp#introduction
//U8G2_SSD1306_128X64_NONAME_F_SW_I2C u8g2(U8G2_R0, /* clock=*/ 5, /* data=*/ 4);
const char *ssid = "davido";
const char *password = "password";
const int analogInPin = 0; // Analog input pin that the potentiometer is attached to
int sensorValue = 0; // value read from the potentiometer
int outputValue = 0; // value sent to server
void setup() {
Serial.begin(115200);
delay(10);
// We start by connecting to a WiFi network
Serial.println();
Serial.println();
Serial.print("Connecting to ");
Serial.println(ssid);
/* Explicitly set the ESP8266 to be a WiFi-client, otherwise, it by default,
would try to act as both a client and an access-point and could cause
network-issues with your other WiFi-devices on your WiFi-network. */
WiFi.mode(WIFI_STA);
WiFi.begin(ssid, password);
while (WiFi.status() != WL_CONNECTED) {
delay(500);
Serial.print(".");
}
Serial.println("");
Serial.println("WiFi connected");
Serial.println("IP address: ");
Serial.println(WiFi.localIP());
Serial.begin(115200);
// u8g2.begin();
// u8g2.setFont(u8g2_font_logisoso62_tn);
// u8g2.setFontMode(0); // enable transparent mode, which is faster
}
void loop() {
// read the analog in value:
sensorValue = analogRead(A0);
sensorValue = sensorValue / 6; // Put divider constant in to get volts directly x 10
// map to range. The pot goes from about 3 to 1023. This makes the sent value be between 0 and 999 to fit on the OLED
outputValue = map(sensorValue, 3, 1023, 0, 999);
// print the results to the Serial Monitor:
Serial.print("sensor = ");
Serial.print(sensorValue);
Serial.print("\t output = ");
Serial.println(outputValue);
char intToPrint[5];
itoa(outputValue, intToPrint, 10); //integer to string conversion for OLED library
//u8g2.firstPage();
// u8g2.drawUTF8(0, 64, intToPrint);
// u8g2.nextPage();
// Use WiFiClient class to create TCP connections
WiFiClient client;
const char * host = "192.168.4.1";
const int httpPort = 80;
if (!client.connect(host, httpPort)) {
Serial.println("connection failed");
return;
}
// We now create a URI for the request
String url = "/data/";
url += "?sensor_reading=";
url += intToPrint;
Serial.print("Requesting URL: ");
Serial.println(url);
// This will send the request to the server
client.print(String("GET ") + url + " HTTP/1.1\r\n" +
"Host: " + host + "\r\n" +
"Connection: close\r\n\r\n");
unsigned long timeout = millis();
while (client.available() == 0) {
if (millis() - timeout > 5000) {
Serial.println(">>> Client Timeout !");
client.stop();
return;
}
}
Serial.println();
Serial.println("Closing connection");
Serial.println();
Serial.println();
Serial.println();
delay(500);
}
THIS IS FOR THE RECEIVER:
#include <ESP8266WiFi.h>
#include <ESP8266WebServer.h>
//#include <U8g2lib.h>
#include <LiquidCrystal_I2C.h>
#include <Wire.h>
// RX software
// Using nodeMCU guide from here https://robotzero.one/sending-data-esp8266-to-esp8266/
// Original changed to display on a standard 16x2 LCD (I had plenty available!)
// Use LCD instructions from here https://www.instructables.com/id/I2C-LCD-on-NodeMCU-V2-With-Arduino-IDE/
// Select LCD address 0x3F and 0x27 are common
//LiquidCrystal_I2C lcd(0x3F, 16, 2); // Set address for LCD
//LiquidCrystal_I2C lcd(0x27, 16, 2); // Set address for LCD
LiquidCrystal_I2C lcd(0x27, 2, 1, 0, 4, 5, 6, 7, 3, POSITIVE); // Set the LCD I2C address
// LiquidCrystal_I2C library - https://github.com/fdebrabander/Arduino-LiquidCrystal-I2C-library
const char *ssid = "davido";
const char *password = "password";
ESP8266WebServer server(80);
void handleSentVar() {
Serial.println("handleSentVar function called...");
if (server.hasArg("sensor_reading")) { // this is the variable sent from the client
Serial.println("Sensor reading received...");
int readingInt = server.arg("sensor_reading").toInt();
char readingToPrint[5];
itoa(readingInt, readingToPrint, 10); //integer to string conversion for OLED library
Serial.print("Reading: ");
Serial.println(readingToPrint);
Serial.println();
server.send(200, "text/html", "Data received");
lcd.clear();
lcd.print(" Volts: ");
delay(200);
lcd.print(readingToPrint);
delay(1000);
lcd.clear();
server.send(200, "text/html", "Data received");
}
}
void setup() {
delay(1000);
Serial.begin(115200);
Serial.println();
Serial.print("Configuring access point...");
//Use predefined PINS consts for 16 x 2 LCD
Wire.begin(D2, D1);
//lcd.begin();
lcd.begin(16, 2); // initialize the lcd for 16 chars 2 lines, turn on backlight
lcd.home();
lcd.print("David!, NodeMCU");
WiFi.softAP(ssid, password);
IPAddress myIP = WiFi.softAPIP();
server.on("/data/", HTTP_GET, handleSentVar); // when the server receives a request with /data/ in the string then run the handleSentVar function
server.begin();
}
void loop() {
server.handleClient();
}


» David Forrest's R class
» Futaba -868/915mhz equipment
» Darnell type 21 submarine, need some help
» Robbe Seawolf V2
» bladder bags
» WW2 mini sub build
» Peral Submarine of 1888
» U-Boat R/C?