The Association of Model Submariners.

Would you like to react to this message? Create an account in a few clicks or log in to continue.

* THE FORUM FOR ALL THOSE INTERESTED IN BUILDING AND OPERATING MODEL SUBMARINES *


Join the AMS - Registered Forum users can become members of the AMS and it's free ...... To join send an email with your name , address and phone number to amstreasure@googlemail.com


For a guide to past events see the "Shows and Events" section.

Papplewick Pumping Station SUBMARINE Day. 31st March - 1st April 2024.

$$$

&&&

::::

Who is online?

In total there are 3 users online :: 0 Registered, 0 Hidden and 3 Guests :: 1 Bot

None


Most users ever online was 180 on Tue Nov 05, 2019 6:03 am

Latest topics

» Information on camouflage patterns for German seahund
today's work - Page 2 EmptyFri Mar 15, 2024 4:36 pm by david f

» WW2 mini sub build
today's work - Page 2 EmptyTue Mar 12, 2024 1:56 pm by geofrancis

» Not the hobby I expected :)
today's work - Page 2 EmptySun Mar 10, 2024 6:30 pm by cat

» 868/915 Mhz as a viable frequency for submarines.
today's work - Page 2 EmptyWed Mar 06, 2024 4:50 pm by tsenecal

» Sheerline gasket material
today's work - Page 2 EmptyMon Feb 19, 2024 9:24 pm by Michaelc

» Choice of CAD software and Printer for 3D printing
today's work - Page 2 EmptyThu Feb 15, 2024 1:53 pm by david f

» Engel Nautlus
today's work - Page 2 EmptyTue Feb 13, 2024 9:15 am by palmert6

» RF 27/433MHz maximum depth in pools (1-5 ppm chlorine, 6-8pH)
today's work - Page 2 EmptyThu Feb 08, 2024 2:05 pm by david f

» Arduino proportional control of a piston tank
today's work - Page 2 EmptyThu Feb 08, 2024 1:37 pm by david f

Statistics

Our users have posted a total of 12425 messages in 1980 subjects

We have 1003 registered users

The newest registered user is Stefan Udovenko КПДЮ

4 posters

    today's work

    merriman
    merriman
    Guest


    Posts : 347
    Join date : 2011-10-16
    Age : 75
    Location : Virginia Beach, Virginia

    today's work - Page 2 Empty Re: today's work

    Post  merriman Mon Jan 06, 2020 11:51 am

    david f wrote:Very interested to see you turning down stainless steel motor shafts. Not for the faint hearted!

    Great work.

    David

    Indeed, David. For that stuff common tool-steel cutters are not up to the task. However, this Carbide tipped tool; bathing the work in oil; along with thoughtful machine set-up, got the job done with no chatter or dragging.

    today's work - Page 2 YuHGvz

    A tightened four-jaw chuck, and all gibs grabbing their respective rails with a death-grip helped.

    Any idiot can turn machine-brass. Stainless, on the other hand, will test you!

    David
    merriman
    merriman
    Guest


    Posts : 347
    Join date : 2011-10-16
    Age : 75
    Location : Virginia Beach, Virginia

    today's work - Page 2 Empty Re: today's work

    Post  merriman Tue Jan 07, 2020 5:04 am

    Today was spent machining the motor bulkheads to fit the Lexan cylinders that house the items within the model submarine that have to be maintained in a dry environment. Most of the work dedicated to mounting the outrunner type brushless motors within the MB's.

    today's work - Page 2 TMPicv

    today's work - Page 2 ENRxxT

    To facilitate motor testing and MB certification I assembled this test rig comprising a battery, electronic speed controller, switch, and servo-setter (pressed into service to act as a 'throttle').

    today's work - Page 2 Ib29Xf

    today's work - Page 2 CaUrp8

    Tomorrow I explore what it takes to assemble, test, and certify a MB equipped with the gear-splitter.

    today's work - Page 2 LedZCI

    today's work - Page 2 DSfpjv
    merriman
    merriman
    Guest


    Posts : 347
    Join date : 2011-10-16
    Age : 75
    Location : Virginia Beach, Virginia

    today's work - Page 2 Empty Re: today's work

    Post  merriman Fri Jan 17, 2020 3:53 am


    today's work - Page 2 ZdO9AO

    today's work - Page 2 2BqJPD

    today's work - Page 2 7awKHB

    today's work - Page 2 MSZ8Sg

    today's work - Page 2 Xkb2dQ

    today's work - Page 2 ZWeVaQ

    today's work - Page 2 0kmvVN

    today's work - Page 2 SFmfja

    today's work - Page 2 D0WQSl
    merriman
    merriman
    Guest


    Posts : 347
    Join date : 2011-10-16
    Age : 75
    Location : Virginia Beach, Virginia

    today's work - Page 2 Empty Re: today's work

    Post  merriman Fri Feb 07, 2020 3:43 pm

    Flu! For three weeks! I’m almost over it. However, in those few moments when I could drag my fat ass into the shop I was able to piddle away on three 1/96 scale submarine models representing ‘modern’ types. When completed and made operational they will, this October, join the rest of my sub fleet at this year’s big Fleet-Run event; a wonderful three days of constant scale (1/96 and 1/100 only) ship and submarine running at the City Lake, Rocky Mount, North Carolina.

    https://youtu.be/Id6jGBhE_a0

    https://youtu.be/7NIuAMzm8s8

    The smallest of the three, next to the wall, is the USS ALBACORE, that model representing the ground-breaking non-combatant research submarine that investigated the virtues of the tear-drop shaped hull, various control surface arrangements, propeller and battery types, as well as the systems slatted for use in the next generation of attack and missile submarines. Middle, is a model representing a unit of the SKIPJACK class attack submarine, the first American submarines to capitalize on the ALBACORE findings. The model will be completed as the ill fated USS SCORPION. And foreground a model of a Soviet ALFA class. These were the fastest attack submarines ever made and were marvels of engineering and innovation.

    today's work - Page 2 5SNumY

    The ALBACORE is assembled from a GRP, resin, and metal kit produced by Scott Terrey and myself; the SKIPJACK is assembled from a GRP, resin, and metal kit I produced back in the 80’s; and the ALFA GRP hull was purchased from The Scale Shipyard (an excellent GRP lay-up, by the way), and I produced all the masters, tools, and parts for the appendages.

    These type subjects present few challenges to the model-builder other than the few deck fittings and their sail mounted retractable optical, air induction and electronic masts. So, that’s where a lot of my scratch-building skills are lavished, as demonstrated in this shot of the masts projecting from the tops of the ALBACORE, SCORPION, and ALFA models.

    I’ve been working these three, off-and-on, the past two years, with a plan to get them to the stage where I could address them all, as a group, when it came time to paint, detail, mark, weather, and clear-coat.

    today's work - Page 2 YkSJL7

    It’s a good practice to pace your work sessions on a model – space out your flurry of tasks with a ‘cooling-off’ period. As it’s during those periods of rest that your mind fills with ever more objective thoughts of what-I-did-right-and-what-I-did-wrong, which often leads into a plan to undo or alter recently completed work. Such was the case with the little 1/96 ALBACORE model when I rejoined that project recently.

    Initially I scribed in a longitudinally running line along each side of the hull. The trouble was instead of a line of slight, graceful curvature; it wound up being a little ‘wavy’ at points along its length. It was during the most recent hiatus (actually, sitting on the toilet … is there a linkage between anus and brain?) that I formulated a method of straightening that engraved line. As it turned out a simple solution in practice, but something that took me several weeks of casual thinking as I pondered how I was going to execute that fix. And it was so easy: tape down a piece of styrene sheet to the hull and re-scribe those portions of the engraved line that were out of true. The task took only minutes. A little touch-up putty over the ‘fixed’ areas of the engraved line, one final pass of the engraving tool, and the two engraved lines were straight and true.

    Problem identification plus time and thought, stir in experience, mix well, and you eventually get the best solution to the problem.

    today's work - Page 2 O2Q8y0

    The three models were pulled off the wall and surveyed for sloppy engraving, scratches and tool-marks that required touch-up putty and sanding. Case in point is the ALFA’s bridge closures, represented by these engravings: their outlines were too deep and wide.

    today's work - Page 2 IFlPi1

    So, I filled the engravings with putty, and while it was still wet I chased out the excess putty with a very narrow scribing tool. Note the use of masking tape to limit the spread of the putty to only those areas needing repair work.

    today's work - Page 2 Awcgzb

    Again, working the three boats at the same sitting, I wet-sanded back applied touch-up putty. Each boat was wiped down with a damp cloth and blow-dried with low pressure air. All scribed lines were lightly engraved to remove any sanding dust. Stiff sanding tools were made by taking a strip of .032” thick brass sheet and CA’ing a piece of #400 grit sandpaper to ones side, and #600 grit sandpaper to the other. These are perfect little sanding blocks for knocking down dried putty. I used tightly wound sandpaper twists to abrade into and over tight compound curves such as the ALFA condenser scoop intakes and stabilizer fillets.

    today's work - Page 2 5wbIZd

    Fine steel-wool is used to lightly abrade tight-radius areas of the model, such as the fillets between ALFA stabilizers and hull. Before using steel-wool on a models surface the steel-wool has to be rinsed in lacquer thinner to remove the preservation oils that impregnate it – that oil there to keep the fine steel fibers from rusting. Failure to degrease the steel-wool can result in poor coating adhesion.

    today's work - Page 2 Ne3Lak

    Once all touch-up putty had been applied, sanded smooth, and engraved lines chased out with a scribe, the three hulls and they’re appendages were given spot-coats of primer on the worked areas.

    today's work - Page 2 2AARPn

    The demarcation lines between stabilizer and hull fillets had to be enhanced after all that sanding and abrasion with steel-wool. So, to re-enhance the fillet plates, I masked the stabilizers and hull with adhesive tape and spray painted on two heavy coats of primer. Removing the mask revealed the desired raised edge of the fillet plates that fair the stabilizers to the hull.

    Note the use of s ‘swivel-knife’ and plastic sheet stencil used to produce the uniquely shaped self-adhesive masks.

    today's work - Page 2 MRudY6

    Special sanding tools were made and used to refine the shape of the many different sized and shapped limber, flood-drain, and vent holes along the length of the ALFA’s hull.

    today's work - Page 2 HOF9NW

    Scratch-building would be a joy if multi-view orthographic drawings of the subject are at hand. But, in the real world the smaller items of a subject presented as a plan are done so with few if any enlarged auxiliary views that would reveal the intricacies of these smaller items. So, by necessity, photographic interpretation is a big part of documentation enhancement that has to be done by the careful modeler. A valuable tool in your inventory of skills is the ability to generate your own ‘shop sketches’, based on study of still and video images of the prototype. Such renderings helping you identify the geometry of the object being rendered as a three-dimensional model.

    Just such a drawing used to assist me as I turned a length of machine brass round-stock to form the ALFA’s only periscope – a big ugly thing definitely not intended for close-in attack duty. Most of this item was lathe turned, but the scope head itself had to be carefully carved shaped by hand using riffler files, knife, and moto-tool burrs.

    today's work - Page 2 ZWwBbt

    Something the Russian submarine design bureaus did little about, until recent years, was the use of streamlined mast fairings to streamline the cylindrical retractable masts to the water flow. As a submarine travels at speed the drag of the water passing around the cylindrical mast will, at some critical speed, go turbulent and will, like clock-work, induce a vibration onto the mast. Mast vibration will interfere with the optics of a periscope, or the wave-guide efficiency of a high-frequency antenna system. That same mechanical vibration also presents a strain on mast seals and shears. The inevitable vibration problem addressed to some degree by the Russian practice of making their masts of (by American standard) very large diameter steel tube.

    However, these simple mast cylinders are a god-send to the lazy model-builder, like me: a length of aluminum tube, cut to appropriate length, topped by a cast scope, snorkel induction, or antenna and I’m done!

    Most Russian designed boats feature these simple tubular masts. Our Russian counterparts did not employ mast fairings till later versions of the KILO class boats came off the building ways. Nowaday’s Russian boats employ streamlined fairings on most of their retractable masts… welcome to the 21st century, Ivan!

    today's work - Page 2 H8keEv

    Once the RenShape mast foundation piece is glued within the top of the sail the upper hull is positioned onto the bed of the drill press and the appropriately sized bit is used to drill a perfectly aligned hole through the foundation, forming a interference fit between it and the base of a mast.

    today's work - Page 2 7O1MEN

    I have yet to make the tool and cast parts for the optical, induction, and electronic items that top the masts that project atop the ALFA’s sail. What you are looking at are the brass masters that will eventually be used to make the rubber tools from which white-metal production parts will be cast.

    What I’m handling in this shot is what I assume to be a combined snorkel induction head-valve-antenna mast – I have not been able to get a definitive answer as to the function of this mast, but that is my best guess. Anyway, it does demonstrate how the masts make a friction fit to the internal mast foundation piece.

    today's work - Page 2 XMRFbc

    An obvious cheat on my part is the non-scale representation of extended masts through closed fairing hatches. Though I’ve produced parts representing opened hatches I elected to simply poke holes through the centers of the engraved representation of those hatches through which the masts passed. Most of the time the operational model will only have the scope in place, the other masts left back on the table as I drive the model – the open holes serving a practical function: venting the free-flooding hull as the model submarine submerges and surfaces. All masts are in place only for display out of the water.

    today's work - Page 2 XiJHfH

    Presented here are the ALFA, ALBACORE, and SCORPION propellers at various states of finish. From left to right: the ALFA propeller demonstrates the initial work needed to take a cast white-metal propeller from the raw state to a point where it’s ready for pickling. Here I’m filing back the invitable flash imparted to the casting from the tool.

    The two-propeller ALBACORE propulsor featured two concentric shafts, each swinging a counter-rotating propeller – identifying this as a phase-4 arrangement. The filing, pickling, and initial primer work has been done.
    The completed and painted SCORPION wheel shows the end-game of propeller manufacture.

    today's work - Page 2 IfBGhU

    Many non-ferrous metals tend to shrug off primer and paint if not first oxidized to pit the surface of the metal in order to secure a tight mechanical bond between surface and coating. The white-meal, (Tin-Antimony alloy) part is soaked in acid to oxidize its surface. The oxidation creates zillions of little pits that key with the coating applied over it. This ‘pickling’ process is simple: dunk the work in acid and while its immersed brush the surface of the part vigorously with (duh!) an acid-brush to insure complete oxidation of the parts surface, rinse in fresh water to get the pH back to normal, dry, and prime.

    today's work - Page 2 54Jn6t

    Here, demonstrating the difference between a raw whit-metal casting and a worked and oxidized propeller. Once so pickled, the substrate is most receptive to the primer, producing a tight bond between metal and coating.

    today's work - Page 2 9d549j
    david f
    david f
    AMS Treasurer


    Posts : 2395
    Join date : 2010-11-10
    Age : 73
    Location : Cumbria

    today's work - Page 2 Empty Re: today's work

    Post  david f Sat Feb 08, 2020 9:50 am

    Three very interesting models of very significant submarines.

    You make an interesting point about the need for the careful interpretation of photos. Photos are much more easily available in an internet age. (I remember having to order copies of "Jane's" from public libraries only to see blurry black and white photos!)

    A masterclass in scribing and making masts.

    Interesting tips about washing steel wool and etching metal parts prior to painting. I have used etch primers in the past but I assume ferric chloride is better. (Though I have memories of brown stained fingers from etching printed circuit boards!)

    Glad you are over the flu.

    David
    merriman
    merriman
    Guest


    Posts : 347
    Join date : 2011-10-16
    Age : 75
    Location : Virginia Beach, Virginia

    today's work - Page 2 Empty Re: today's work

    Post  merriman Sat Feb 08, 2020 3:22 pm

    david f wrote:Three very interesting models of very significant submarines.

    You make an interesting point about the need for the careful interpretation of photos. Photos are much more easily available in an internet age. (I remember having to order copies of "Jane's" from public libraries only to see blurry black and white photos!)

    A masterclass in scribing and making masts.

    Interesting tips about washing steel wool and etching metal parts prior to painting. I have used etch primers in the past but I assume ferric chloride is better. (Though I have memories of brown stained fingers from etching printed circuit boards!)

    Glad you are over the flu.

    David

    Good morning David.

    You and I are contemporaries, and I too remember the sparse desert of photographic reference material compared to today where a search on the Interlink (sly V reference there for you Britt's) renders a wealth of photos to study and interpret.

    This is the age of information availability! To bad these times are also witness to a colossal rejection of the hand-crafts by society as a whole -- I fear that the age of the Star Trek Replicator (additive/subtractive material forming machines) will usher old Craftsman such as us out the door without so much as a Gold watch. Our total reliance of electricity is almost a reality. What if?...

    Most solutions of Ferric chloride and water can be used neat to pickle copper bearing alloys. Circuit board cutting is the most common and understood. Your crack about brown fingers is right on -- I would add to that cautionary observation the joy of dissolved cuticles and soar-throat. (Real men don't use gloves, eye-protection, or charcoal masks!) When etching the surface of aluminum alloys water down the solution and work quick or the metal will quickly turn to a steaming, frothing solution! (Insert Vincent Price cackle here).

    Thanks, I'm almost over it.

    May this find you and the rest of your buddies over there in the cradle of Democracy doing fine as well (and welcome back to UK sovereignty!).

    David
    From The Colonies


    merriman
    merriman
    Guest


    Posts : 347
    Join date : 2011-10-16
    Age : 75
    Location : Virginia Beach, Virginia

    today's work - Page 2 Empty Re: today's work

    Post  merriman Fri Feb 14, 2020 2:38 am

    Last installment I presented the pretty side of model-building; kit assembly and the joyous and challenging tasks of scribing, detailing, and part integration.

    Well, this isn’t that!

    This installment I present to you the dark underbelly of professional model-making: dumb-ass, boring, repetitive, no-talent, soul-crushing production work.

    Exhibit-A: casting bulkheads and unions for our current line of Modular SubDrivers (MSD); a look at how raw resin parts are cast and machined into useful components that fit together into a rational system.

    Pictured here is about two-gallon worth of polyurethane casting resin in the solid state, fresh out of the rubber tools that gave them form. Note the attached sprues and risers hanging off of the castings.

    Casting resin parts goes like this: Rubber tools (molds), usually of the two-part type, are prepared; polyurethane resin is mixed with its hardener (catalyst), and quickly poured into the tool; the tool is placed in a pressure pot and subjected to at least one-atmosphere of pressure (14 psig) which is maintained until the liquid polymerizes, i.e. changes state to a solid; the tool is removed from the pot and opened up, and the part popped out; repeat till you crave death!

    today's work - Page 2 DMKaqW

    I hate production work!

    Most of the MSD tooling is of the two-part type, the halves held together with rubber bands backed up by strongbacks – typically plywood or chip-board ‘shelving’ sock. But the tools are not assembled until their cavities and flange faces have been treated with a silicon part-release spray and a good dusting of talc or corn starch.

    today's work - Page 2 CIZ8ae

    My initial tooling for the MSD work was formed from masters that – as we found out after the first MSD’s were being evaluated – featured ‘stops’ that were too thin and, on the cast resin parts, would break easily when pried against, such as when attempting to pry a cylinder loose during disassembly. Instead of wasting the initial set of tooling after only a few shots (RTV rubber is expensive!)I elected to modify some of them by cutting away portions of the rubber, this resulting in castings with fatter stops. A crude solution, but one that worked well enough to justify the extra machining needed to true up the fatter stops.

    today's work - Page 2 O7hcwz

    To slit the three different diameters of tools, I made three specific slitting tools; one for the 2.5” diameter union tools, one for the 3” diameter union tools, and another for the 3.75” diameter union tools. The work went surprisingly fast.

    today's work - Page 2 MQOWy4

    The operation was simple enough: hold the semi-circular edge of the slitting tool in the existing grove of the tool, and rotate. Follow that with a 90-degree slit from the top with a hand-held X-Acto knife, and I’m done.

    Of note here is where the blade of this slitting tool is projecting – this cavity is both sprue and riser; it’s where the liquid resin is introduced into the molds cavity and were make-up resin comes from to make up any liquid lost as air-bubbles within the mix are crushed into solution during pressurization.

    today's work - Page 2 1SvYKU

    I’ve poured several parts from these modified tools and I had no problem smoothing out the rough ‘stops’ on the lathe while turning the radial flanges to form tight fits to the Lexan cylinders they support. This is a stop-gap solution though; I’m re-working the masters with fattened stops and will produce ‘production tools’ that will incorporate that and other changes – to correct problems identified in the initial batch of MSD resin parts.

    today's work - Page 2 35G4Wq

    Tool preparation starts with a heavy spray coating of part-release. This silicon oil forms a barrier between the tools rubber and the polyurethane casting resin. I go through the Mann 200 part-release by the case! Good stuff.

    Note the brass inserts in some of the tool halves. These ‘cores’ suspend an o-ring that will be encapsulated in the unions; that o-ring making a watertight seal between the unions internal bulkhead and brass tube conduit that runs the length of the ballast tank. After a casting is made, the tool is opened up and the part extracted, I then yank the brass core out which leaves the conduit bore and o-ring that slightly projects into that bore. Slick! I learned this trick by hanging around the rubber and mold shop aboard the USS YOSEMITY back when I was a snot-nosed Diver.

    today's work - Page 2 BYYBeJ

    To enhance the ability of the liquid casting resin to fill all voids within the tool a thick coating of talc or corn starch is applied within the tool cavities – the excess powder shaken out onto the floor before the tools are assembled. The powder coating held in place by the sticky part-release previously applied. The powder works to further isolate the rubber from the crazing effect of the casting resin, extending tool life. The powder also works to wick resin into the tight areas of the cavity, contributing to a better fill.

    Nowadays I can expect at least eighty cycles from a tool. Forty years ago I was lucky to get twenty. The marvels of modern chemistry.

    today's work - Page 2 MgVQjD

    Artifacts of the resin casting process are the sprue and riser elements of the casting. These are the result of the cavities that introduce the resin to the tools cavities, permit the escape of displaced air, and provide make-up resin as entrapped air not vented away is crushed into solution during pressurization. These appendages to the casting proper have to be snipped or sawed off the resin part before any serious machining can begin.

    today's work - Page 2 I9KfoW

    Some castings after clean-up and sizing are further worked with the installation of Oilite bearings, such as these ‘gear-splitters’ used to produce two counter-rotating shaft outputs from a single shaft input. Surprisingly CA adhesive works to permanently glue these oily flanged shaft bearings in place.

    today's work - Page 2 QWoBdP

    Exemplified here a motor-bulkhead casting has not only been equipped with a gear-splitter unit, but also shows off the post casting insertion of three watertight seals that pass control surface pushrods. You can just make out support studs, spider motor-mount, and out-runner type brushless motor that outputs into the gear-splitter through its own watertight seal.

    Casting MSD parts is only the start. There is much machining and part integration needed to make these parts useful elements of the system.

    today's work - Page 2 2o71jW

    As commercially available Lexan cylinder has a wide variance of diameters (very, very sloppy industry tolerance) -- I don’t know from buy to buy just what actual diameter I have in the racks -- I produce my bulkhead and union masters substantially over-sized in diameter. This not only accounts for the inevitable shrinkage of the room temperature vulcanizing (RTV) tool rubber and shrinkage of resin as it changes state from liquid to solid, it also assures that no matter how out of specification my Lexan cylinder is, I would be able to reduce the diameter of the cast resin bulkhead or union to fit to the cylinder at hand. One size DOES NOT fit all!

    today's work - Page 2 BX2f4G

    In foreground is a raw cast resin union, mounted on a lathe holding fixture ready to be machined to the desired diameter. I’m holding a machined example of the same item, ready for insertion into the cylinder it has been sized to fit. The terribly flawed stop you see here, butted against the face of the holding fixture, is a consequence of the somewhat less than perfect slitting job I did on its tool to fatten up the stop in the eventual casting. Once faced and shaved to correct diameter the casting will be just like the one in hand.

    today's work - Page 2 TCSAgR

    Shaving the outside diameter of the radial flange; as well as facing the god-awful ragged ‘stop’, is a simple lathe job. However, a big side-step away from ‘shop safety’ is the use of a hand-held cutting tool to gouge out the two o-ring grooves. The depth of the groove set to be about two-thirds the wall thickness of the o-ring used to make watertight the union between ah … the union and Lexan cylinder.

    Note how I use (most improperly) the lathes cross-slide mounted cutting bit as a tool-rest as I fine-tune, by hand, the depth of the o-ring grooves in this casting. Very bad shop practice to bare-fist a tool like this. No problem. It’s my frig’n shop, and I’ll do what I bloody well please, thank you very much!

    OSHA and the other Federal and local Regulatory agencies can kiss my nonunion ass!

    today's work - Page 2 ORMS8m

    The o-ring groove cutting tool is simple enough, a tool-steel blank is mounted in an acrylic handle and its cutting edge ground and honed, and a modified wheel-collar used to act as a stop that insures the depth of o-ring groove cutting stops at the correct depth.

    today's work - Page 2 AzkTJk

    A little math and I set the distance of the wheel-collar stop to the tip of the tool using the appropriate leafs of a feeler-gauge.

    today's work - Page 2 GiYtB8

    The stop is secured to the tool with a set-screw.

    today's work - Page 2 NZPmZP

    A cheat I employ if I find that the o-ring is either too tight or loose when the cylinder is installed over the union or bulkhead radial flange is to go to an under or over-sized o-ring. The end-game is to get a good mashing of the o-ring between flange and cylinder, easy to see through the transparent Lexan.

    Torpedoman A-School was not wasted on me!

    today's work - Page 2 0Q0Ru0


    merriman
    merriman
    Guest


    Posts : 347
    Join date : 2011-10-16
    Age : 75
    Location : Virginia Beach, Virginia

    today's work - Page 2 Empty Re: today's work

    Post  merriman Wed Feb 19, 2020 2:58 pm

    I put in a few hours on the 1/96 ALBACORE and SCORPION models. The deck hatches – hatches that are pretty much of the same type for these boats – were worked up in mass to limit the steps taken to get them ready for installation. The two deck hatches on the SCORPION are recessed and faired over by fairing plates which feature an opening in their centers to clear the hatch hand-wheel and fairing bail. The bail fairleads the escape buoy down-haul cable when it’s deployed.

    The ALBACOR deck hatch arrangement is a bit different: the forward hatch (on later variants of the much altered little research boat) is recessed and faired over like the SCORPION’s, but the after deck hatch sits atop the hull, which makes for an interesting and eye-catching arrangement. Note the opening near the ALBACORE’s bow what will later contain the bow compartment deck hatch. A fairing plate will fit the opening.

    today's work - Page 2 YLS5nL

    In the early days of American ‘modern’ submarines the escape trunks (typically two of them, one forward over the torpedo-room/bow compartment; and one back in the engineering spaces) were topped with the hardware needed to make possible use of the McCain rescue chamber. A down-haul cable, released by the submarine, and yanked to the surface by a buoy, would be spliced into a winch within the rescue chamber (an underwater elevator, if you will) and used to pull the rescue chamber down onto the seat surrounding the escape trunk hatch. Four hold-down padeyes on the submarines deck would be made up to fixtures within the skirt of the escape chamber to more securely attach the rescue chamber to the deck of the disabled submarine.

    Here I’m fitting small gauge wire into holes drilled around the ALBACORE’s deck-level after hatch, these forming the rescue chamber hold-down padeyes. The diminutive size of the 1/96 hatch and other items emphasized by the penny.

    today's work - Page 2 SGsxJM

    The down-haul cable runs from a reel under the submarines deck, fairleads through the hatch ‘bail’ and then runs to the escape buoy. When deployed the cable end, with a swaged flair fitting at its end, jams into the bottom of the bail, positioning the vertically running down-haul cable dead-center to the hatch – insuring that the rescue chamber will naturally seat neatly around the hatch and hold-down padeyes when its skirt makes contact with the submarines deck.

    today's work - Page 2 NQyxQ8

    I make it a practice to insure all off-model items are test fitted to insure I won’t have any assembly problems after everything has been painted. An example of that precautionary work is the after deck hatch of the ALBACORE model. The hatch, rescue chamber hold-down padeyes, and down-haul cable all assembled as they eventually will be on the finished model. Once I affirm that everything fits properly, the items are taken off the model and finished separately. Rejoined only after all painting and weathering is completed.

    today's work - Page 2 Hw8hcY

    The recessed deck hatches are mounted on cast resin foundations that will eventually be glued to the inside of the hull, with the top of the deck hatch projecting through a hole in the center of the deck fairing plate. These are cast white-metal items. Note that the hatch and fairing bail are separate items that have to be glued together. Two recessed deck hatches for the SCORPION and one for the ALBACORE; and one deck mounted hatch for the ALBACORE.

    today's work - Page 2 K2BMyS

    Work continues on the Modular SubDriver motor-bulkheads. The motor bulkhead can be configured for either single or dual-shaft output.

    today's work - Page 2 LyAtM0

    The out-runner type motors required four supporting studs to reach forward and make up to the ‘spider’ type motor-mount. A bit convoluted, but necessitated by the need to clear the rotating motor body from the motor-bulkhead.

    today's work - Page 2 TFrBYO

    today's work - Page 2 MCEXEU

    today's work - Page 2 6wHQsa

    How did that Monk get in the shop!?…

    No dress-code here!

    today's work - Page 2 D3pkDR

    An alternative arrangement to the motor-bulkhead is to attach a ‘gear-splitter’ that converts the single-motor output to two counter-rotating outputs. Here I’m tapping the holes that will accept the gear-splitter mounting screws.

    today's work - Page 2 G2uOF8

    I usually do my brain-storming on paper through sketching. If it doesn’t work in two-dimensions, sure as shit it won’t work in three! Here I’m working out an intermediate coupler between motor shaft and output shaft to the model submarines propeller. The key design criterion is the need to pass this intermediate coupler through a watertight seal.

    today's work - Page 2 PChLAD

    This is the arrangement for a single-shaft output from the motor-bulkhead.

    today's work - Page 2 JdU9rI

    today's work - Page 2 ZGgbFb

    today's work - Page 2 PN9qDS

    today's work - Page 2 NjPyhP
    merriman
    merriman
    Guest


    Posts : 347
    Join date : 2011-10-16
    Age : 75
    Location : Virginia Beach, Virginia

    today's work - Page 2 Empty Re: today's work

    Post  merriman Thu Feb 20, 2020 3:28 am

    today's work - Page 2 0Rm6hA

    today's work - Page 2 CIaAqn

    today's work - Page 2 42KKD5

    today's work - Page 2 P6by2Q

    today's work - Page 2 XL6PSN

    today's work - Page 2 V45Vfw

    today's work - Page 2 6z9yIT

    today's work - Page 2 F3F8Fk
    merriman
    merriman
    Guest


    Posts : 347
    Join date : 2011-10-16
    Age : 75
    Location : Virginia Beach, Virginia

    today's work - Page 2 Empty Re: today's work

    Post  merriman Sat Feb 22, 2020 3:41 am

    Sheet metal work today.

    today's work - Page 2 JFLZ16

    today's work - Page 2 TGfpzL

    today's work - Page 2 ELaIxt

    today's work - Page 2 MKjVMw

    today's work - Page 2 KhXBRE

    today's work - Page 2 DYN4fP
    merriman
    merriman
    Guest


    Posts : 347
    Join date : 2011-10-16
    Age : 75
    Location : Virginia Beach, Virginia

    today's work - Page 2 Empty Re: today's work

    Post  merriman Wed Feb 26, 2020 4:29 am

    today's work - Page 2 PHMh31

    today's work - Page 2 B3Vbcf

    today's work - Page 2 2fWYW0

    today's work - Page 2 97JdUs

    today's work - Page 2 4OERIg

    today's work - Page 2 Z7orPd

    today's work - Page 2 Vy8zbj

    today's work - Page 2 QNz6ol

    today's work - Page 2 ECuflq

    today's work - Page 2 G3iDgb

    today's work - Page 2 8tSjGS

    today's work - Page 2 IyodiE

    today's work - Page 2 Shugay

    today's work - Page 2 ETMEgH
    merriman
    merriman
    Guest


    Posts : 347
    Join date : 2011-10-16
    Age : 75
    Location : Virginia Beach, Virginia

    today's work - Page 2 Empty Re: today's work

    Post  merriman Fri Feb 28, 2020 4:32 am

    today's work - Page 2 T4FMxD

    today's work - Page 2 CAibfb

    today's work - Page 2 Uer7q8

    today's work - Page 2 1Y5hY0

    today's work - Page 2 BSYlzC

    today's work - Page 2 UD1krj

    today's work - Page 2 QiLIb8

    today's work - Page 2 1bGHad

    today's work - Page 2 YcqitD

    today's work - Page 2 VCYjam

    today's work - Page 2 C2rDBT

    today's work - Page 2 MPkBO4

    today's work - Page 2 RjxktU
    merriman
    merriman
    Guest


    Posts : 347
    Join date : 2011-10-16
    Age : 75
    Location : Virginia Beach, Virginia

    today's work - Page 2 Empty Re: today's work

    Post  merriman Sun Mar 01, 2020 2:31 am

    today's work - Page 2 SZWNeq

    today's work - Page 2 JRagvE

    today's work - Page 2 PF3qDJ

    today's work - Page 2 KjEI6v

    today's work - Page 2 NOA4O2

    today's work - Page 2 XmAhAK

    today's work - Page 2 Tsfigs

    today's work - Page 2 SXoNNX

    today's work - Page 2 FrA3g6

    today's work - Page 2 IP77l8

    today's work - Page 2 KlgZOD

    today's work - Page 2 6WK7BQ

    today's work - Page 2 F2CdOa

    today's work - Page 2 DYcFjm

    today's work - Page 2 3dy79g
    merriman
    merriman
    Guest


    Posts : 347
    Join date : 2011-10-16
    Age : 75
    Location : Virginia Beach, Virginia

    today's work - Page 2 Empty Re: today's work

    Post  merriman Mon Mar 02, 2020 1:48 am

    today's work - Page 2 Arktjm

    today's work - Page 2 PdxADW

    today's work - Page 2 MUzmlL

    today's work - Page 2 EjTRub

    today's work - Page 2 6N5Z4j

    today's work - Page 2 R2tW3B

    today's work - Page 2 XM1RGI

    today's work - Page 2 LVNU5m
    merriman
    merriman
    Guest


    Posts : 347
    Join date : 2011-10-16
    Age : 75
    Location : Virginia Beach, Virginia

    today's work - Page 2 Empty Re: today's work

    Post  merriman Sat Mar 07, 2020 9:23 pm

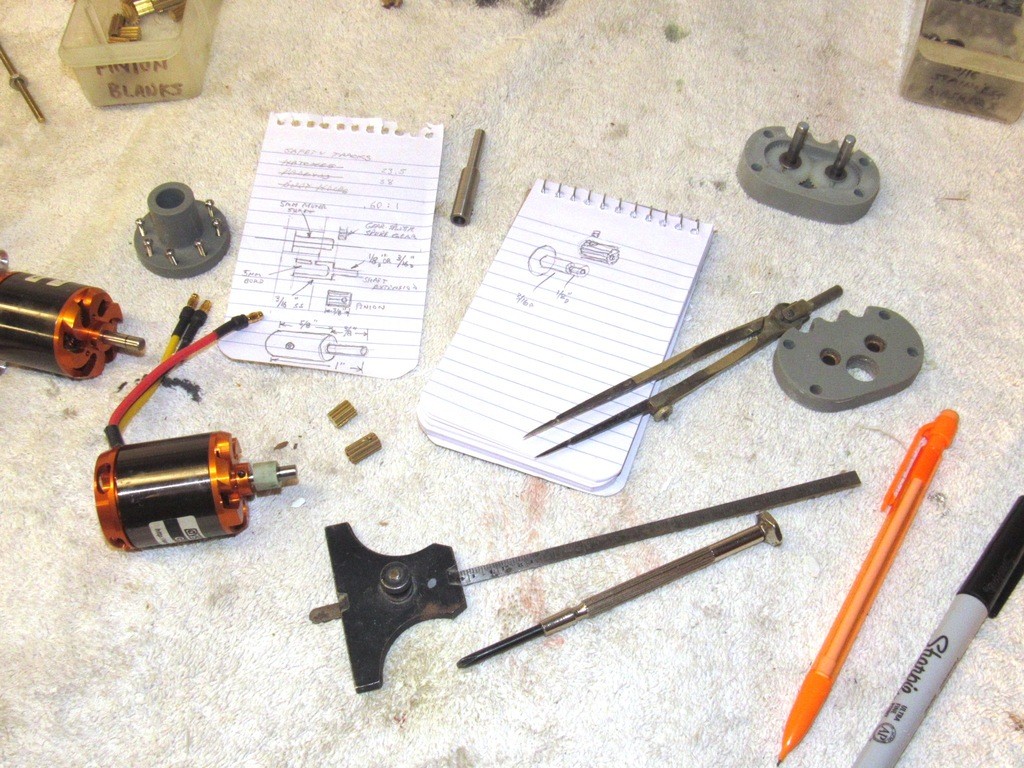
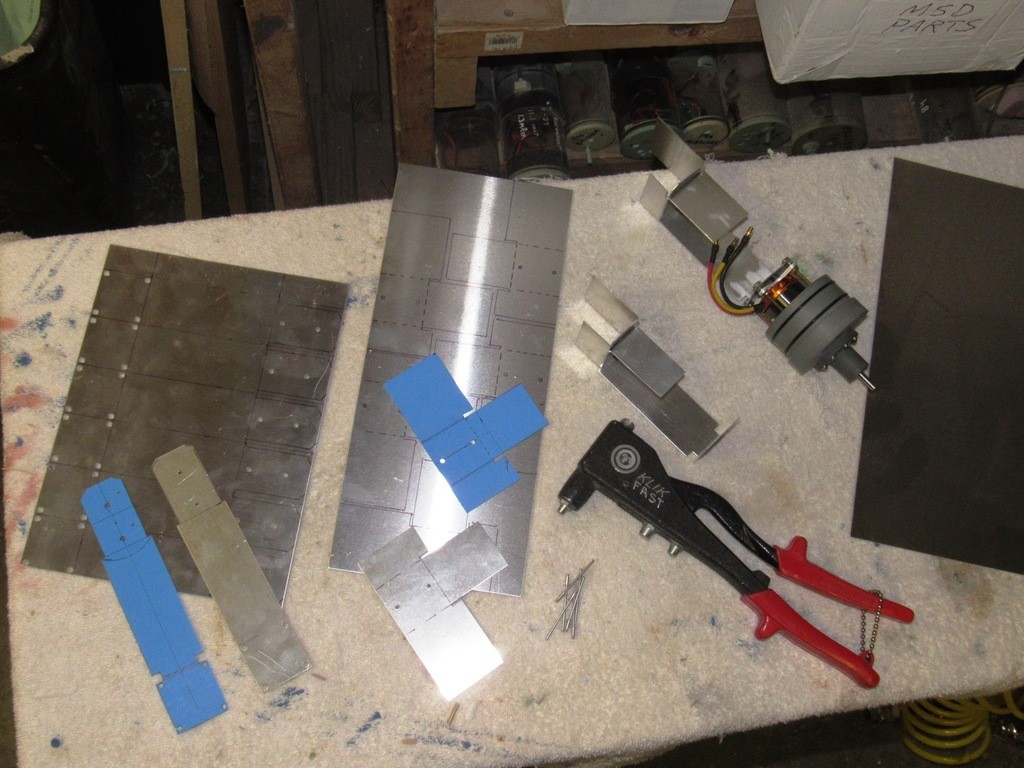
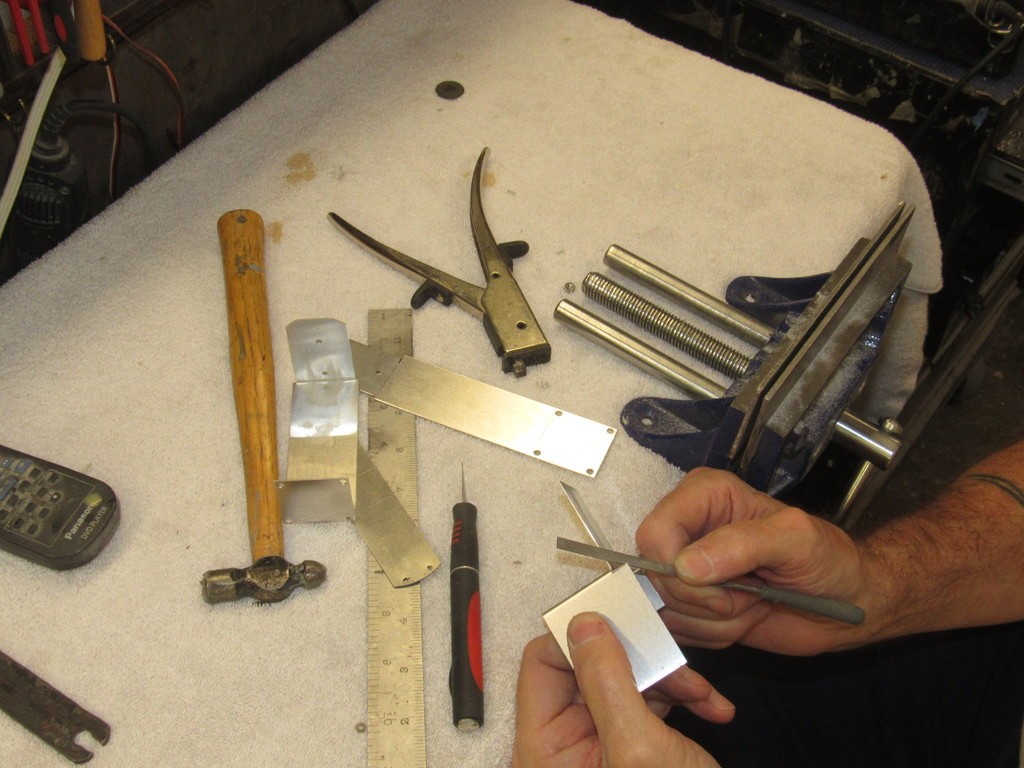
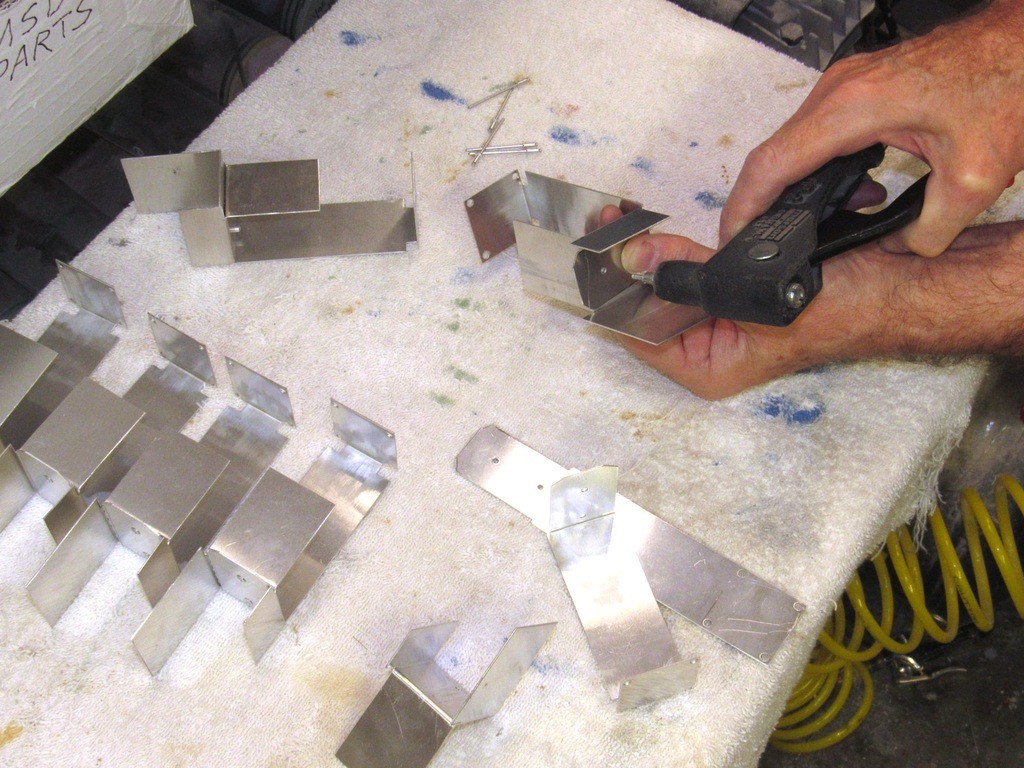
    It takes a great deal of time to produce a new product. The process involves thought, drawings, revisions, masters, production tools, jigs, fixtures, dies, templates, identification of reliable sources of supply, and a rational production methodology. All the things required to get a good product out of one’s head and into a customer’s hands.

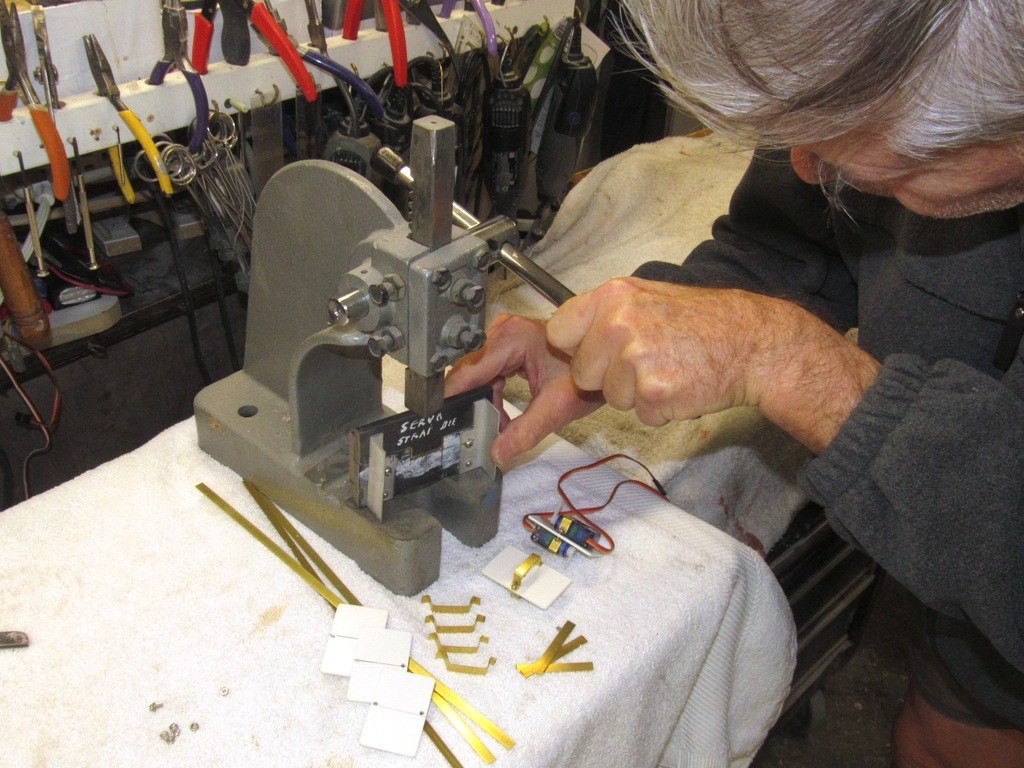
    I’ve been posting a lot of imagery to this forum without any supporting narrative for several weeks now. No, I have not lost my voice – I’ve simply been terribly busy getting a new product on line – and have had little time to put words to pictures. However, last week I transitioned from development to production and once again have the opportunity to answer questions I’m sure some of the many un-captioned pictures have raised. So, with the completion of the first production run of Modular SubDrivers (MSD) done, and the fabrication process now streamlined, I’ll do my best to get you up to speed on what the MSD system is and how it works.

    It’s time for some clarity.

    What the hell is a, modular SubDriver? The MSD is a system that propels, controls, and manages the variable ballast water used to place the r/c model submarine in either the surfaced or submerged condition. The MSD is the ‘dry’ element of the otherwise free-flooding model submarine.

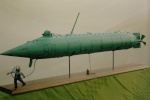
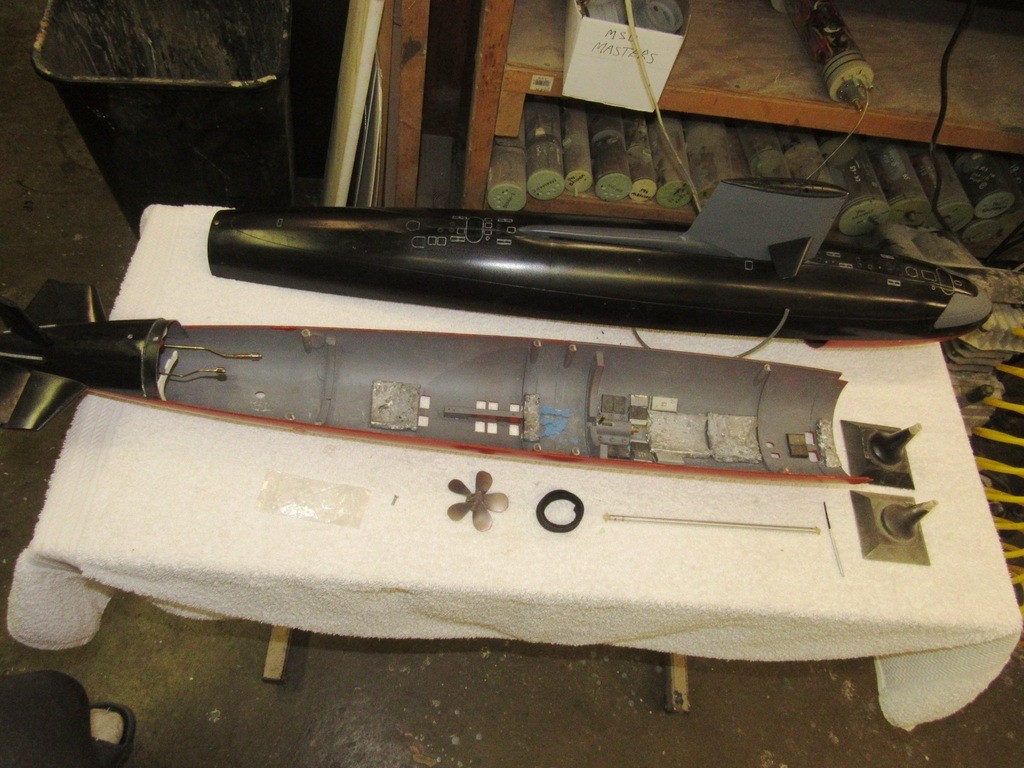
    As illustrated below, the scale model submarine itself is nothing more than a free-flooding fairing in which the MSD resides. But, as a true representation of a prototype, the model submarine hull also supports the control surfaces required to dynamically guide the submarine through the water when in motion, and mounts the propulsor that converts motor torque to axial thrust. Better to think of the ‘model’ submarine as, The Real Thing -- which is very much what it is: a practical, guided, underwater vehicle able to alter its weight to either sail along the surface or operate completely submerged where the opposing forces of gravity and buoyancy cancel one another out resulting in the condition of, neutral buoyancy.

    today's work - Page 2 JM77Jw

    I did not invent the concept of a removable water tight cylinder, the category in which the MSD resides. The WTC seems to have originated in Europe better than a half-century ago. No. I’m just the guy who popularized the concept in America and refined it to what it is today, a system now sold under the trade-name of SubDriver.

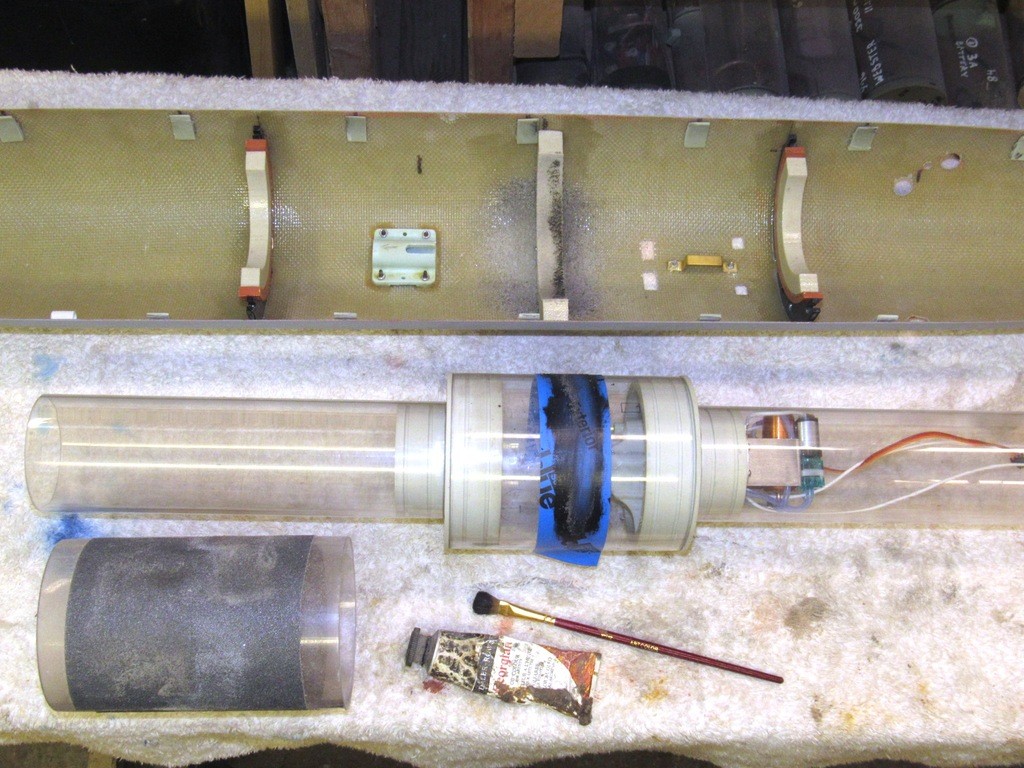
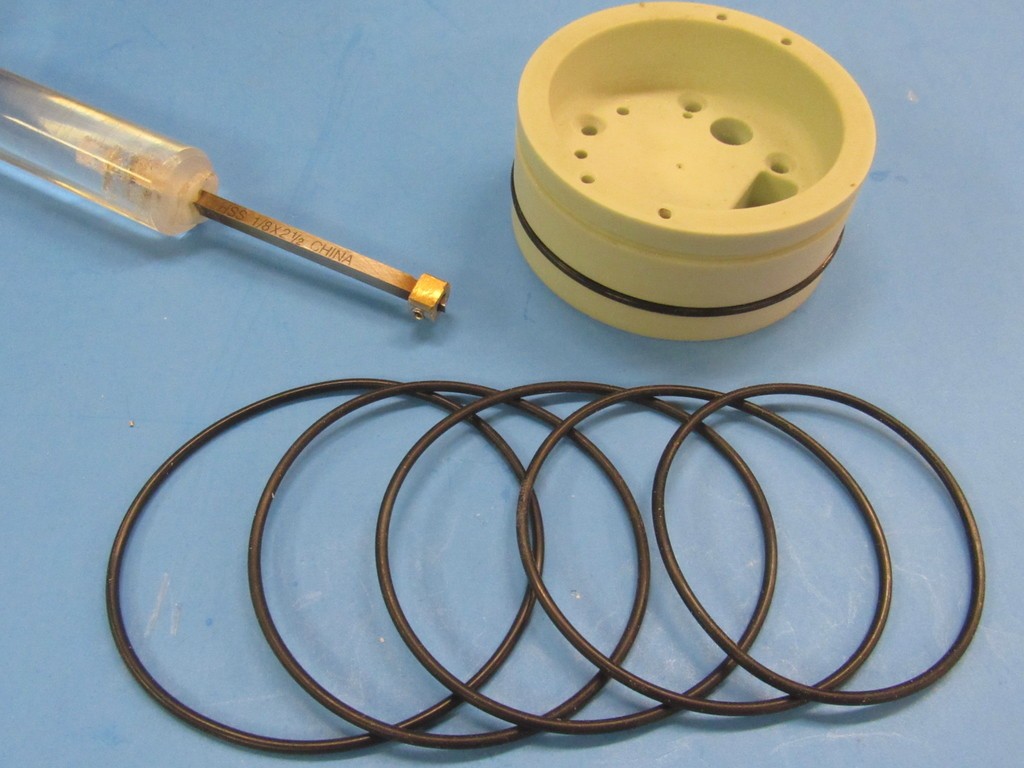
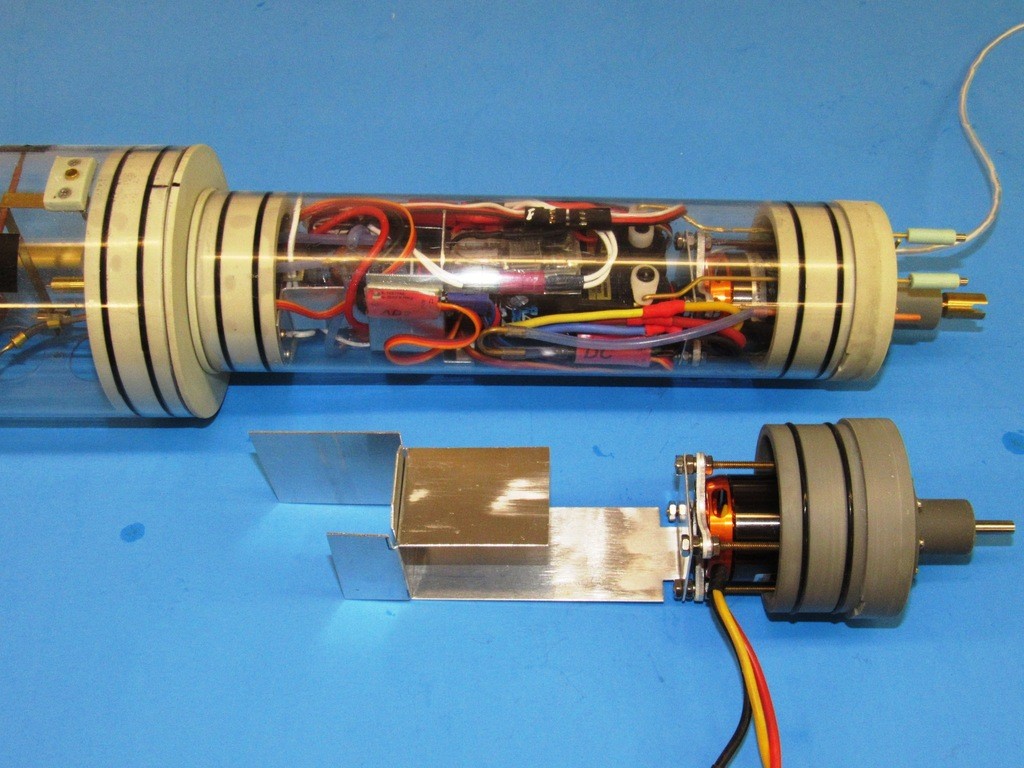
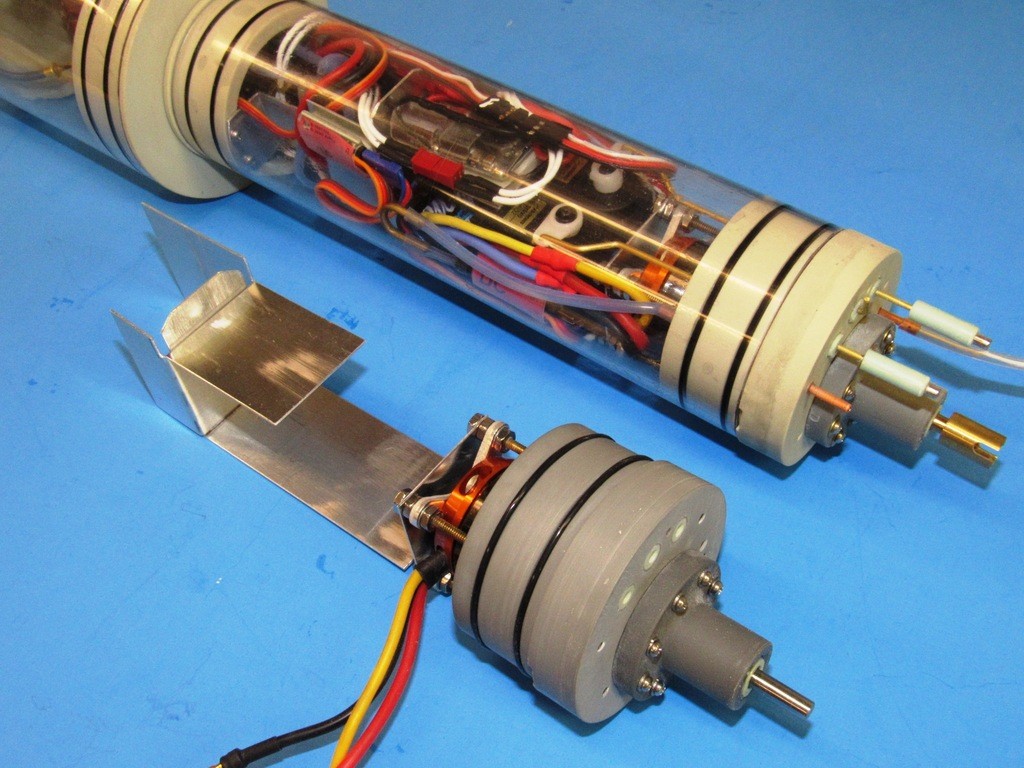
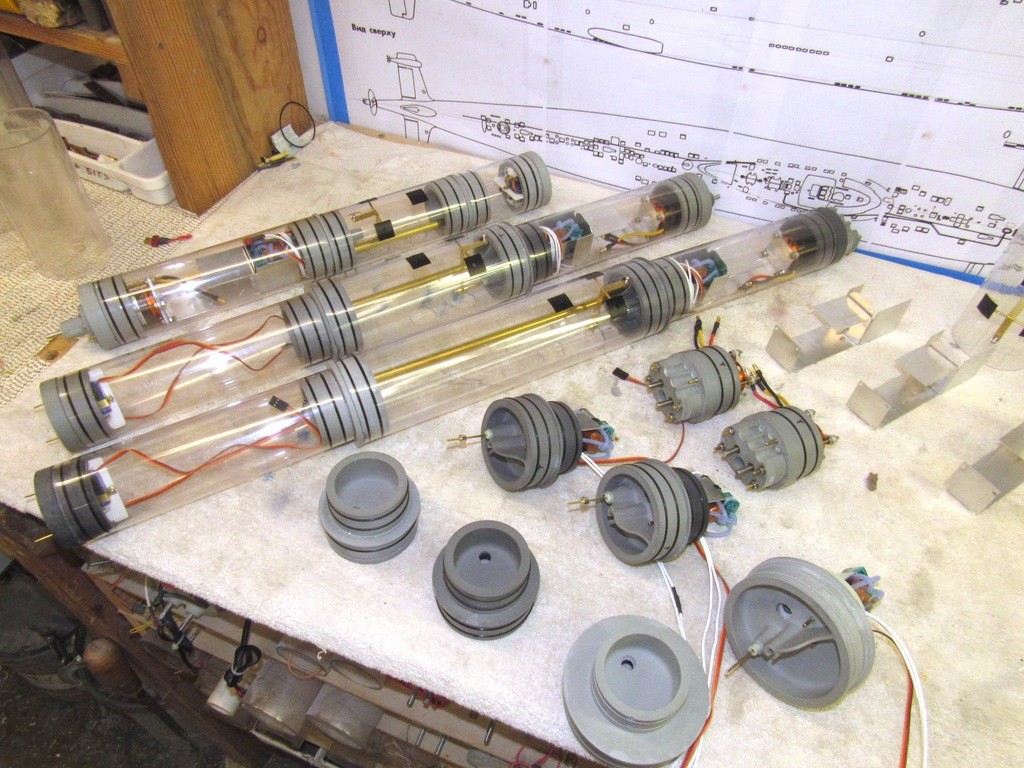
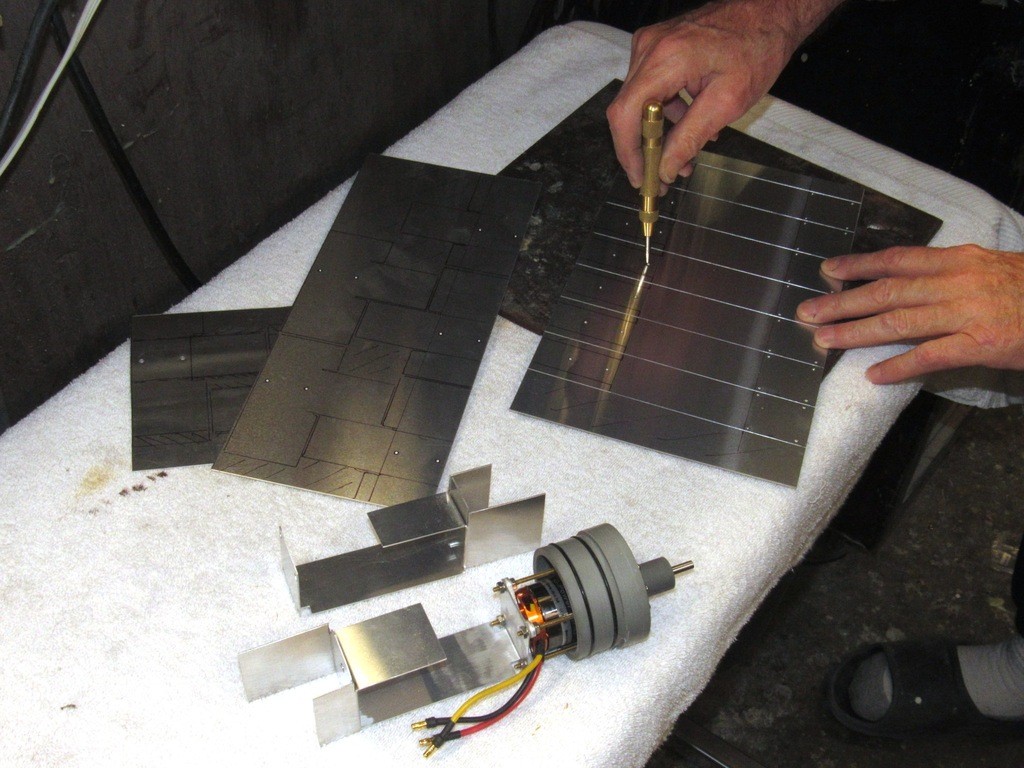
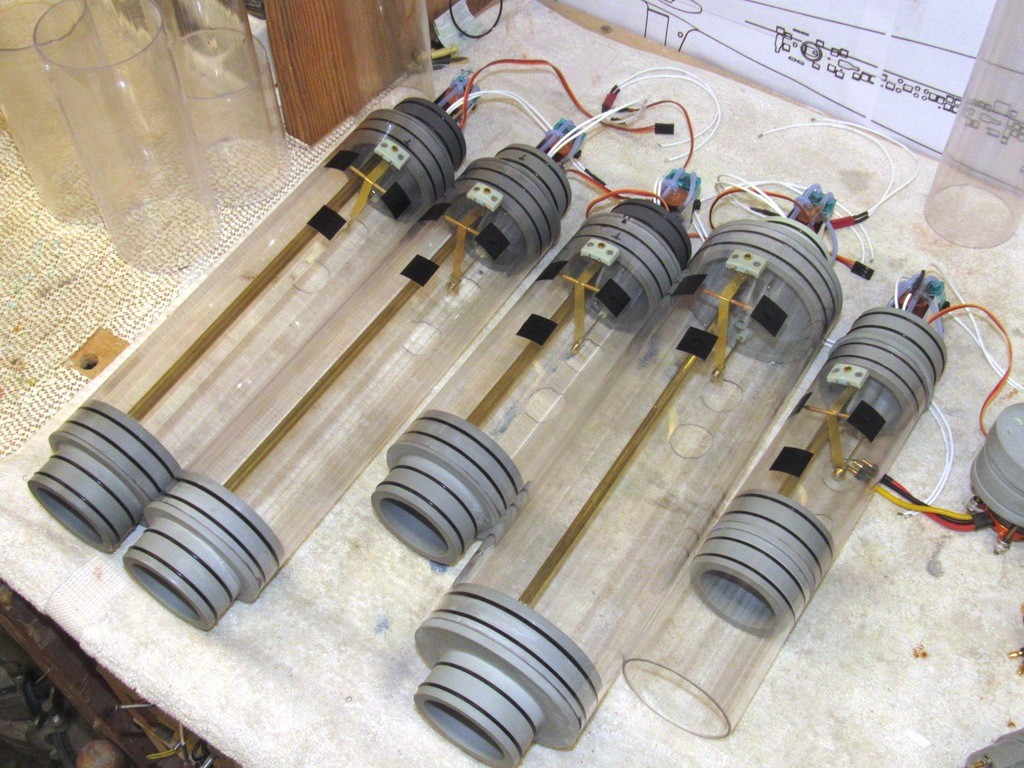
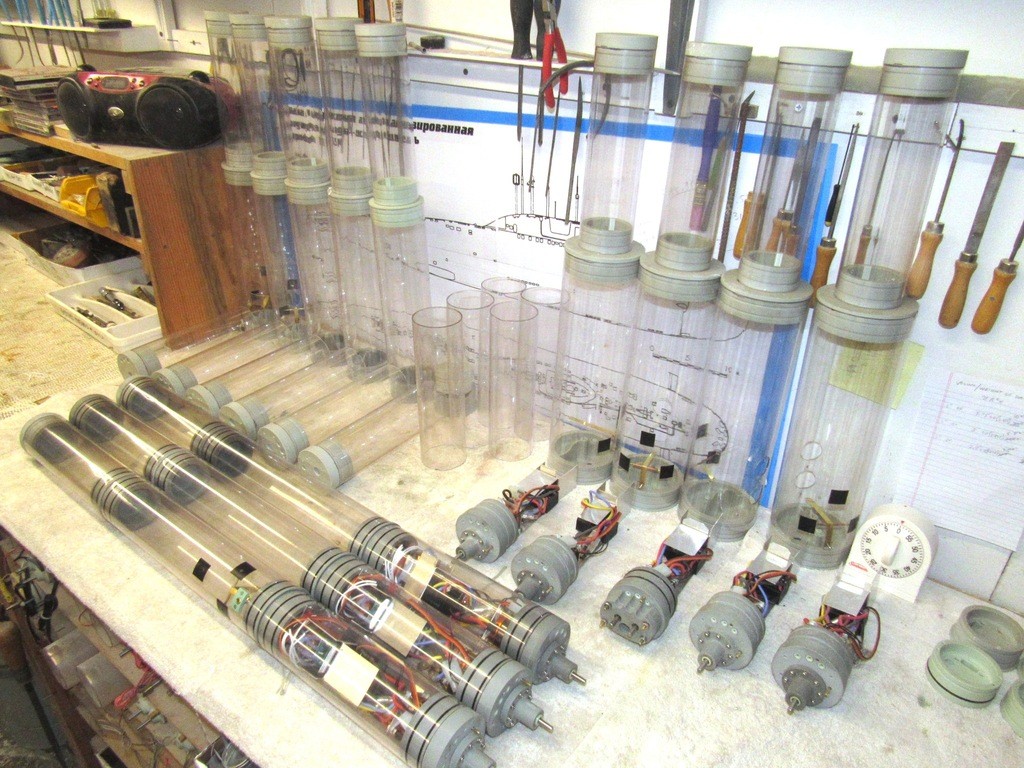
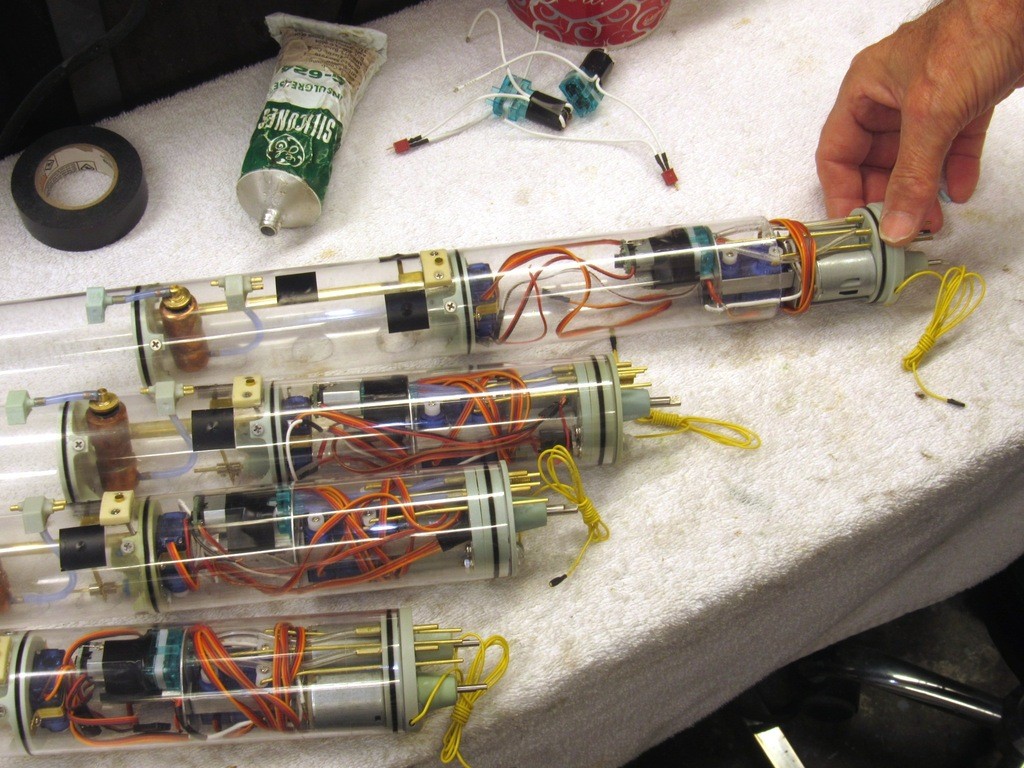
    The recent improvement to the system was to transition from a single length of Lexan cylinder with internal bulkheads separating the three compartments – forward dry space for the battery; ballast tank; and after dry space for the r/c gear, servos, specialized control devices, and propulsion items – through the use of plug-in type unions between three separate lengths of Lexan cylinder. The unions not only eliminate the mechanical fasteners passing through holes drilled into the cylinder; they also offer the ability to employ varied diameters and lengths of cylinder for the three sections. This makes adapting the system to the specific geometry of the model submarine hull easy; better use of the annular space within.

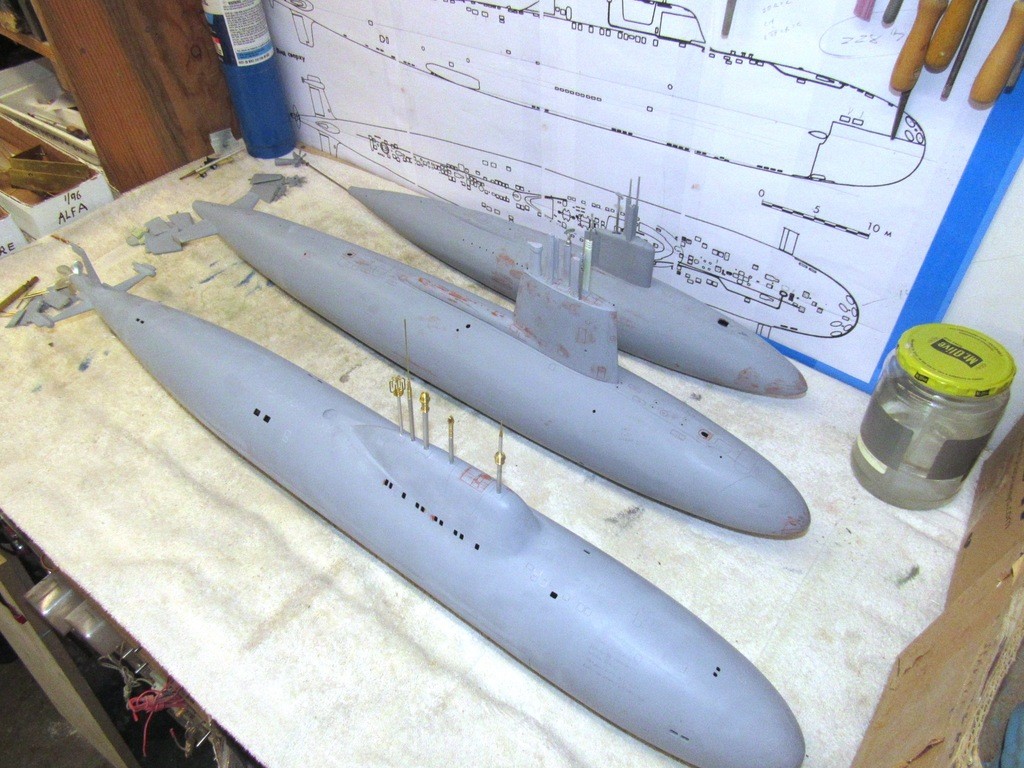
    As illustrated here, you see the two smaller diameter dry spaces flanking the central larger diameter ballast tank. The MSD is quickly installed or removed from the model, it being secured with only two Velcro straps. Such accessibility making maintenance, repair, and adjustment easy tasks, and this feature affords the option of employing one MSD to operate an entire fleet of like sized model submarines.

    today's work - Page 2 URczZy

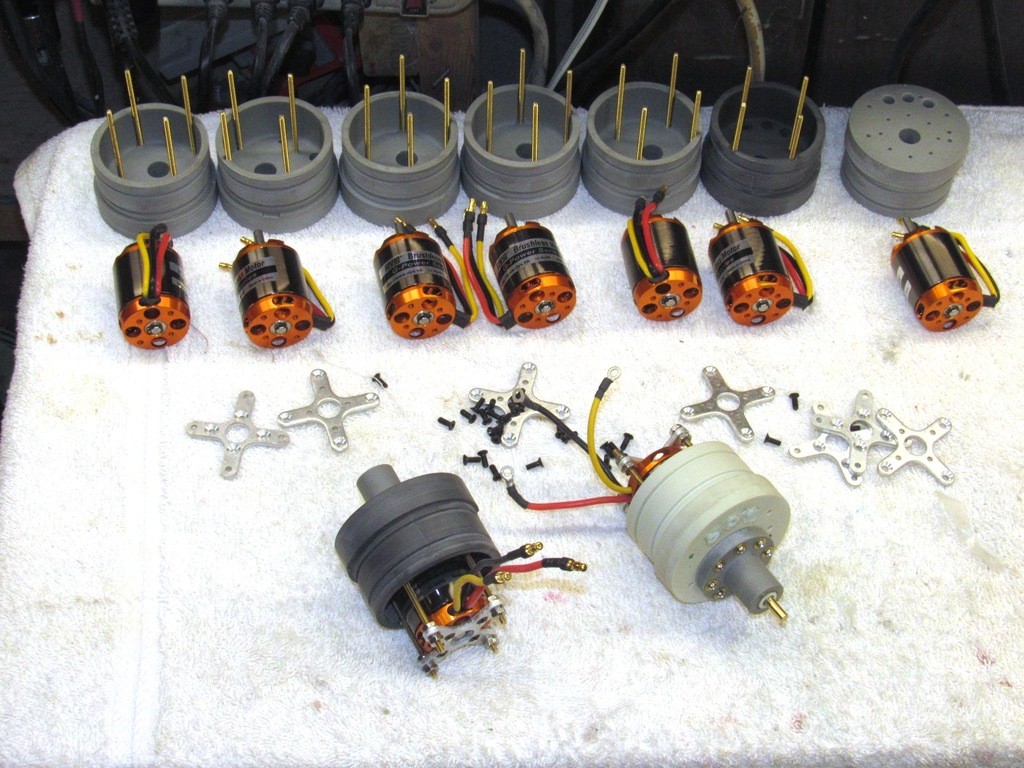
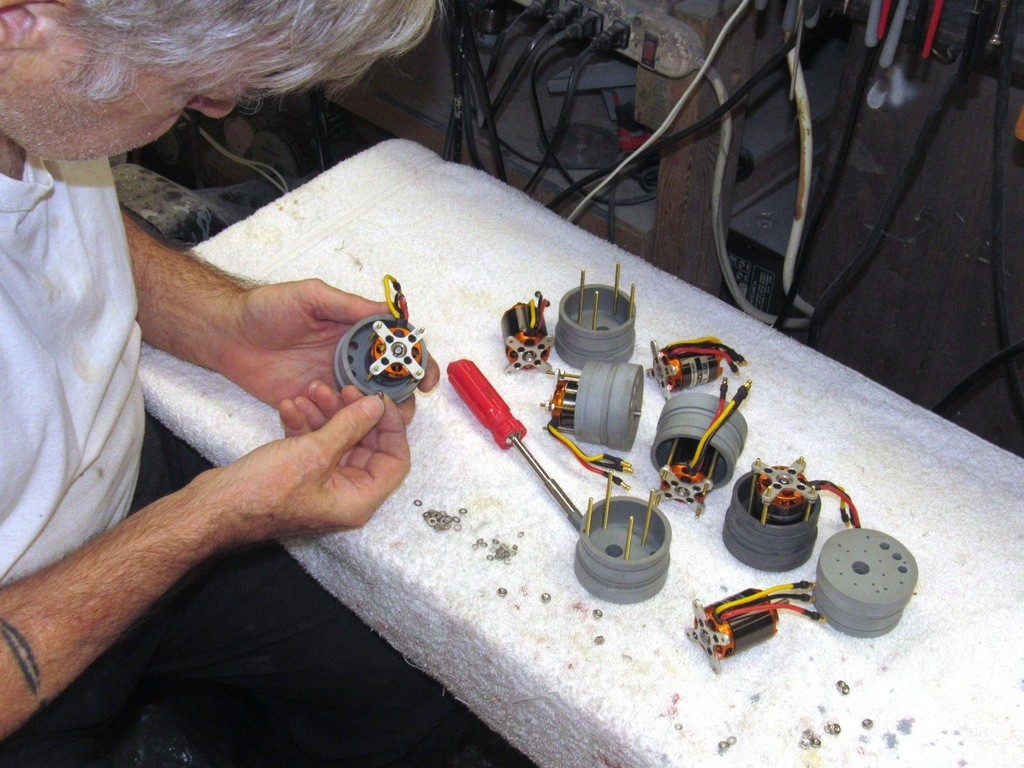
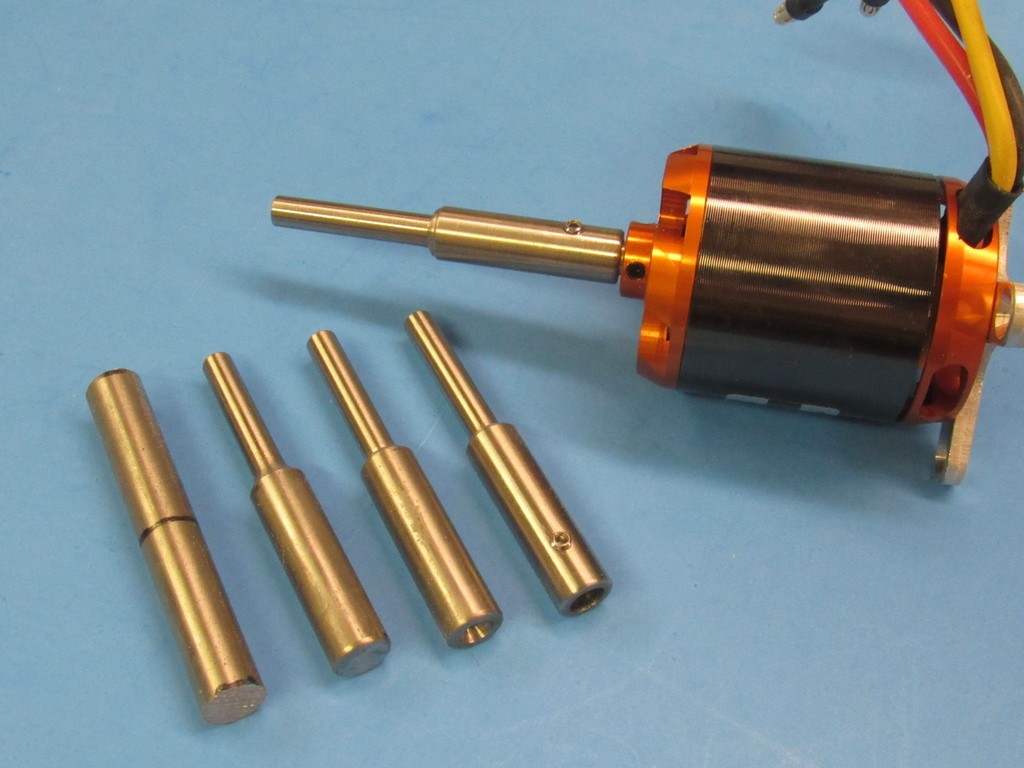
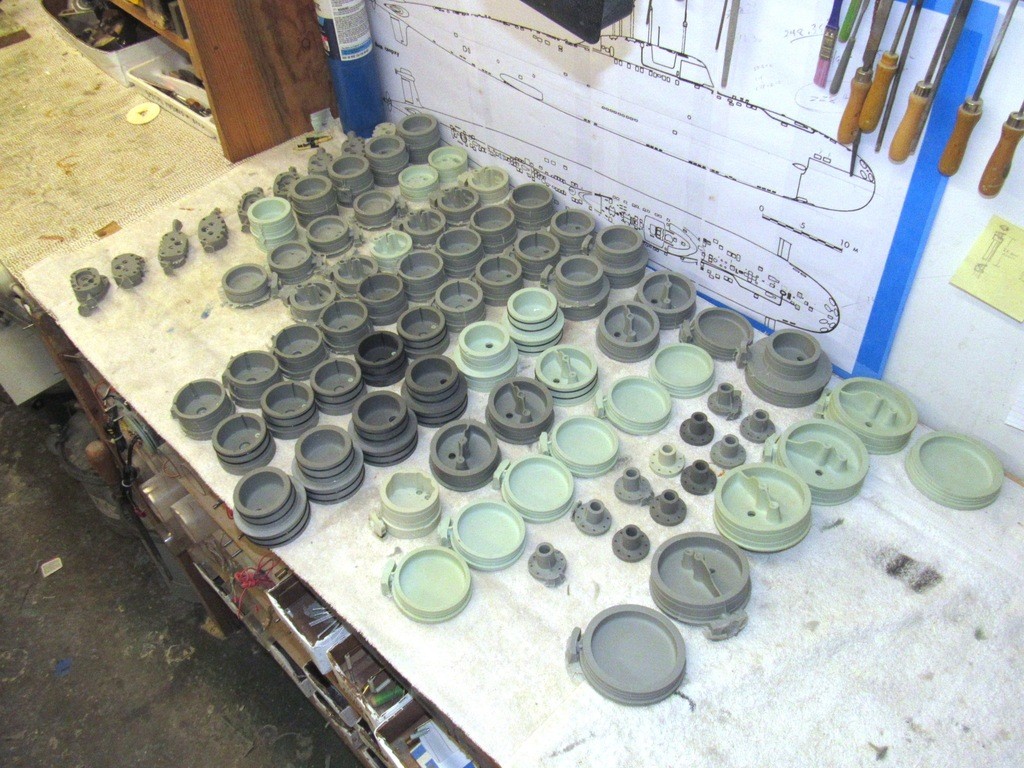
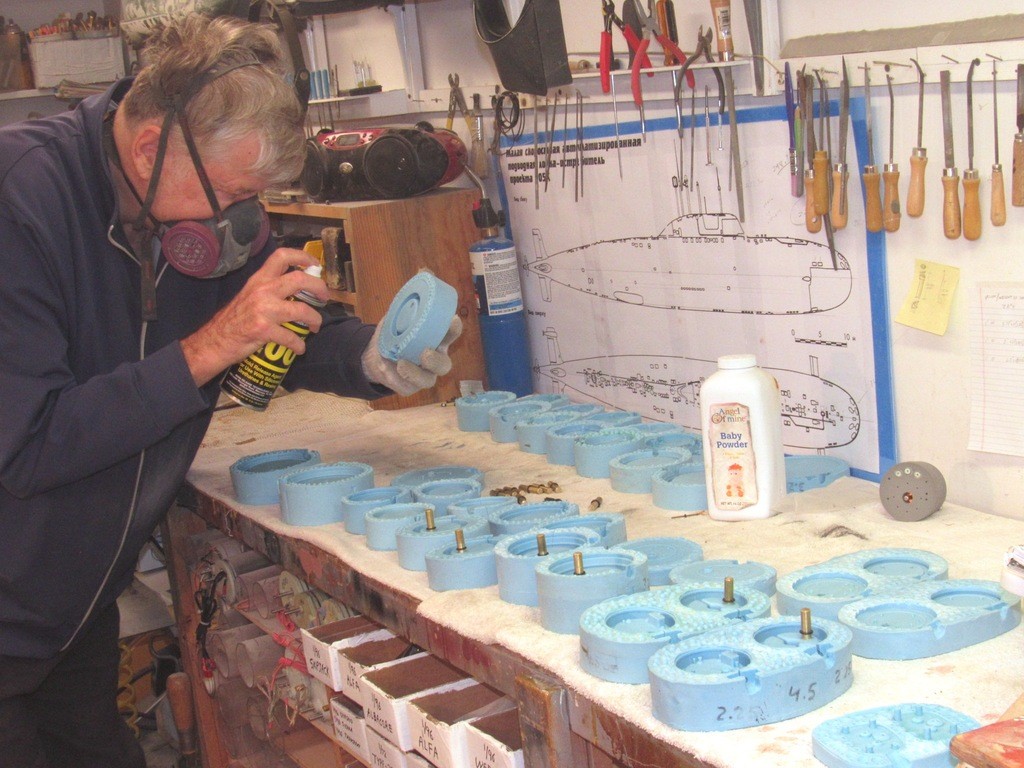
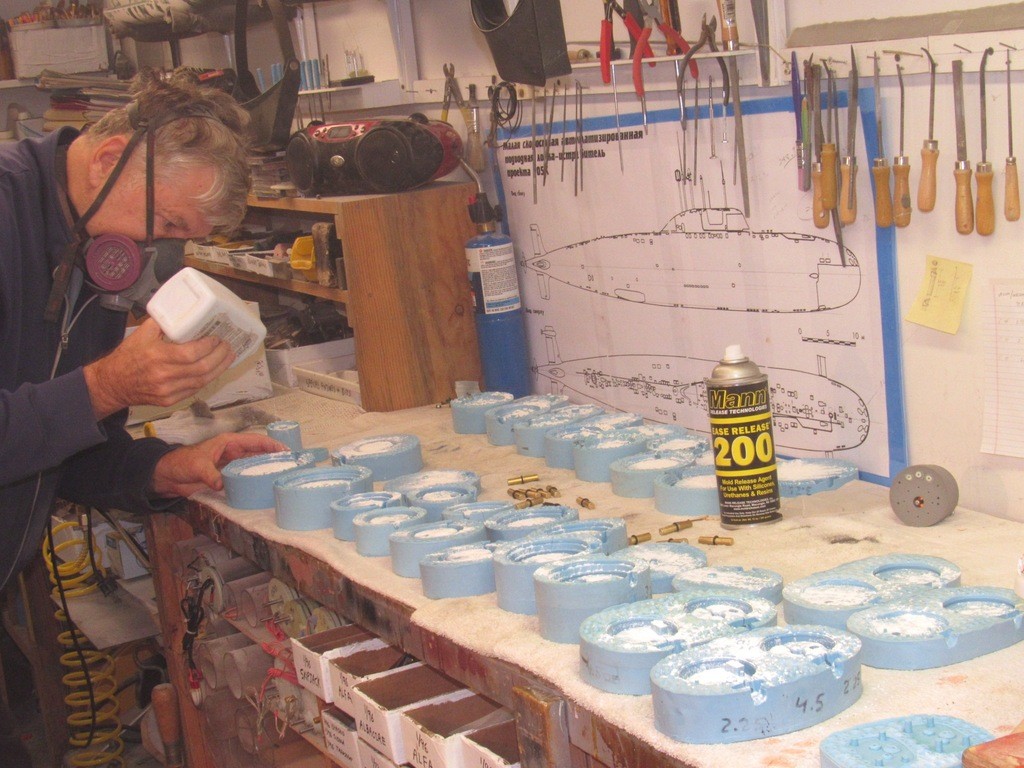
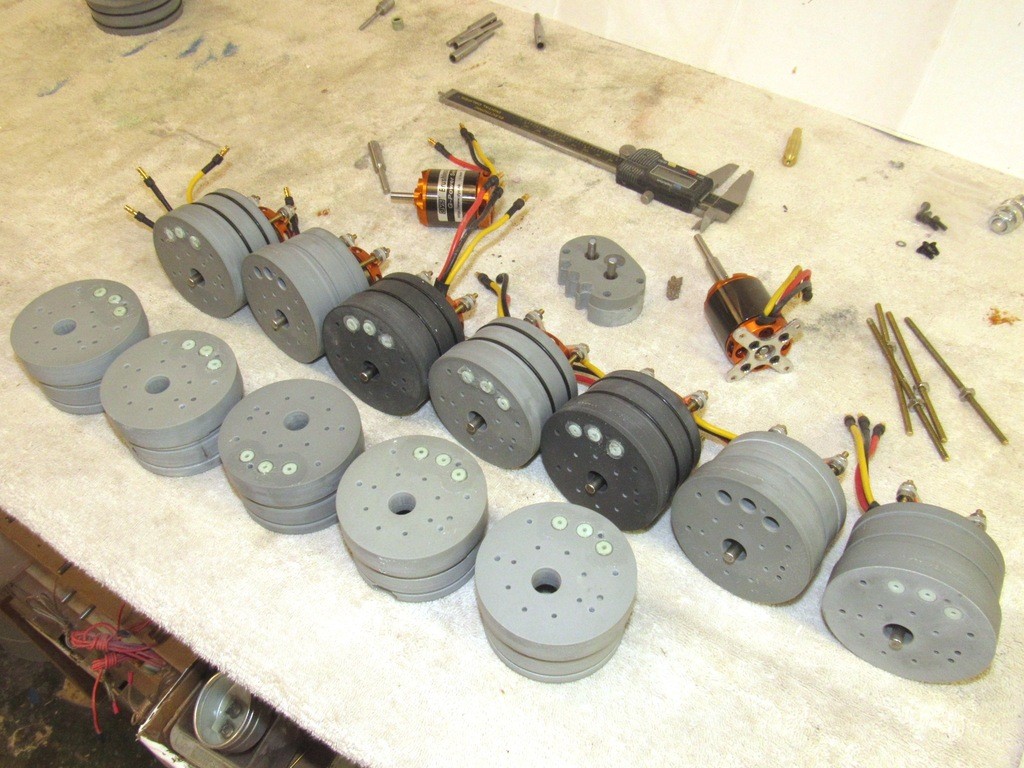
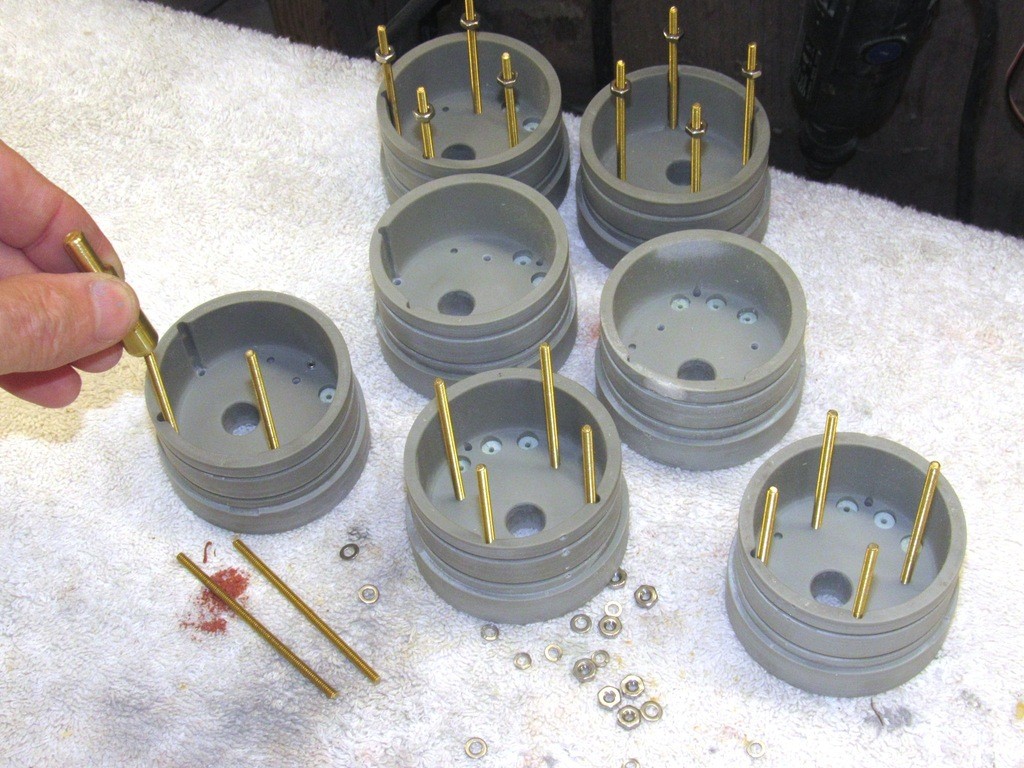
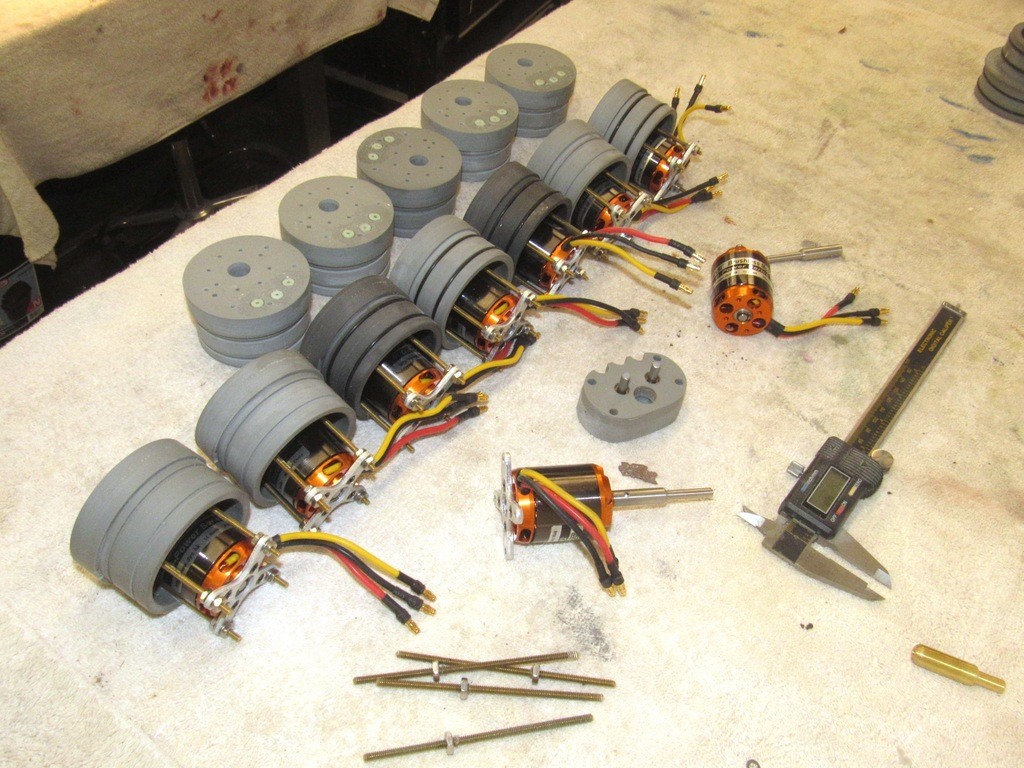
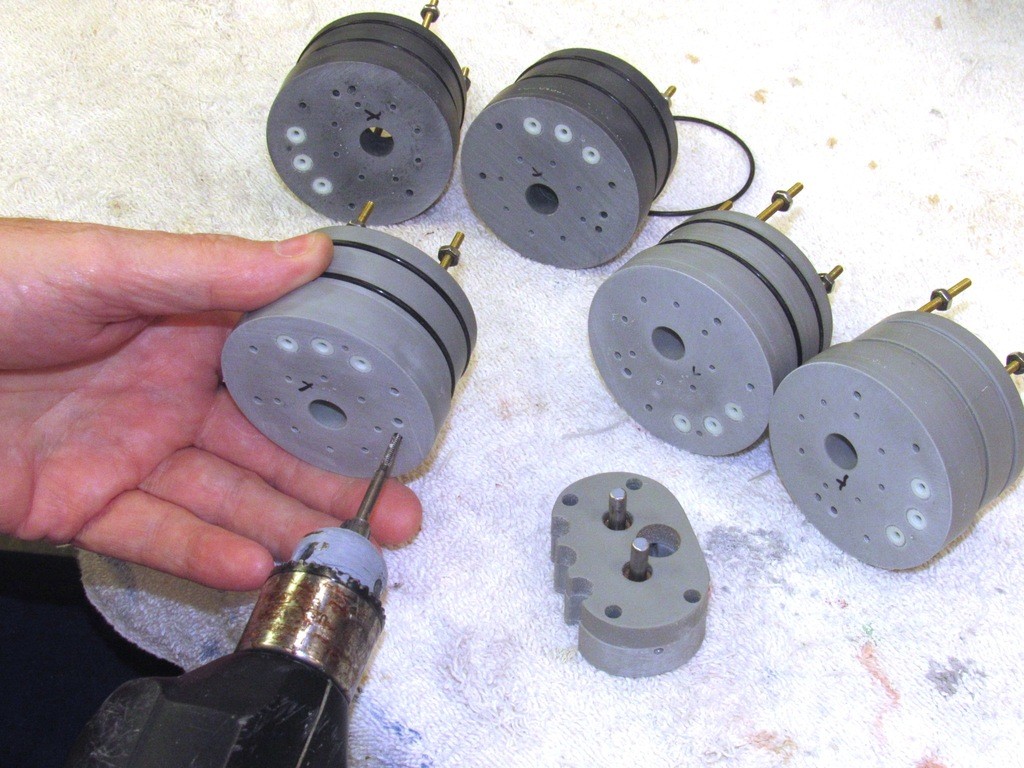
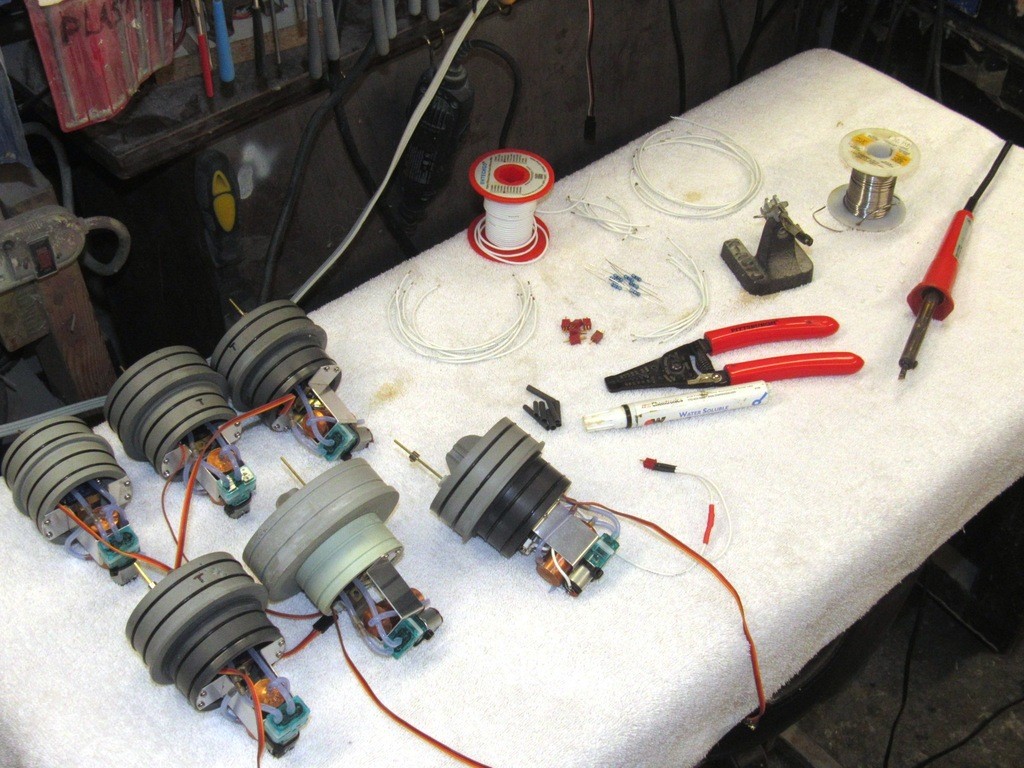
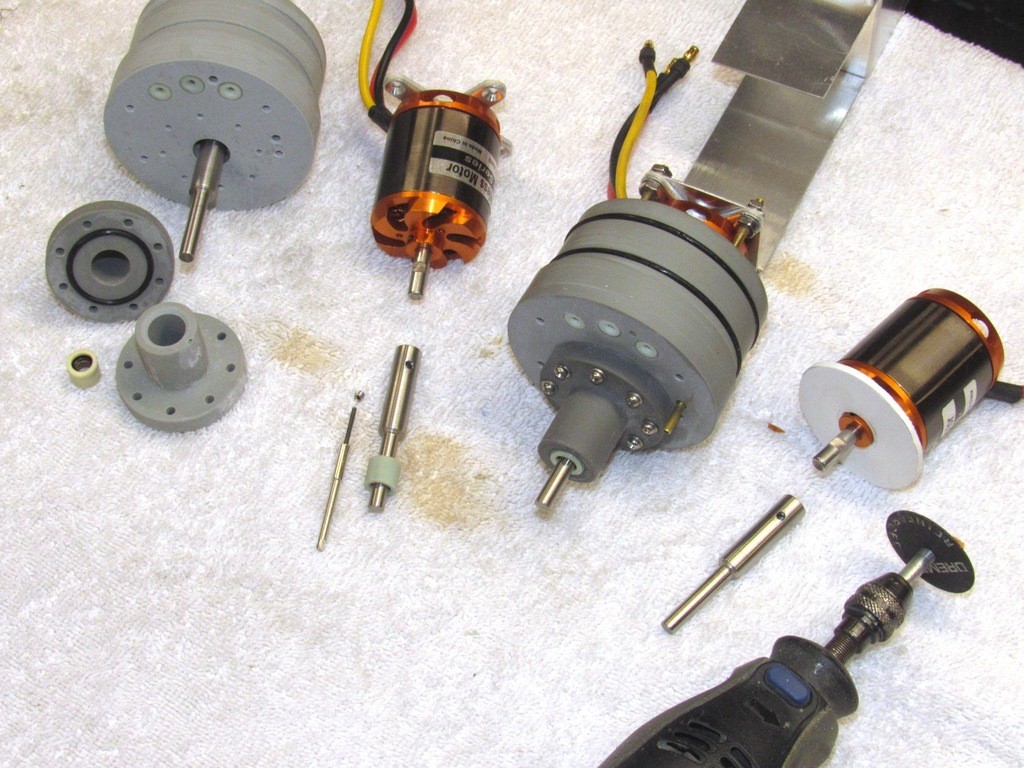
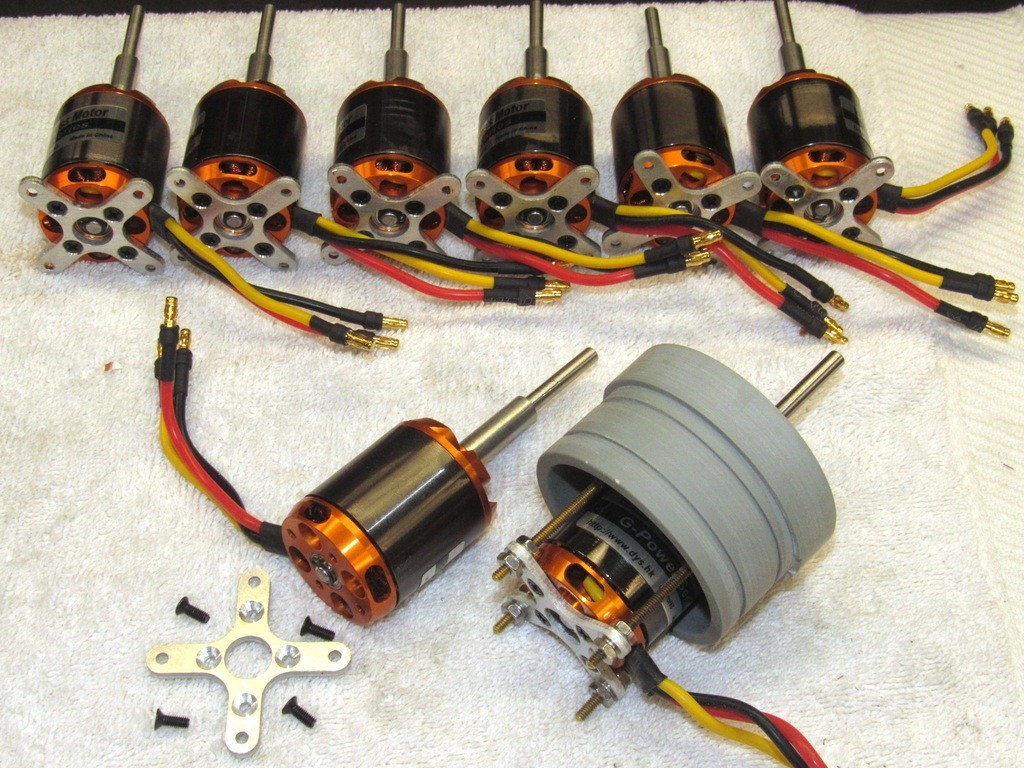
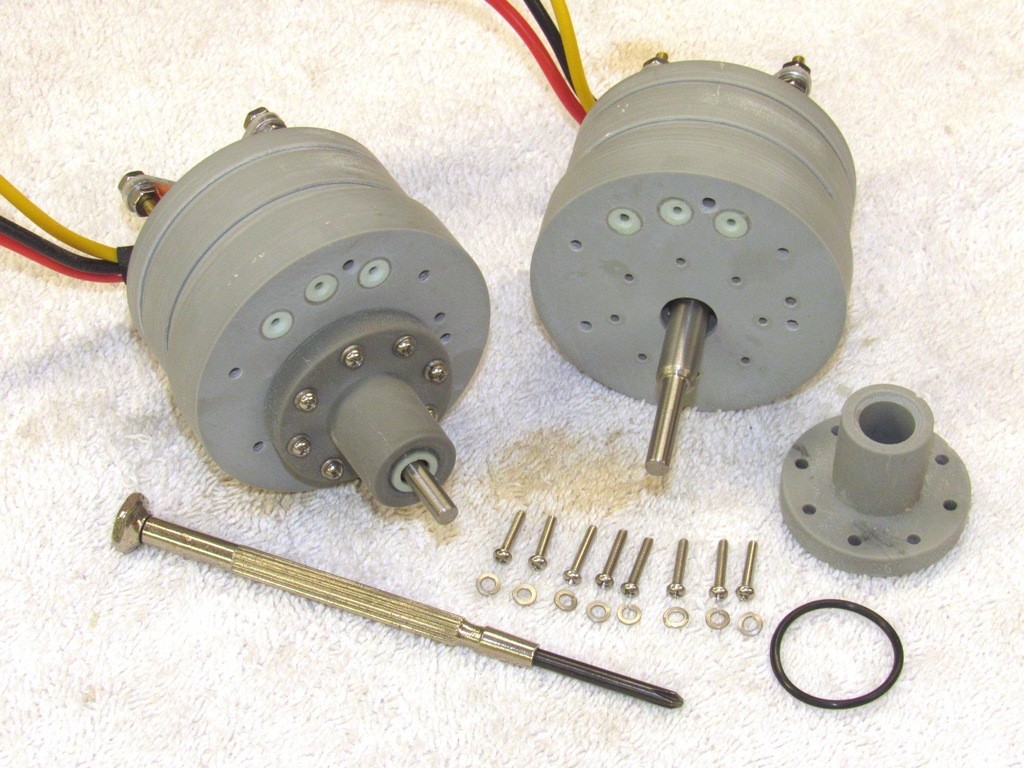
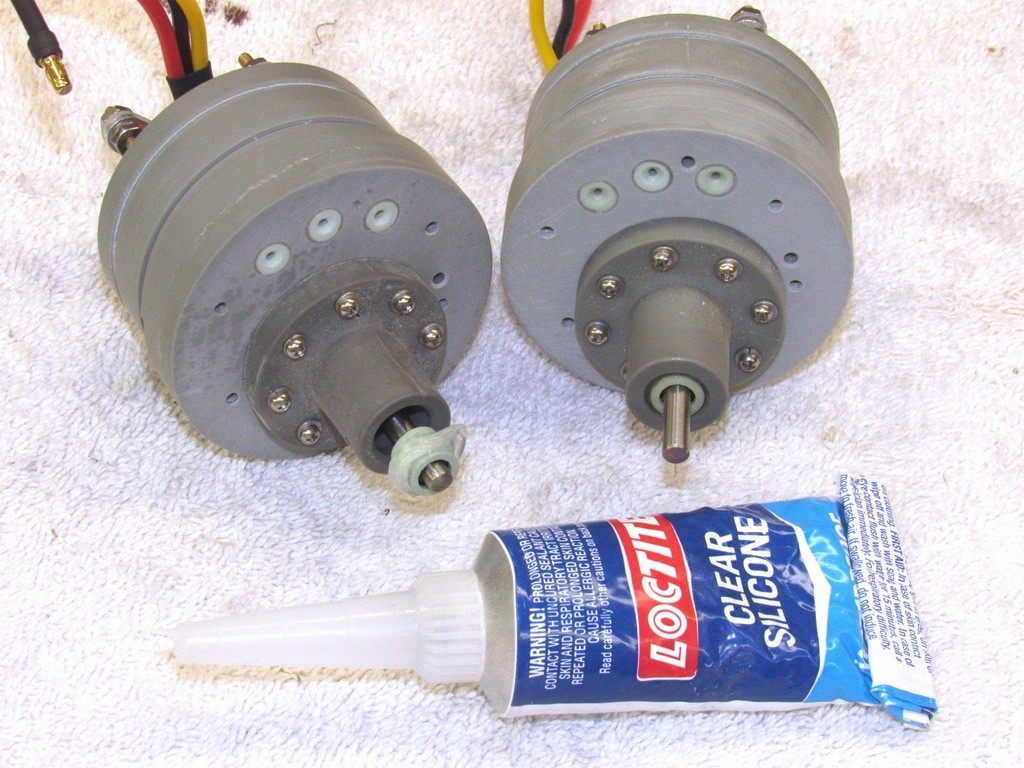
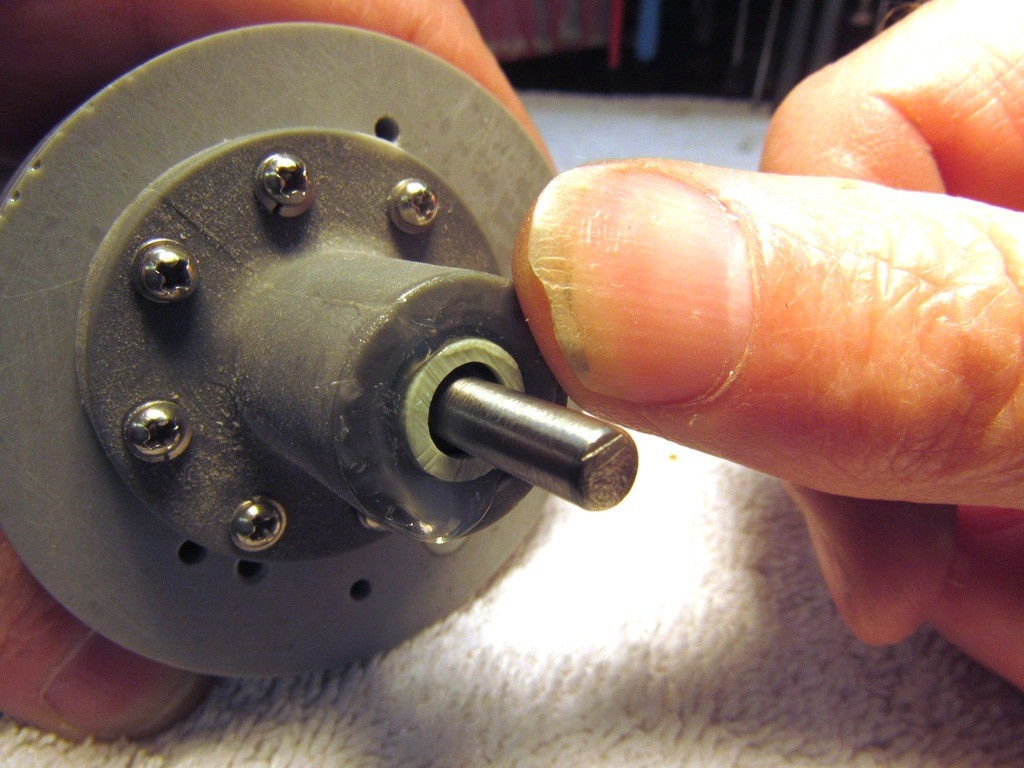
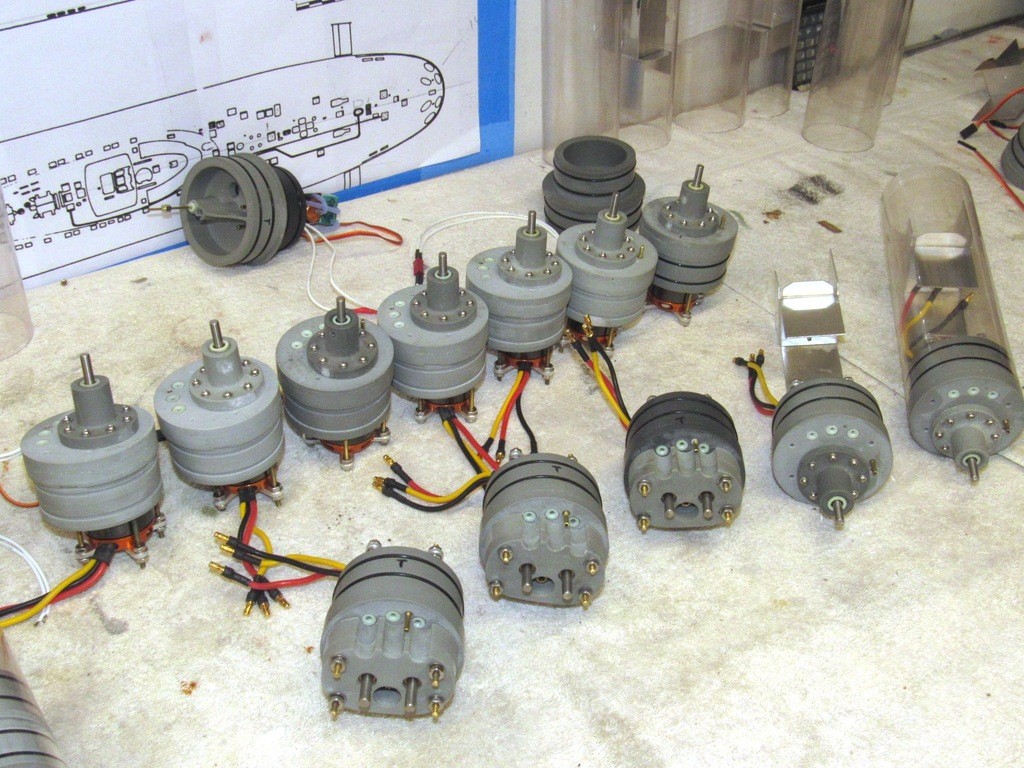
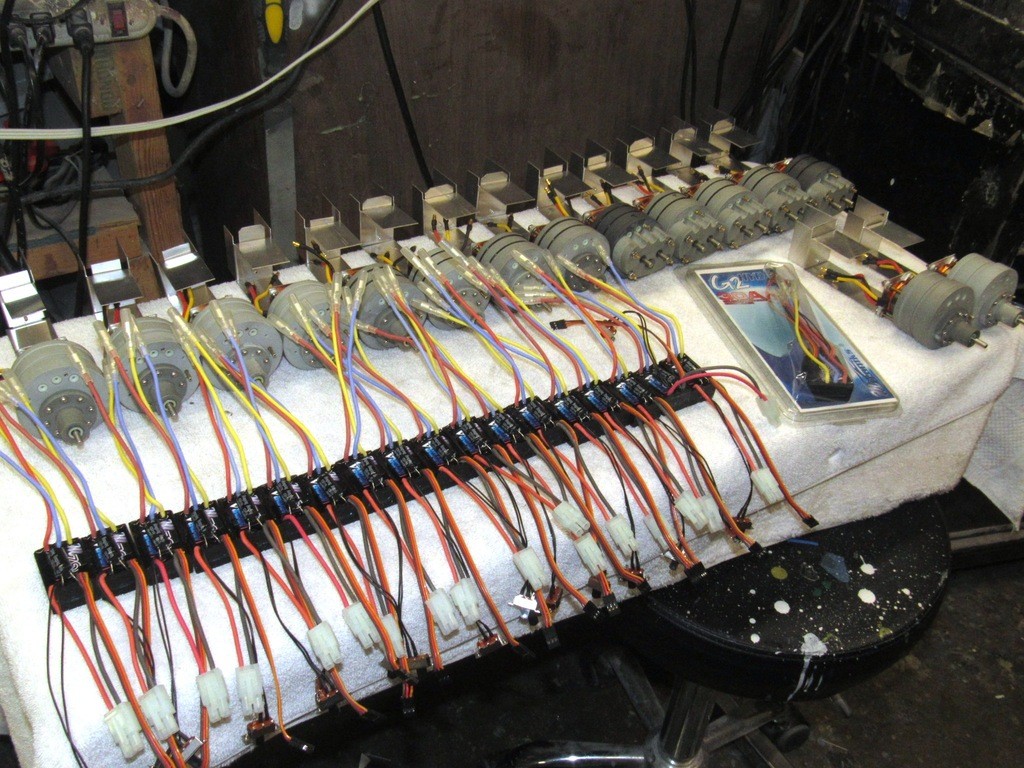
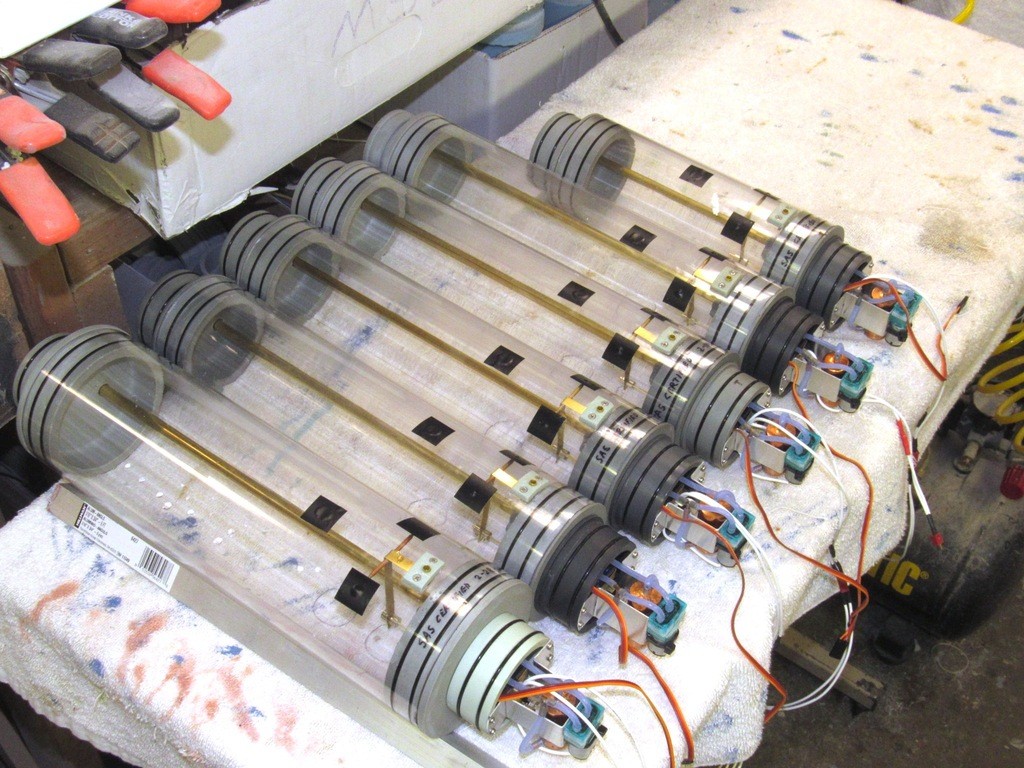
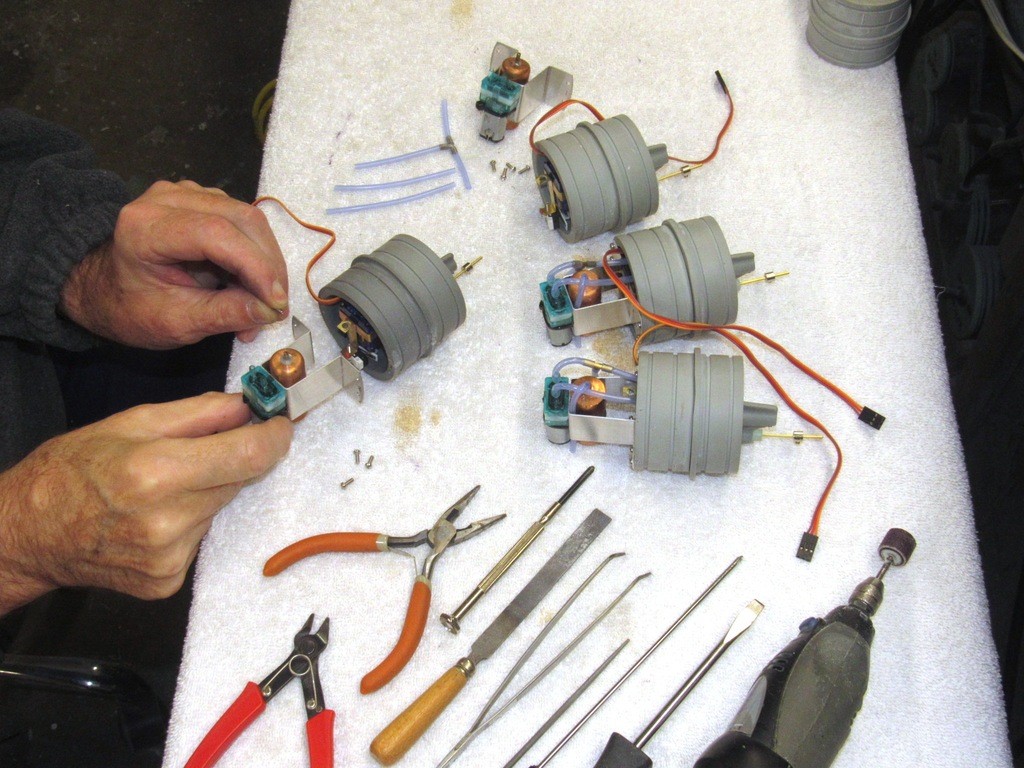
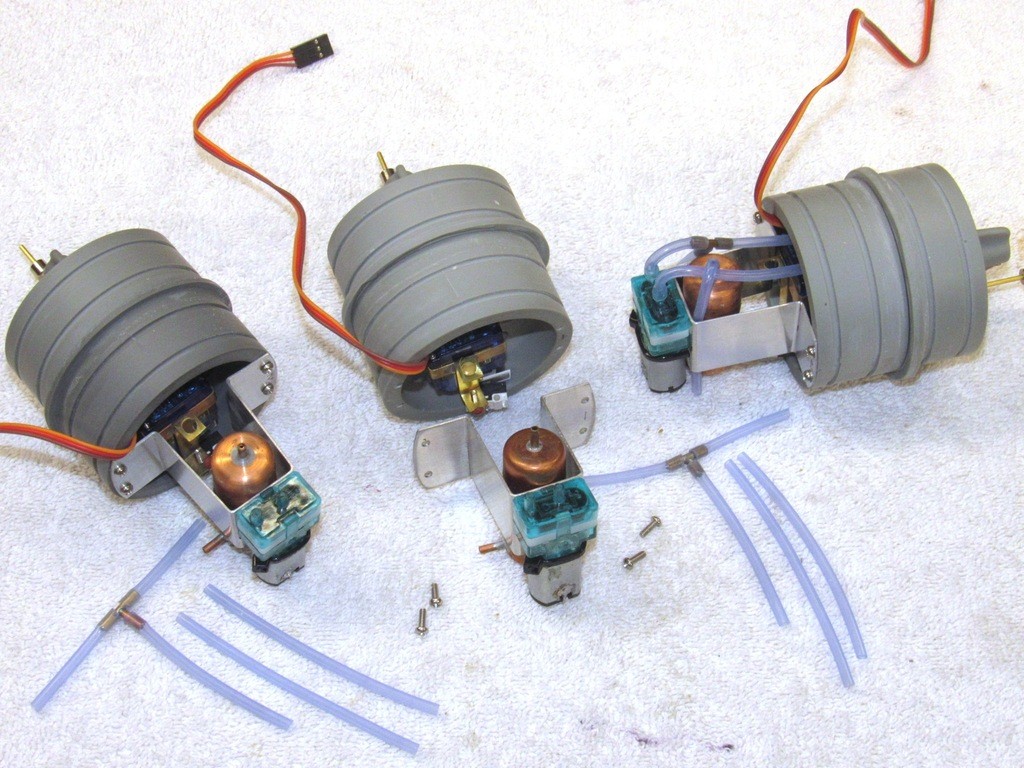
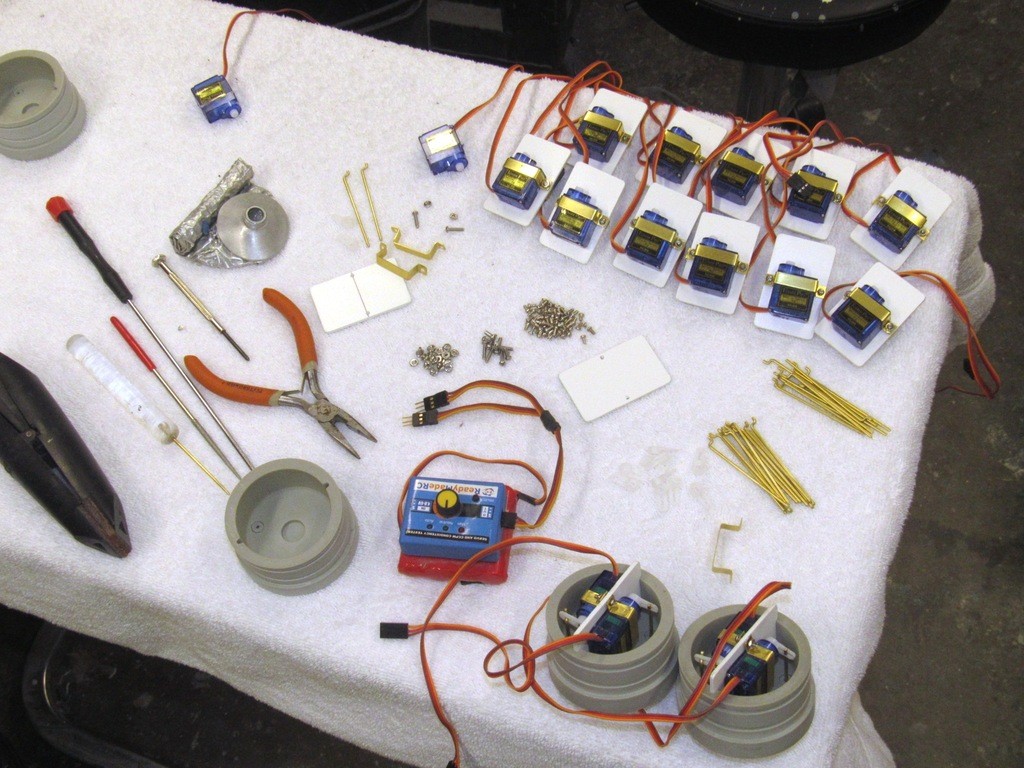
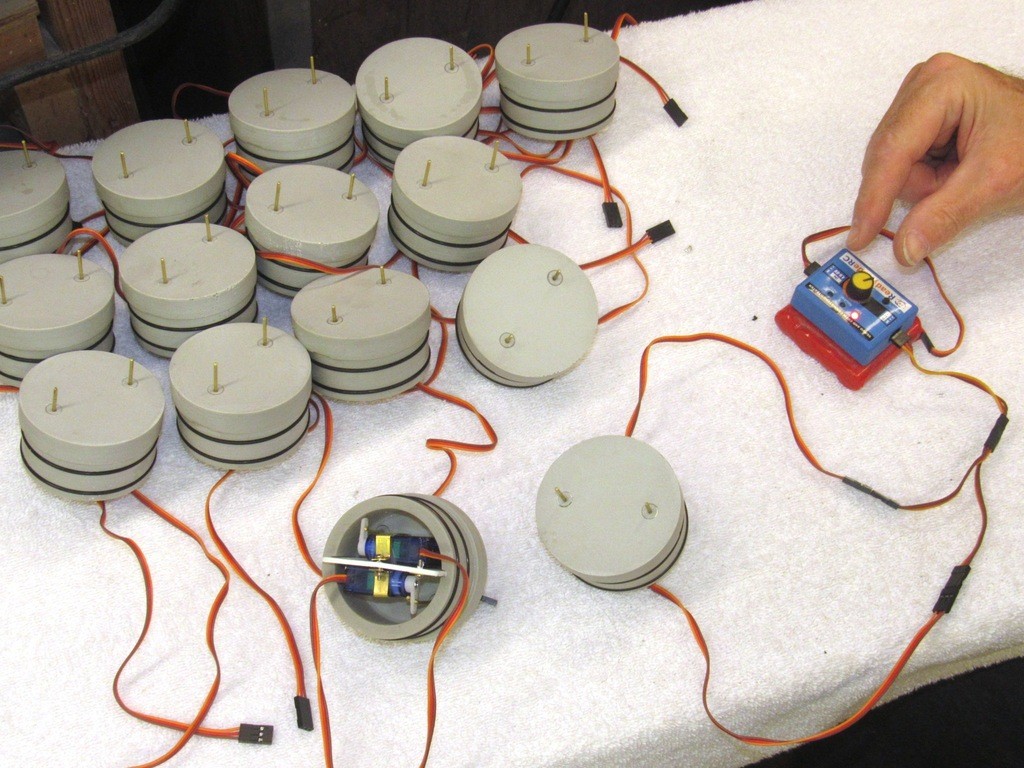
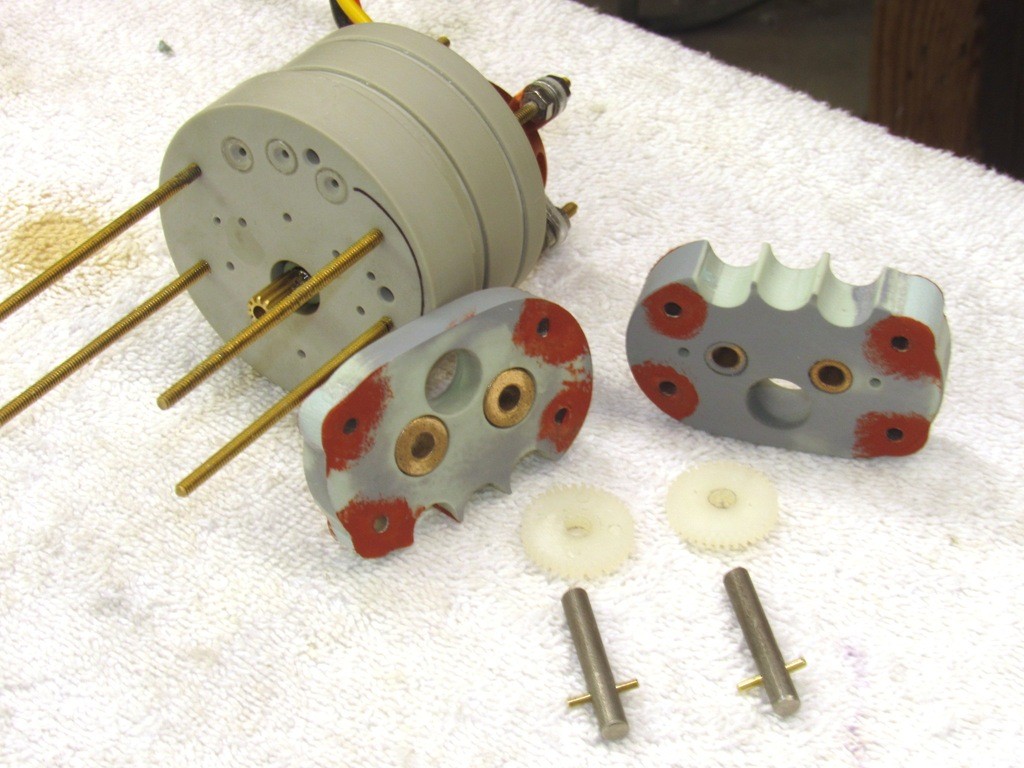
    Demonstrating the flexibility of the MSD design are these six units ready for shipment. All feature the same single brushless motor -- though some have only the one output shaft to the propeller, others are equipped with a ‘gear-splitter’ that derives two counter-rotating shafts from the single motor input. Also note the varied diameters of ballast tank. Other than those two variances, all other aspects of these units are identical. A big improvement over the previous SubDriver design is the MSD’s total abandonment of mechanical fasteners to secure internal bulkheads in place. Only friction holds the cylinders onto their respective union radial flanges. Accessing the internals takes only seconds where before it took considerable time and use of tools to remove fasteners and fish out internal bulkheads.

    today's work - Page 2 HGkrdi

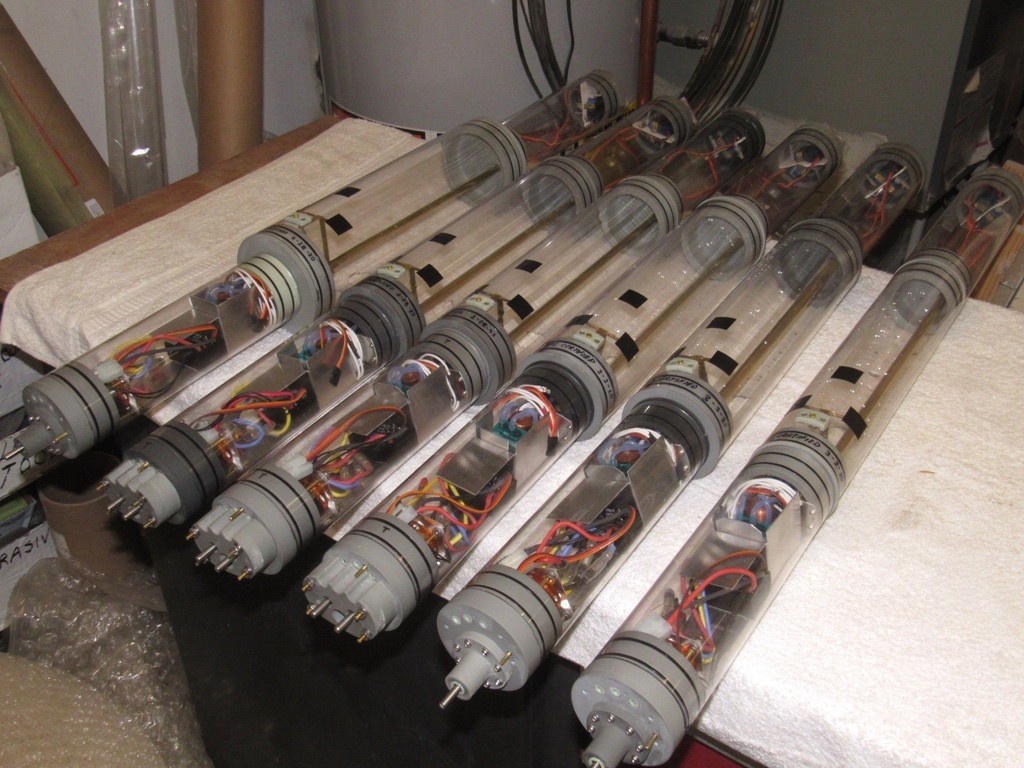
    All cylinder sections are retained via the friction between union radial flange O-rings and inside wall of the cylinder. Not to worry, this seemingly fragile attachment is practical because the air pressure within the cylinders never exceeds that of the ambient surroundings. Also contributing to the grip between union and cylinder is that once set, the silicon grease used to lubricate the parts to ease assembly, once set, acts like a mild adhesive making for a most tenacious attachment!

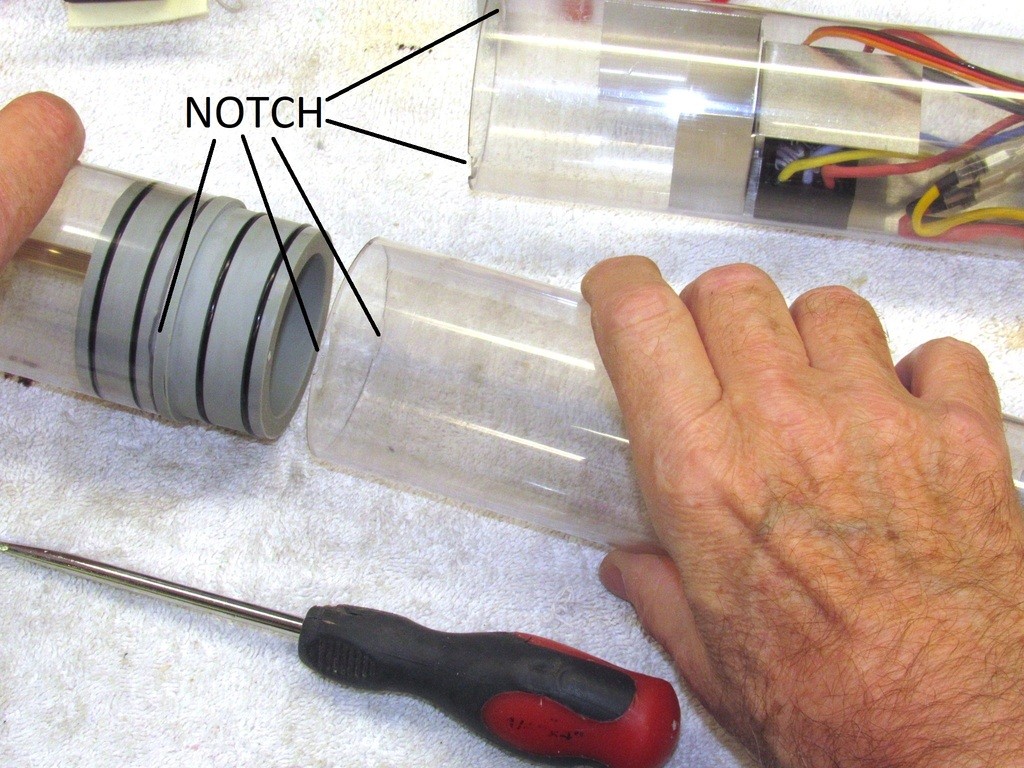
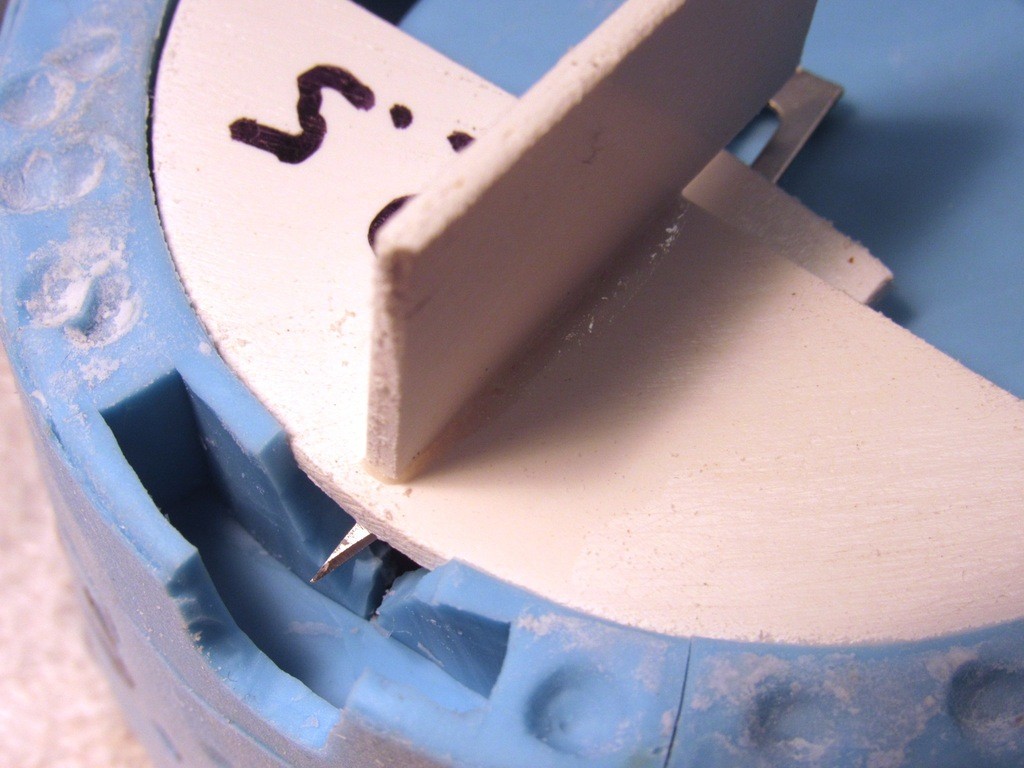
    To facilitate removal of a cylinder from its union I’ve provided at the end of each cylinder section ‘notches’ through which the blade of a screw-driver can be inserted and used to pry and easily break the grip between union O-rings and cylinder.

    today's work - Page 2 YsbyxG
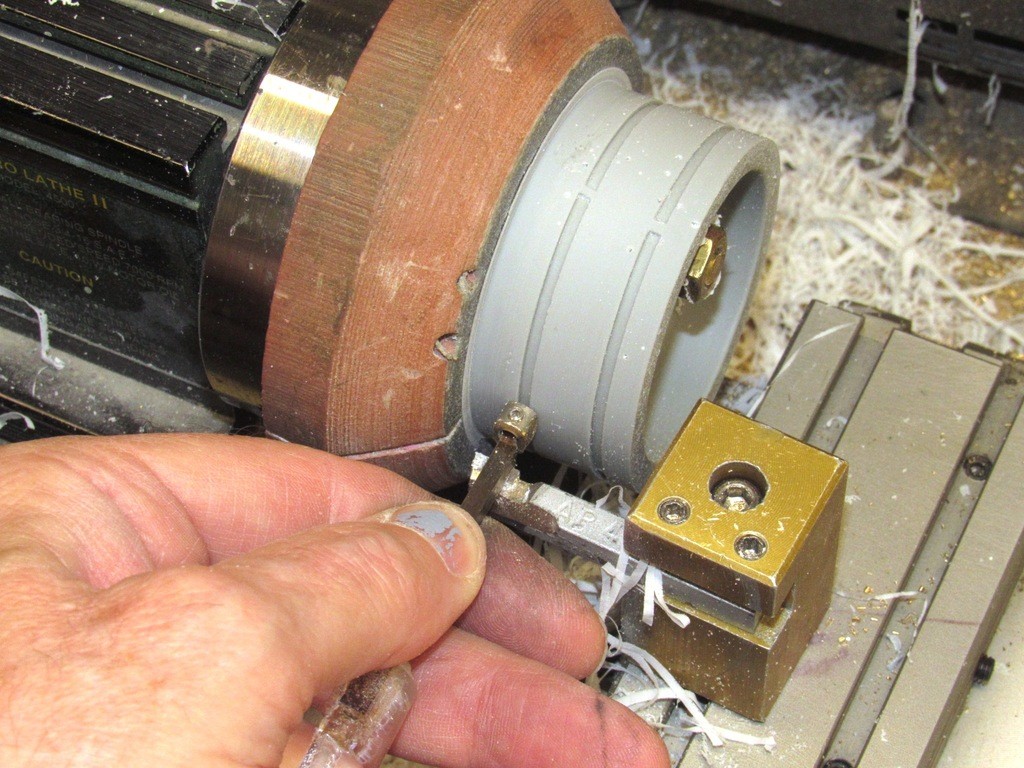
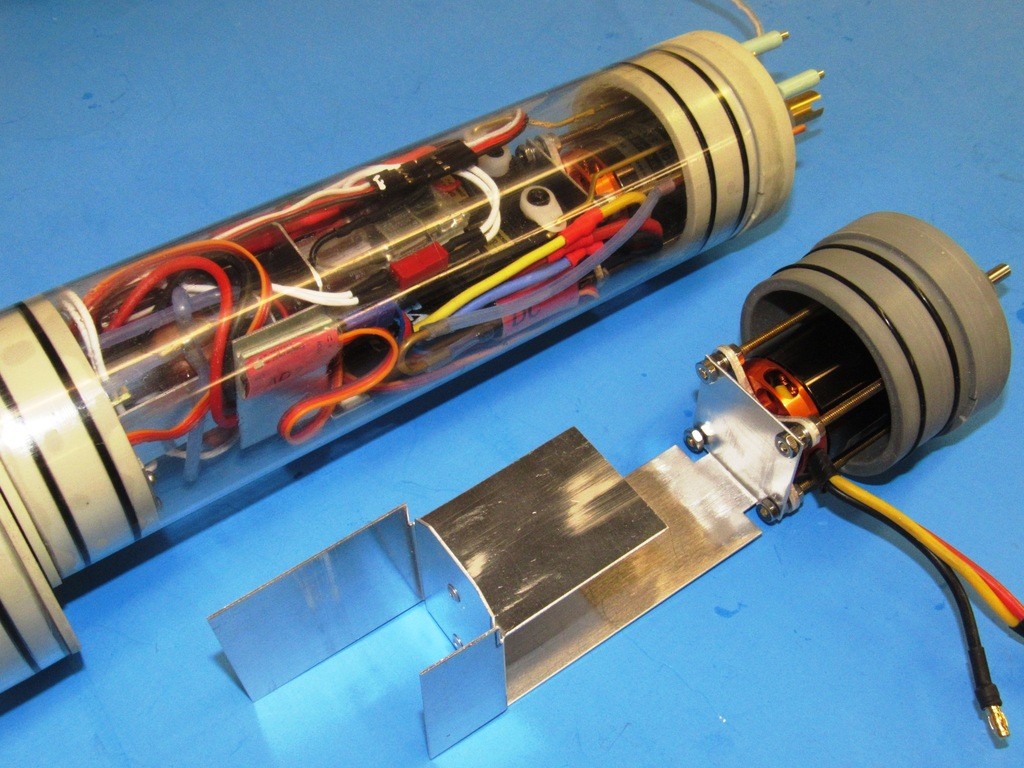
    Elimination of mechanical fasteners has eased cylinder fabrication and eliminated the risk of screw holes fracturing and propagating cracks over O-ring seals -- a situation that jeopardizes the systems water tight integrity. No more of that. Now, only the ballasts tank cylinder is machined with holes in it, and as that cylinder never sees any meaningful differential pressure, and is isolated by the forward and after ballast unions, it will never present a flooding path to the dry spaces.

    today's work - Page 2 RUguyG

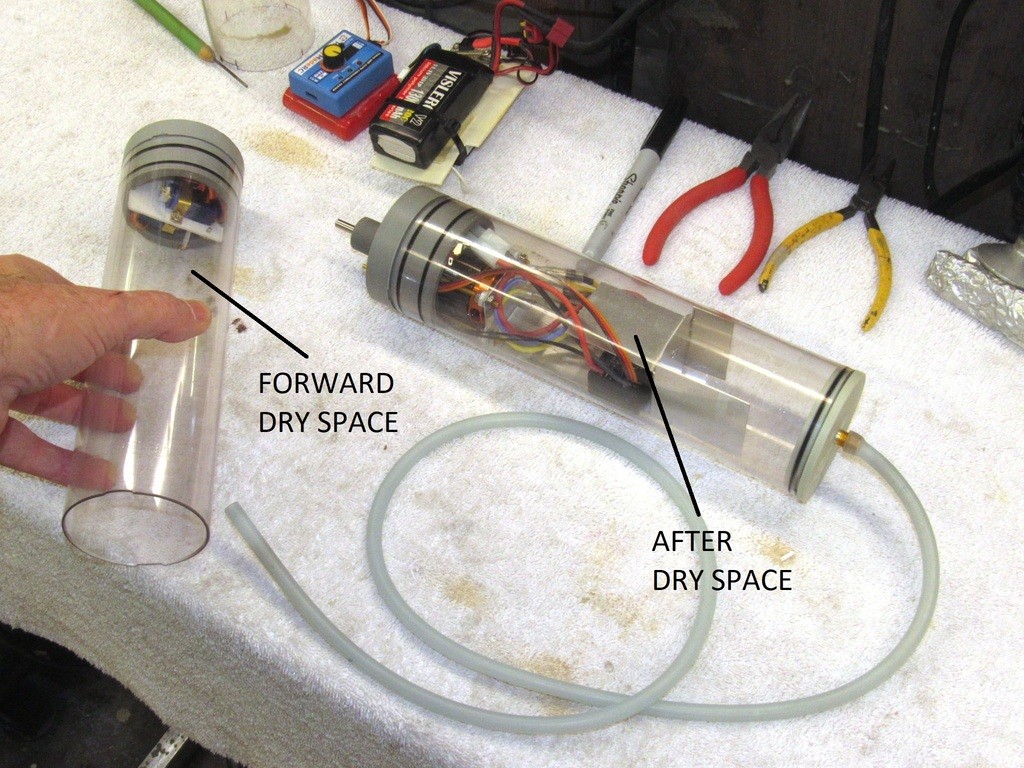
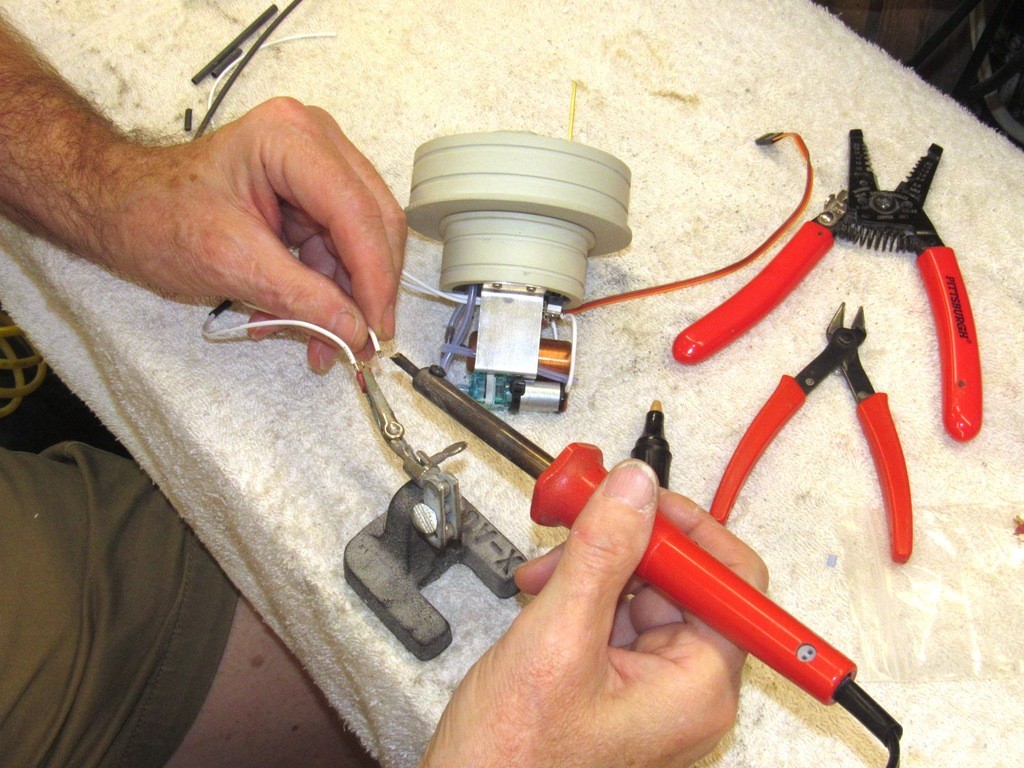
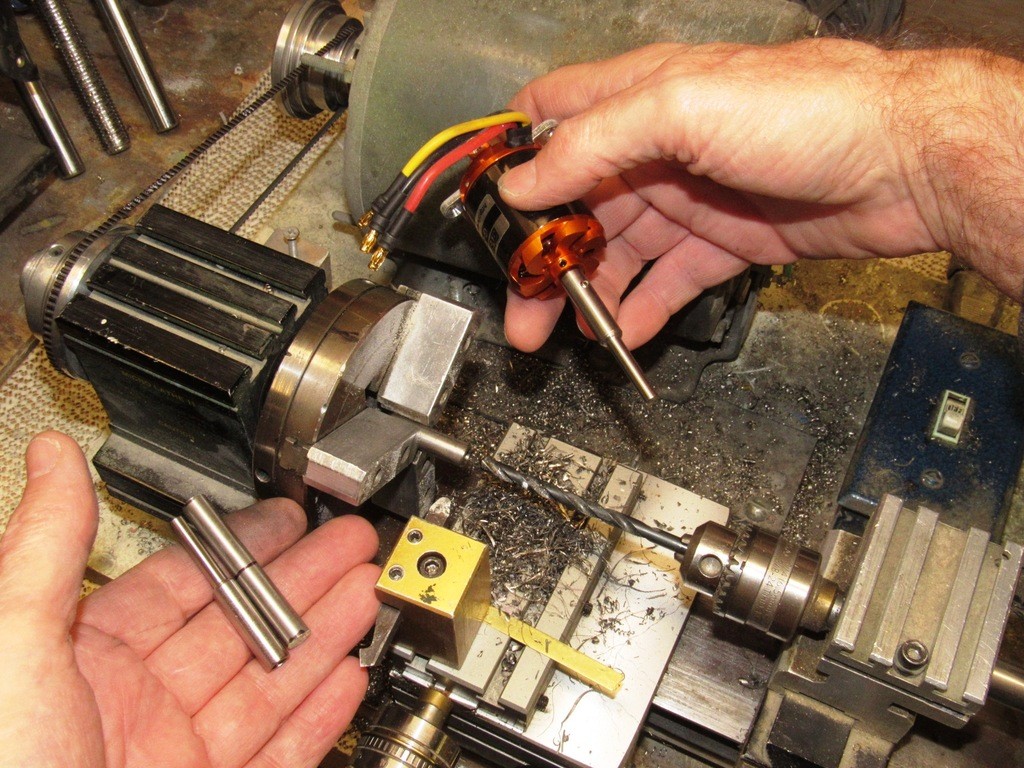
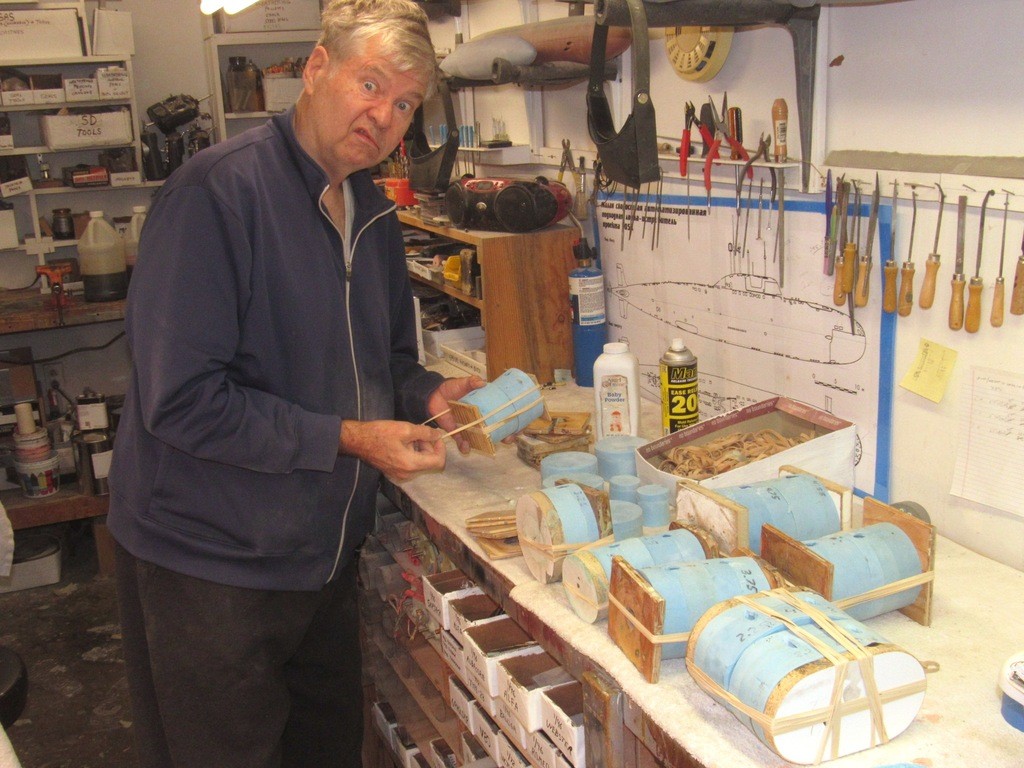
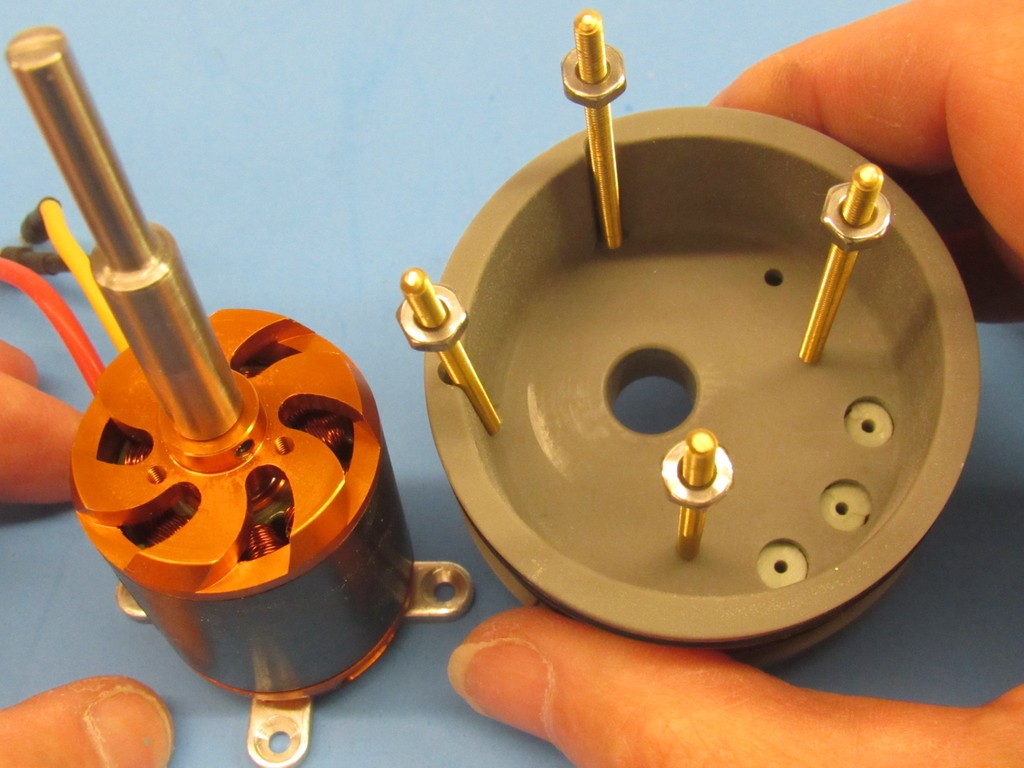
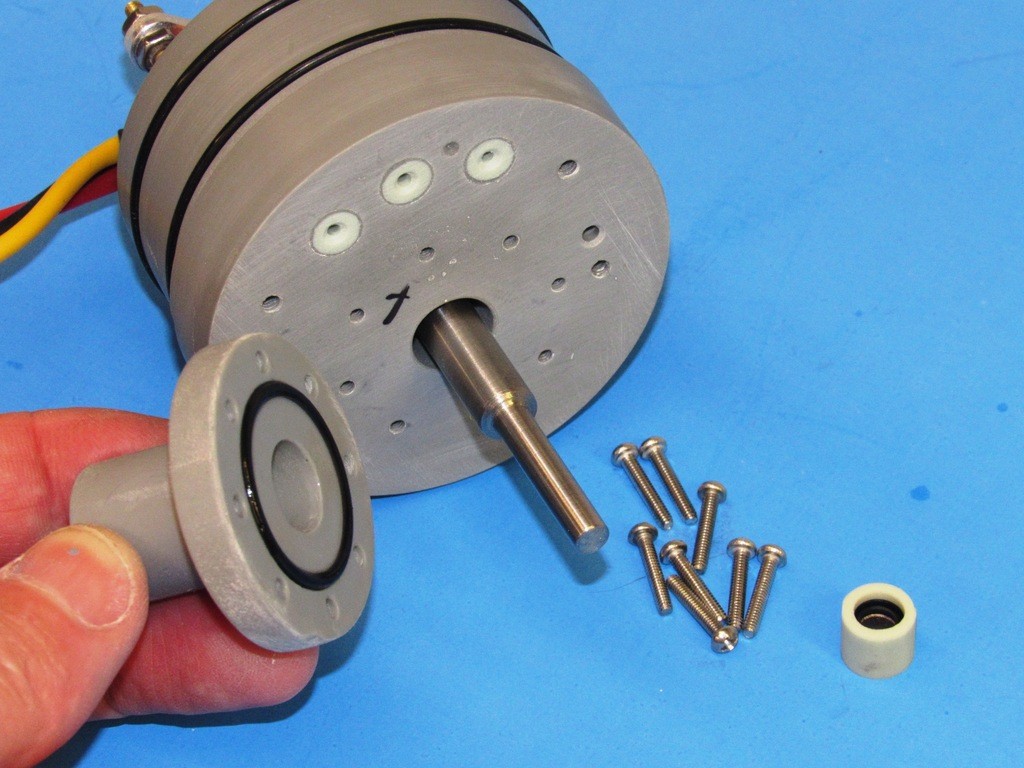
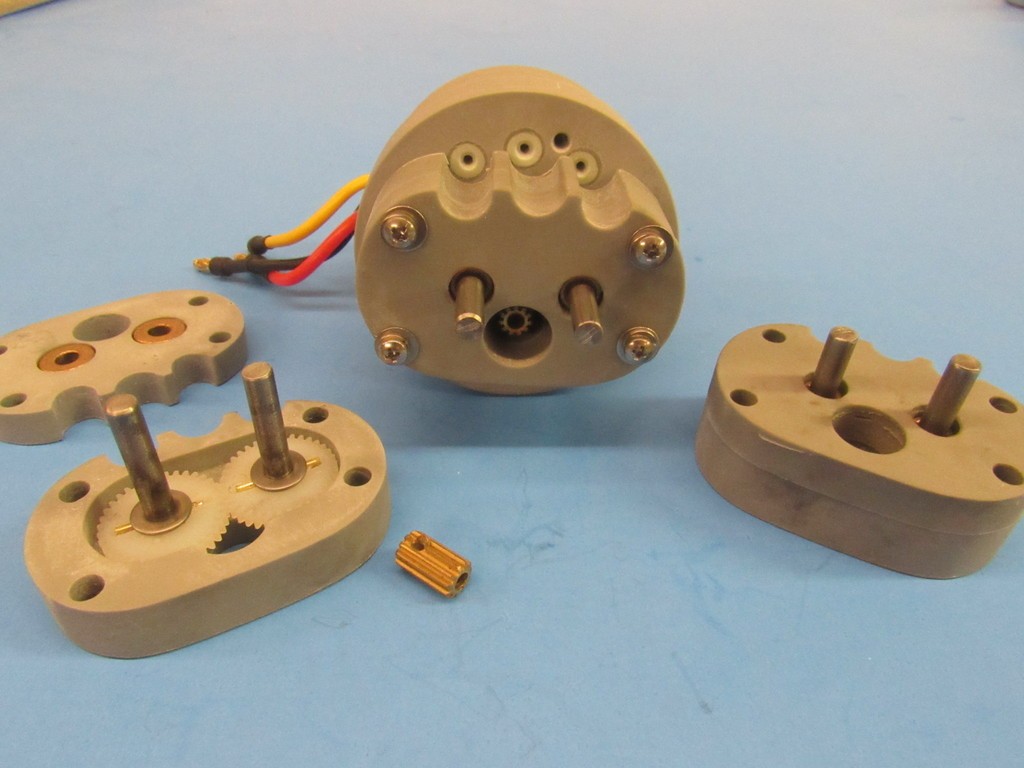
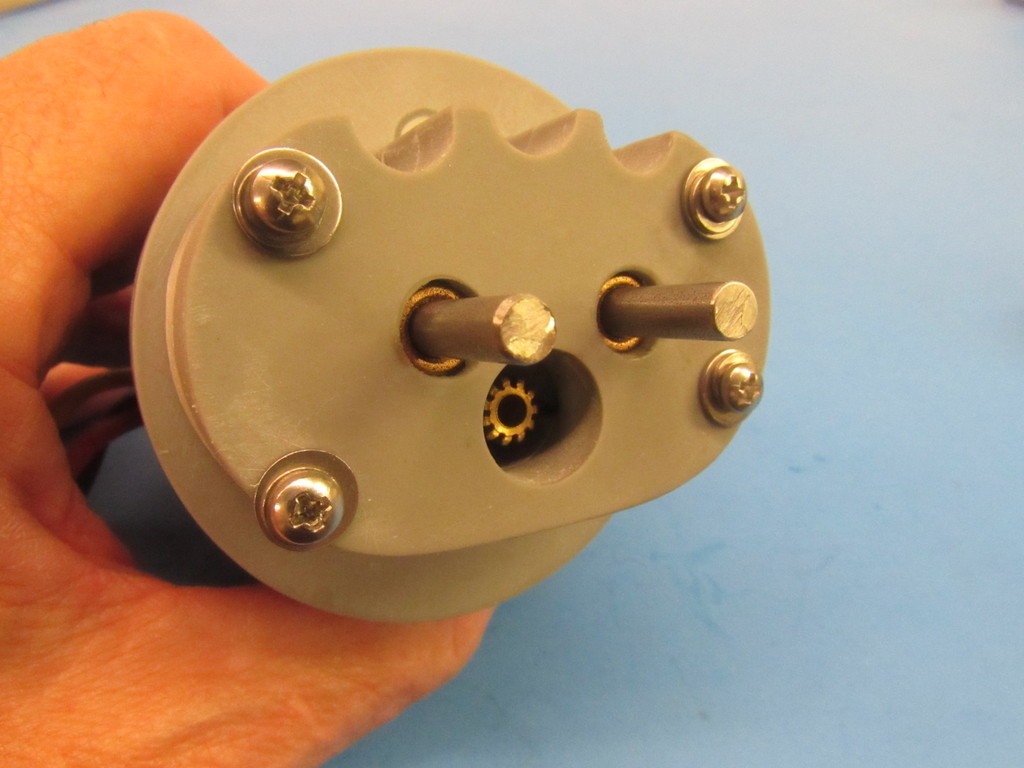
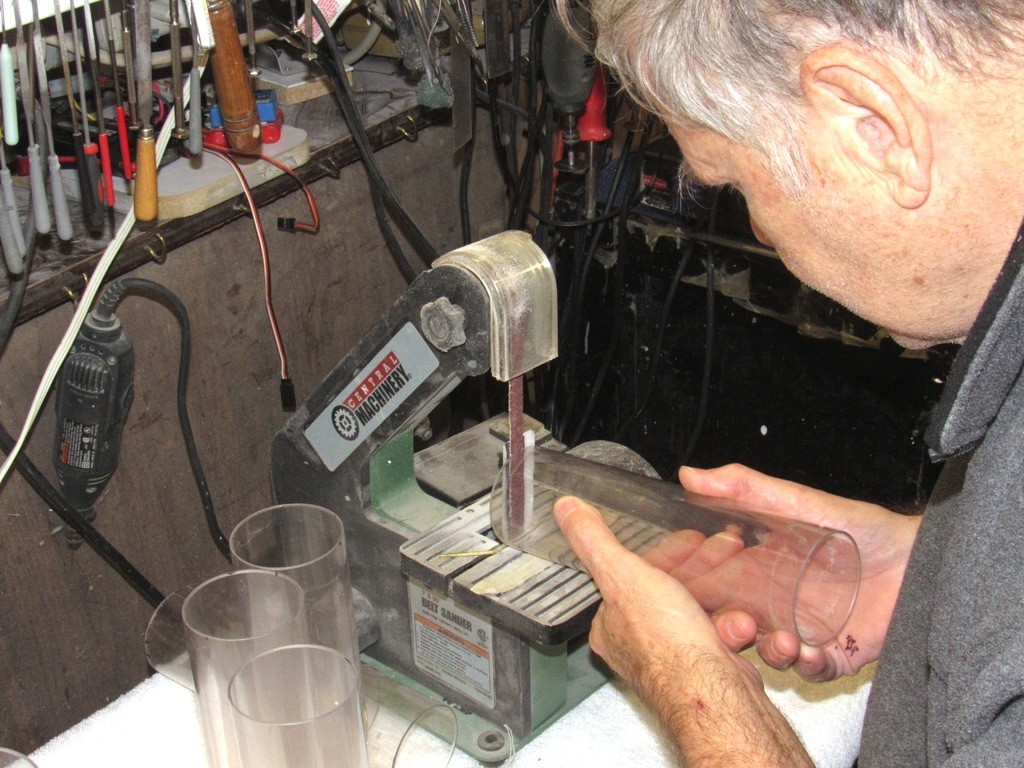
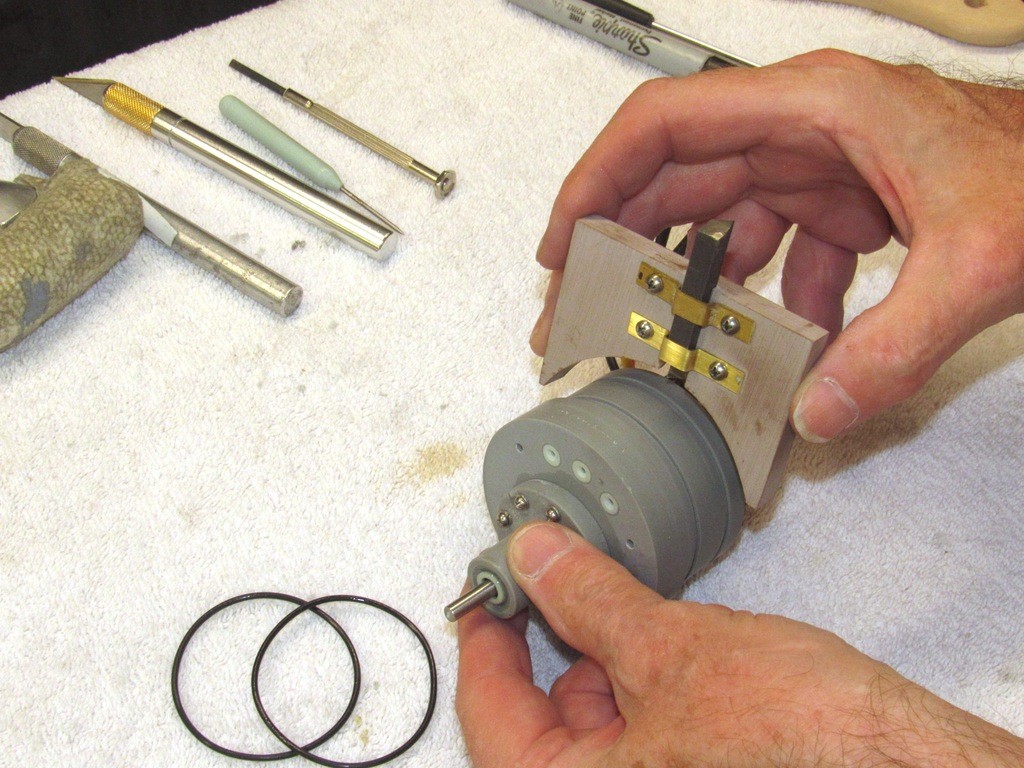
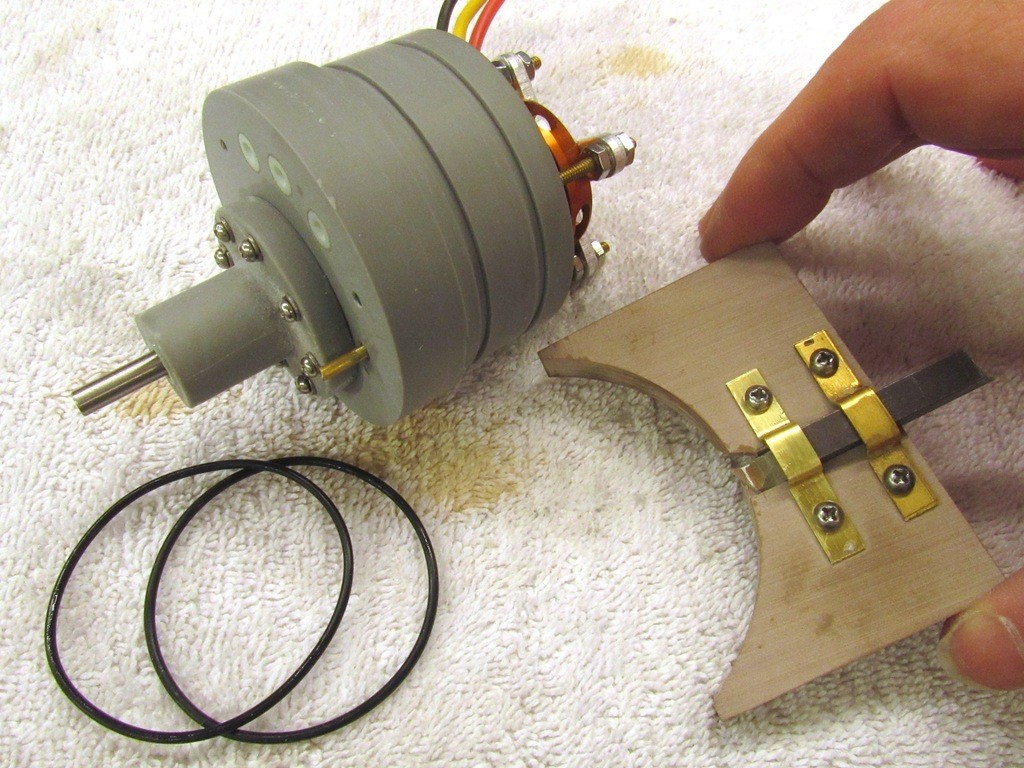
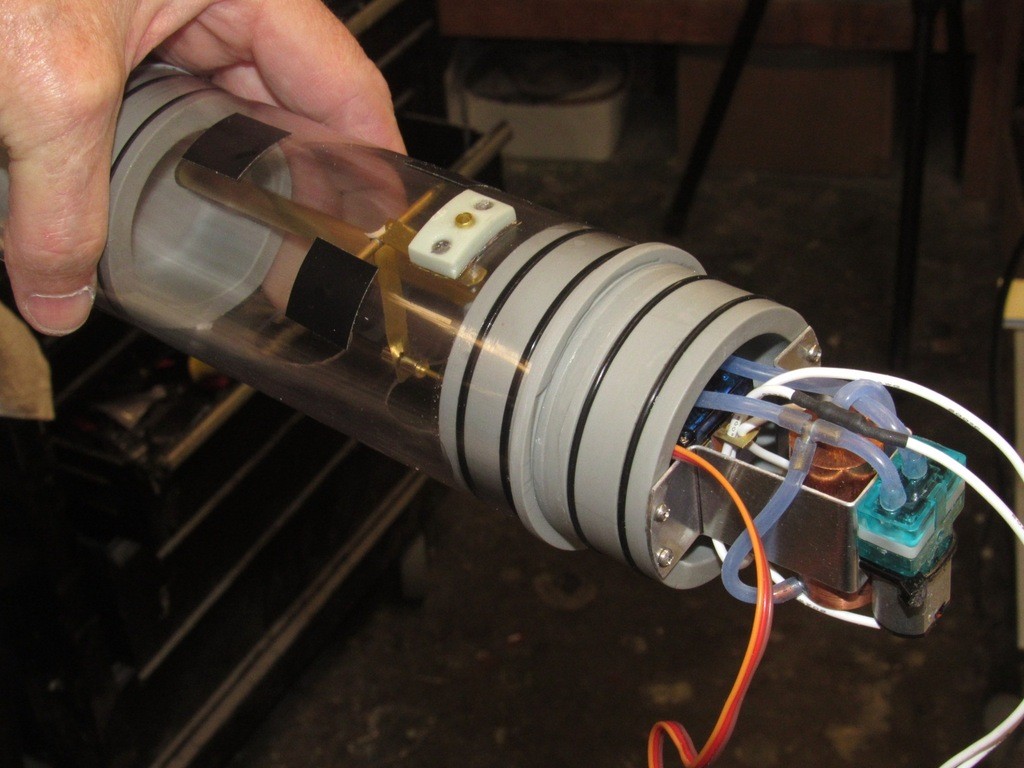
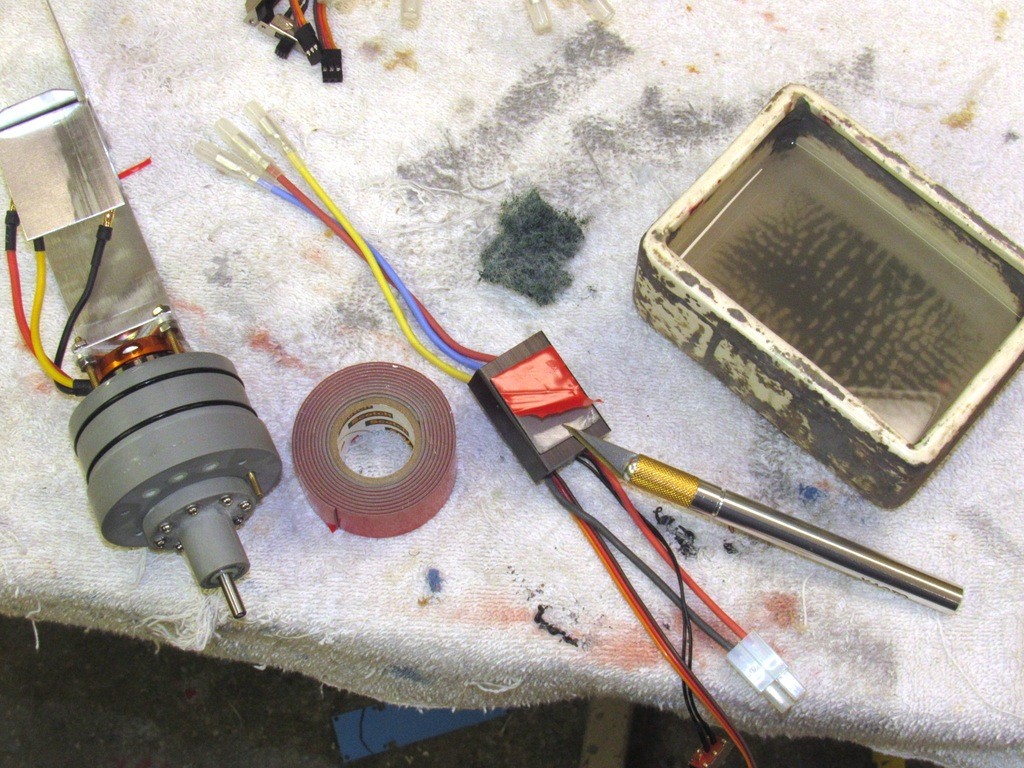
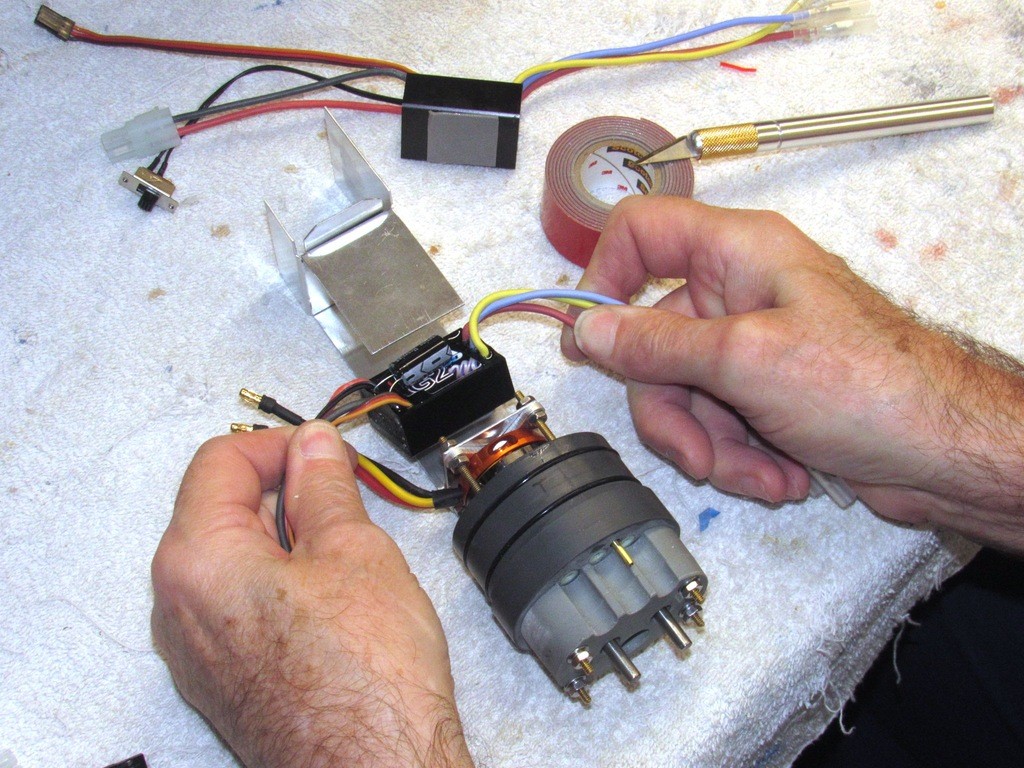
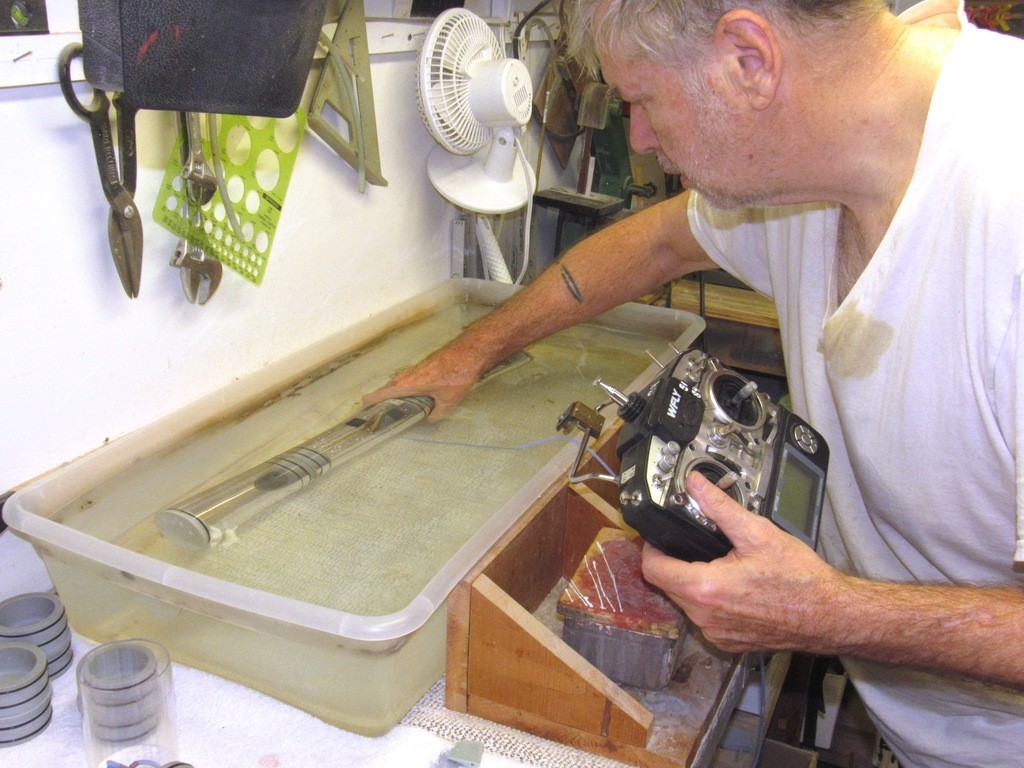
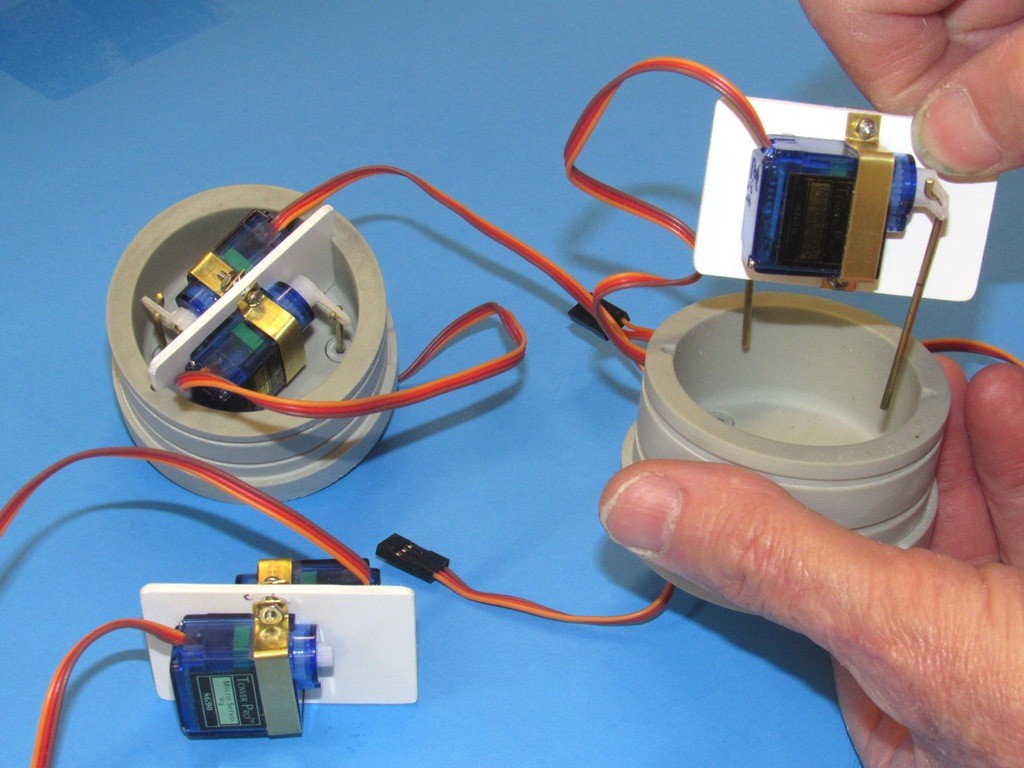
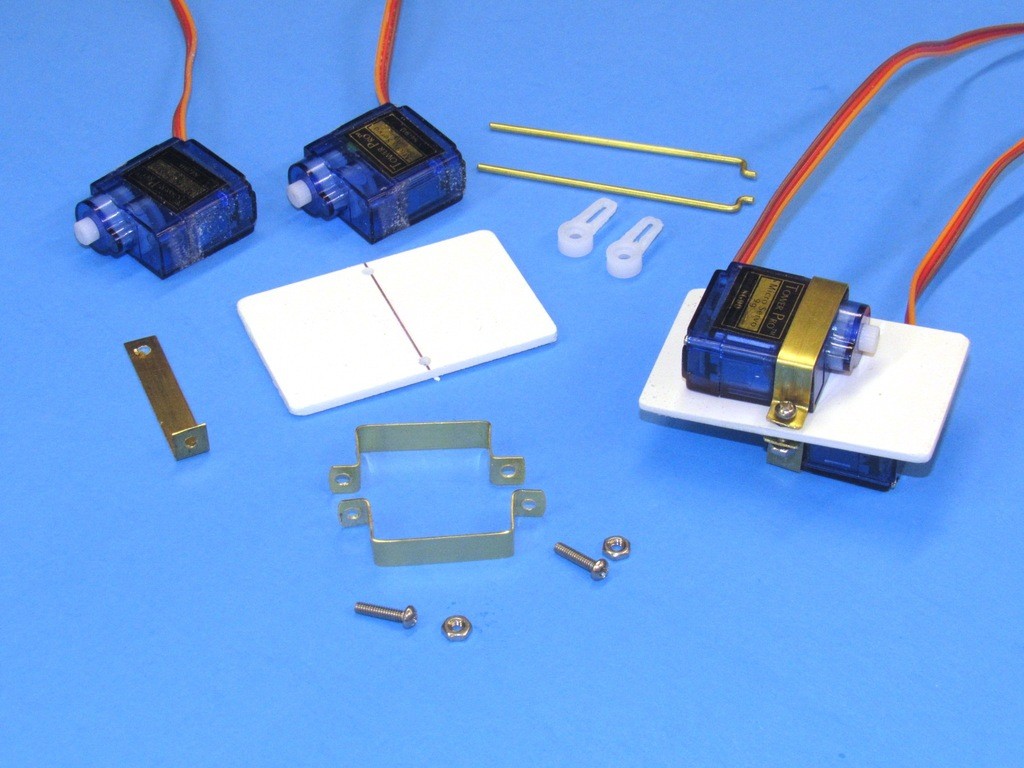
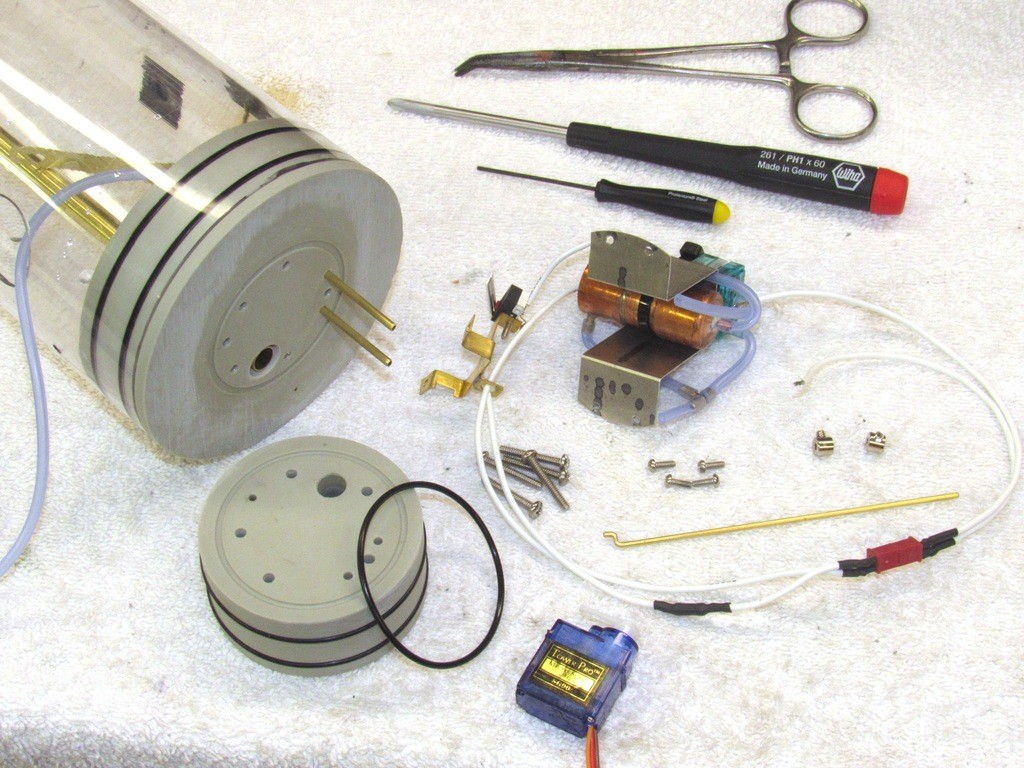
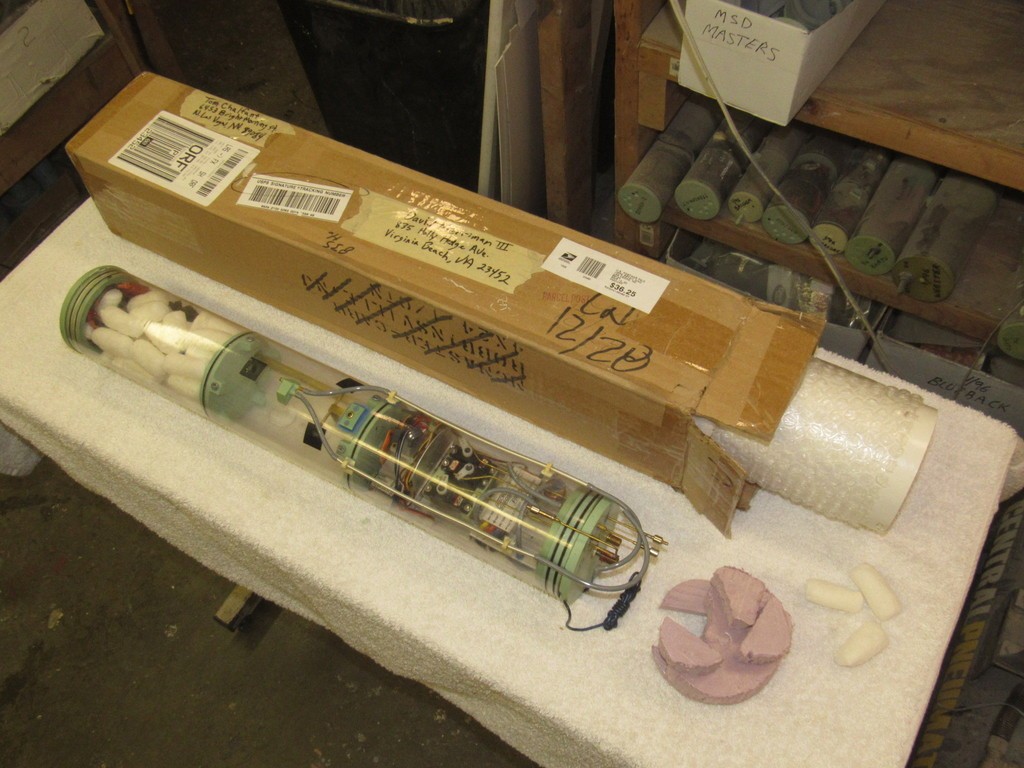
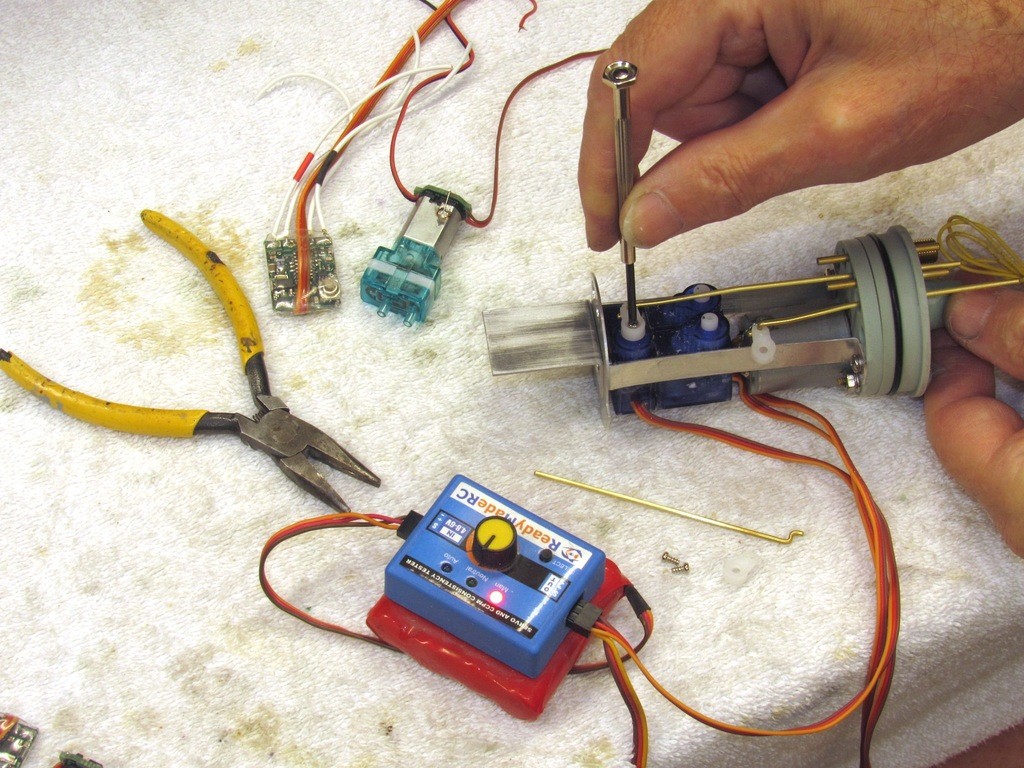
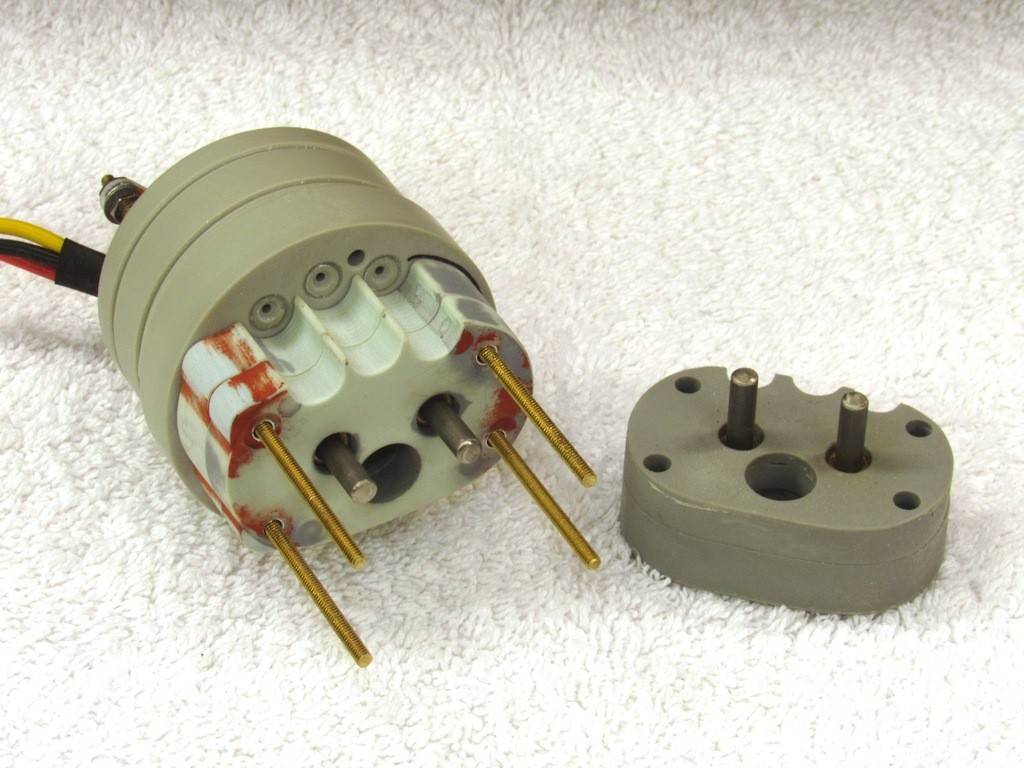
    In my hand is the forward dry space cylinder. The forward bulkhead contains two servos. It’s up to the customer on how they are used. Options include operation of bow/sail planes, torpedo launch mechanism, anchor; anything in the forward area of the model submarine that would require a mechanical actuator.

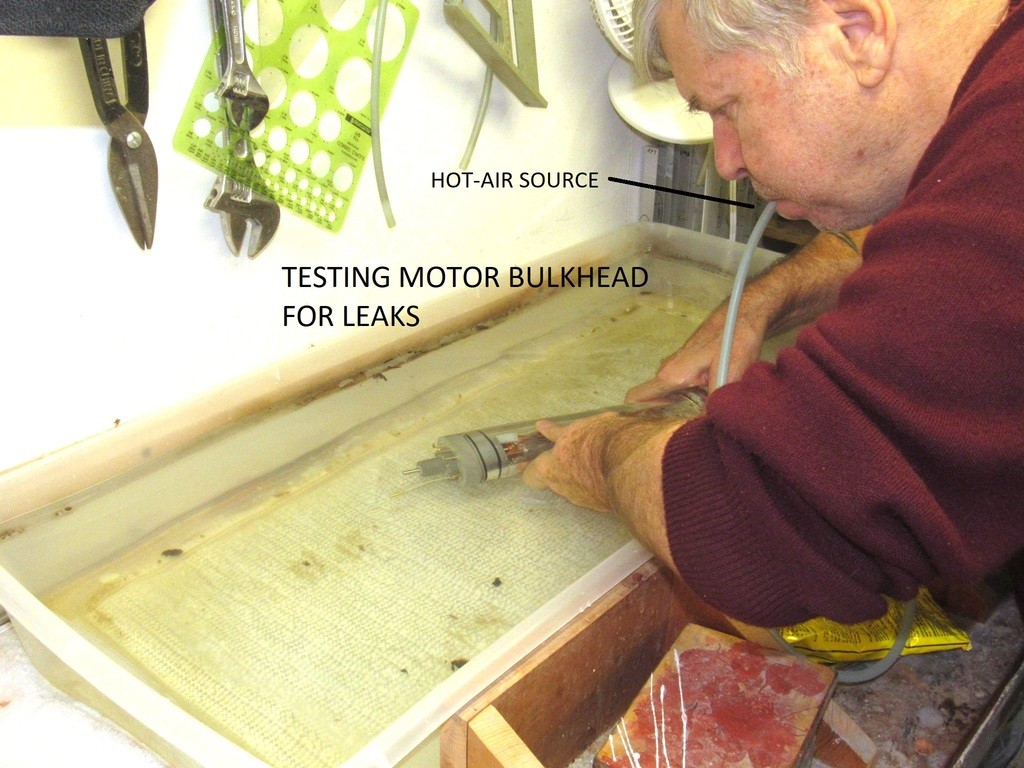
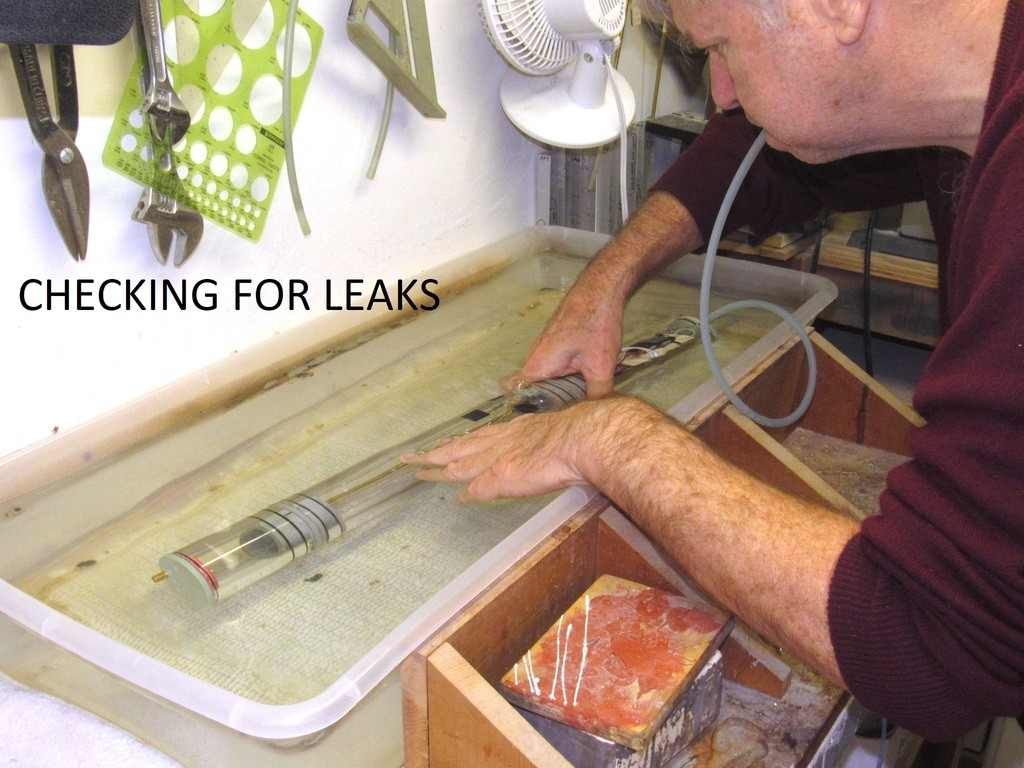
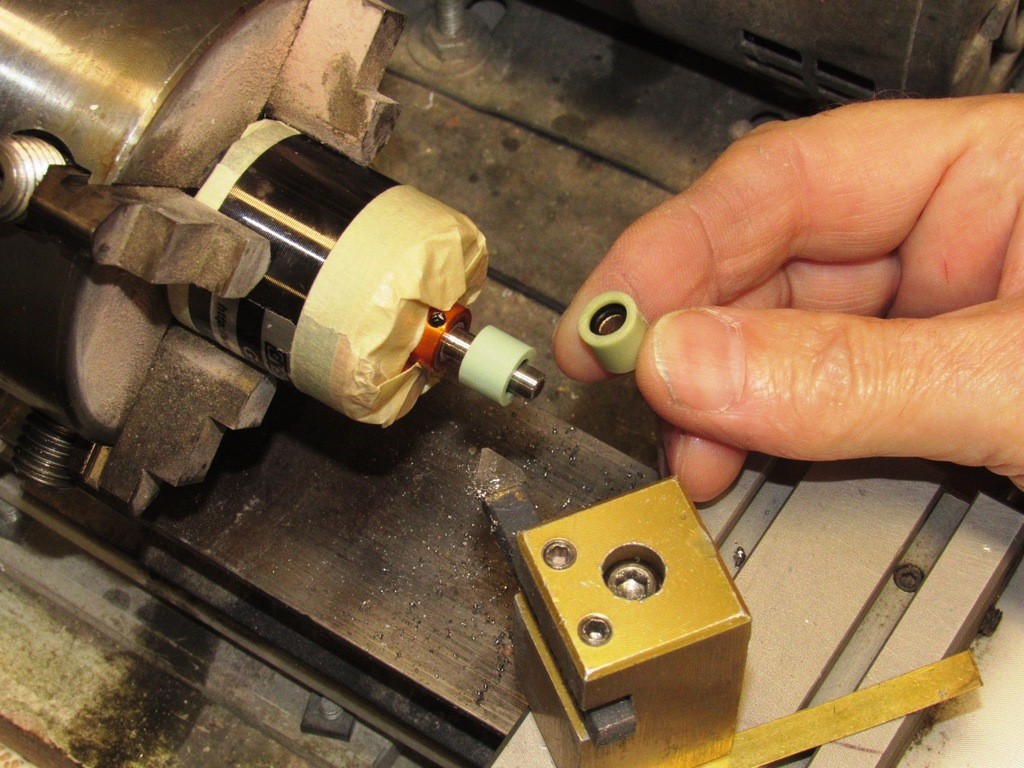
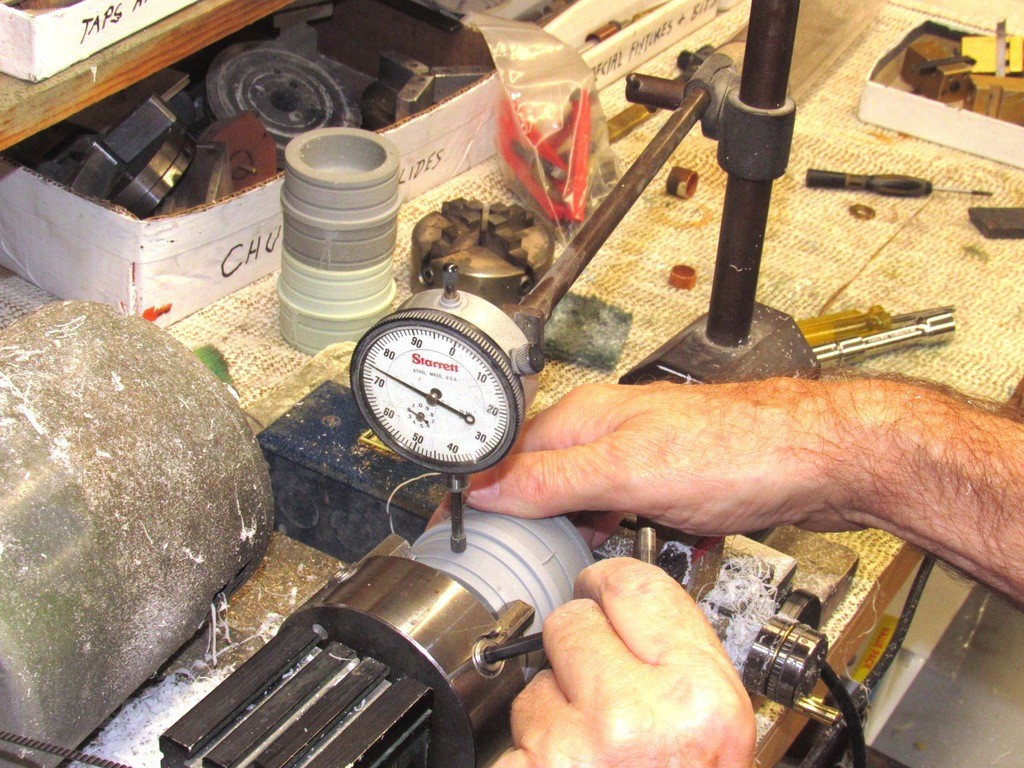
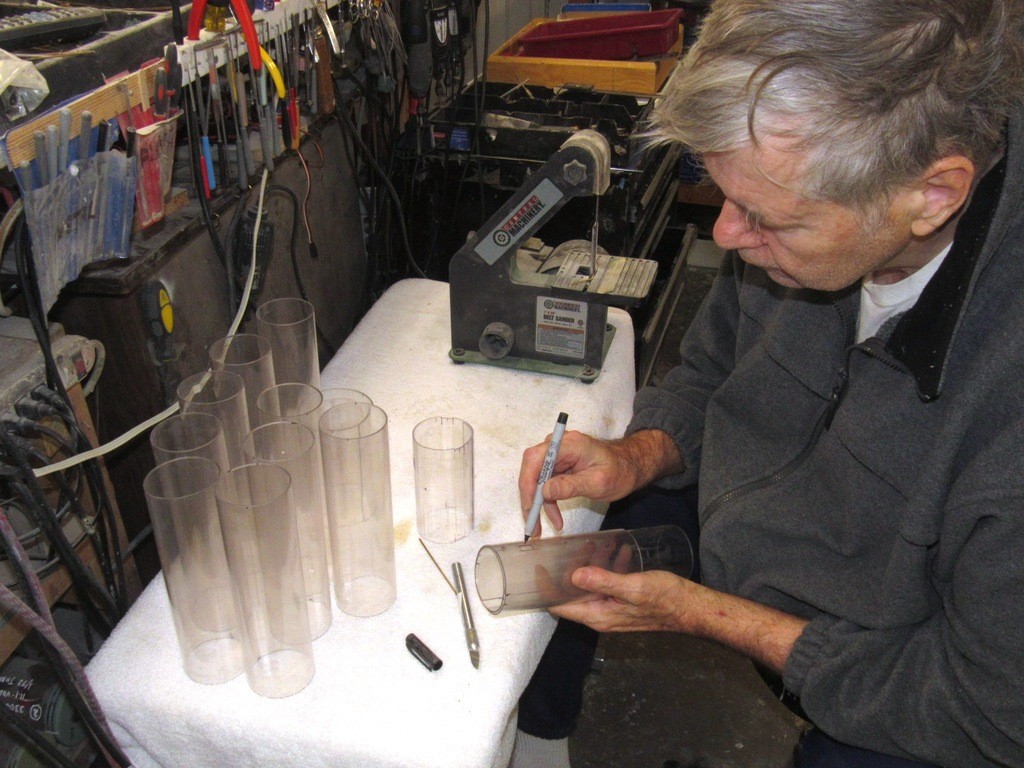
    On the table is the after dry space with attached motor bulkhead. A test cap has been installed. A flexible hose making up to the test cap permits me to blow some air into it, slightly pressurizing the space as I dunk it in the test tank and look for escaping bubbles. This is how I perform the initial leak test on all components that must possess water tight integrity.

    today's work - Page 2 OH1iJZ
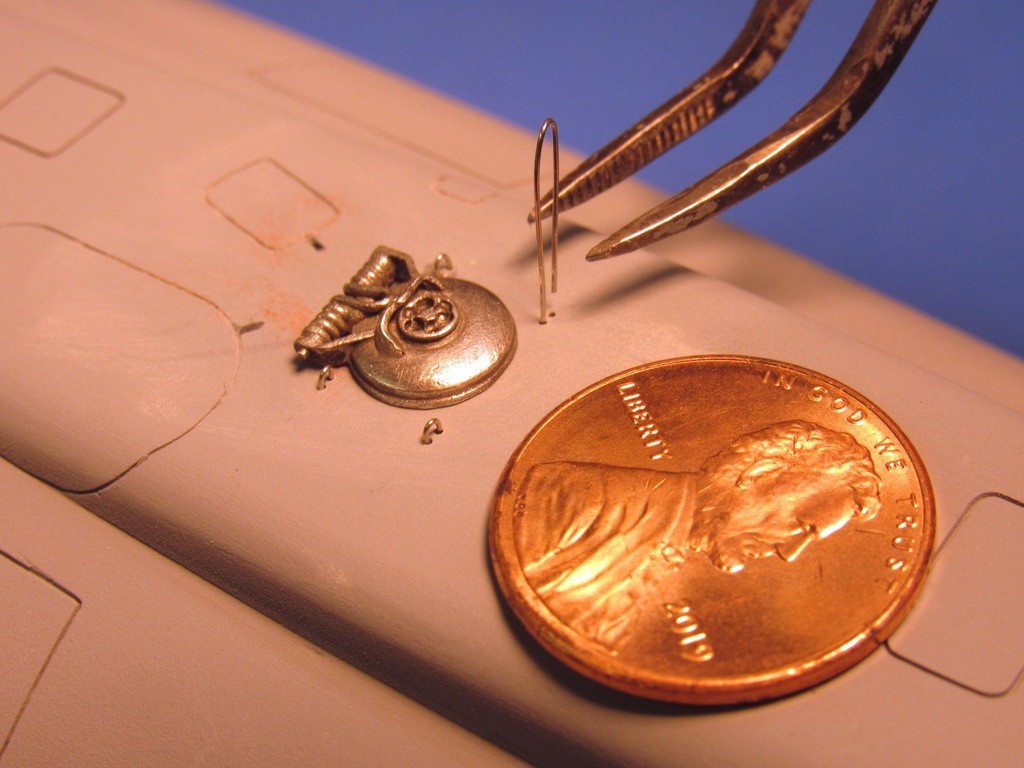
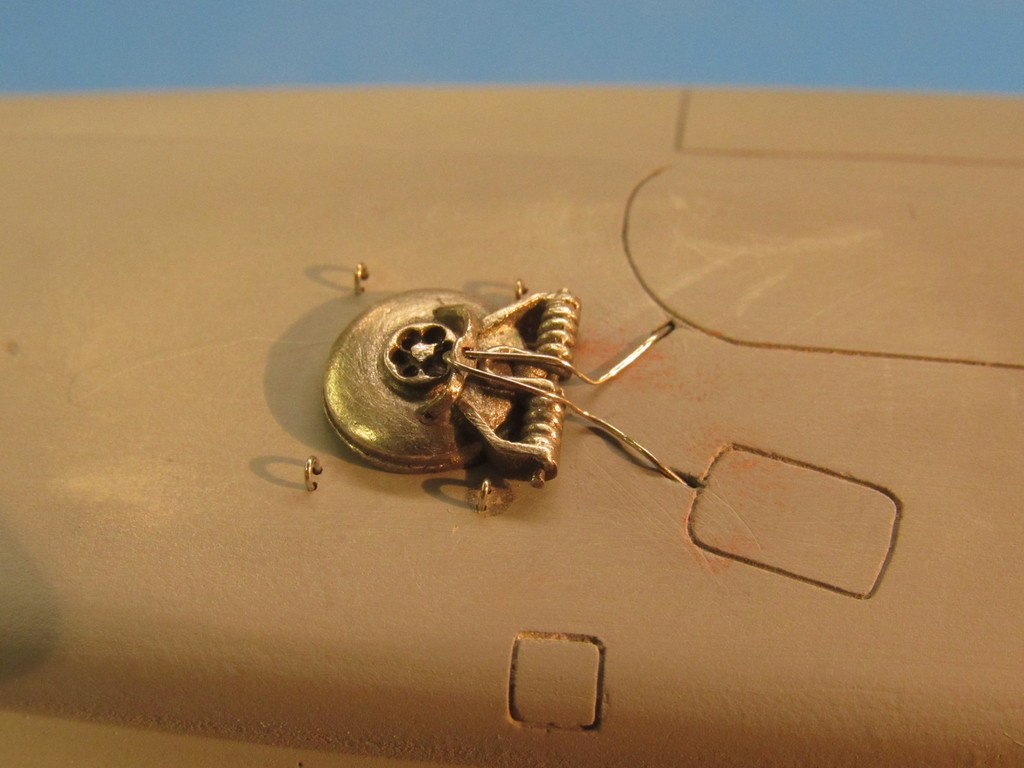
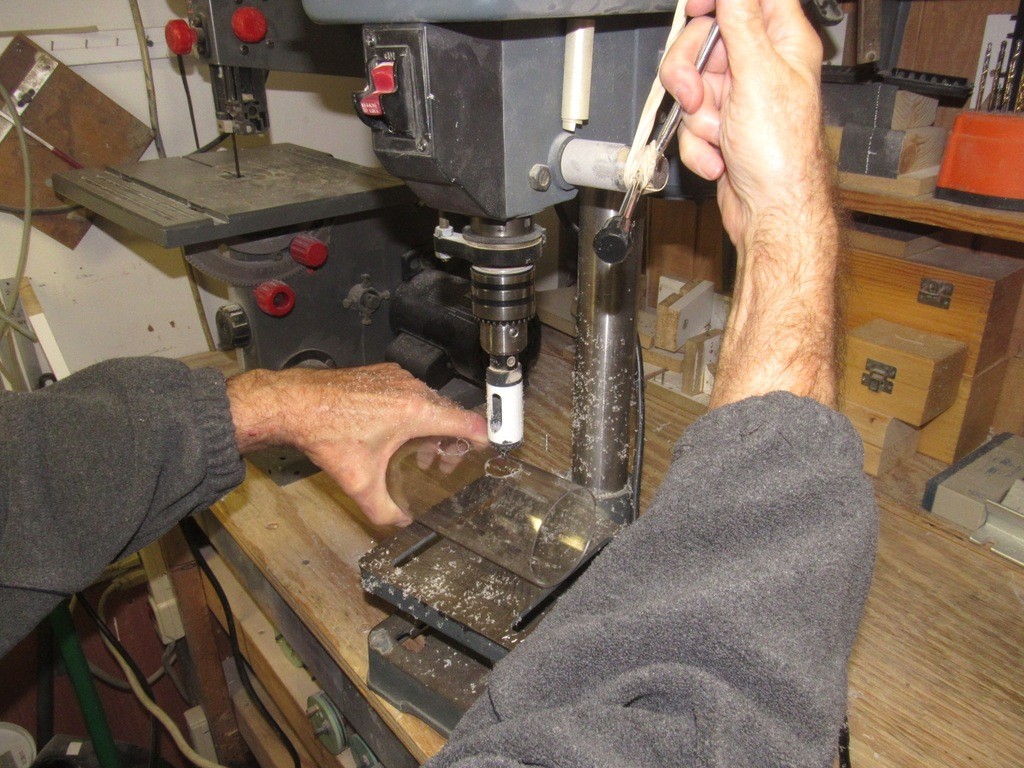
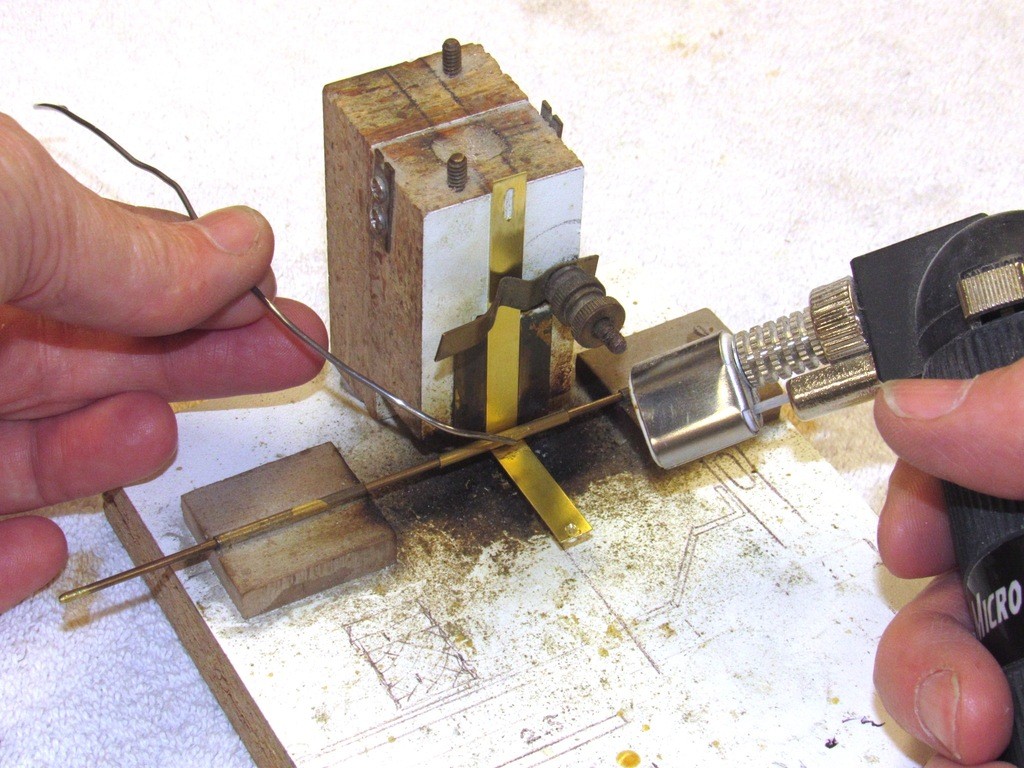
    Here I’m preparing a motor bulkhead for its leak test by inserting blanking rods through the three open pushrod seals. The antenna nipple is also blanked off with a short length of flexible tubing capped with a piece of rod.
    Typical points of leaks on this item is typically around the O-ring seal at the base flange of the drive-shaft seal foundation, the drive-shaft seal itself, around the three pushrod seal bodies, and the two O-rings between the motor bulkheads radial flange and Lexan cylinder.

    today's work - Page 2 Y4aHDH

    The leak testing itself is a simple affair: blow air into the cylinder, dunk the unit underwater, and look for bubbles. Typical fixes include packing in more silicon RTV sealant around pushrod seal bodies, tightening the shaft seal flange fasteners, or replacing the radial flange O-rings with O-rings of slightly bigger diameter. Yes, this test presents a differential pressure in the wrong direction, but is most useful in finding gross leaks. However, careful production work results in most units passing the gross and later certification leak tests without incident.

    today's work - Page 2 VrSKfs

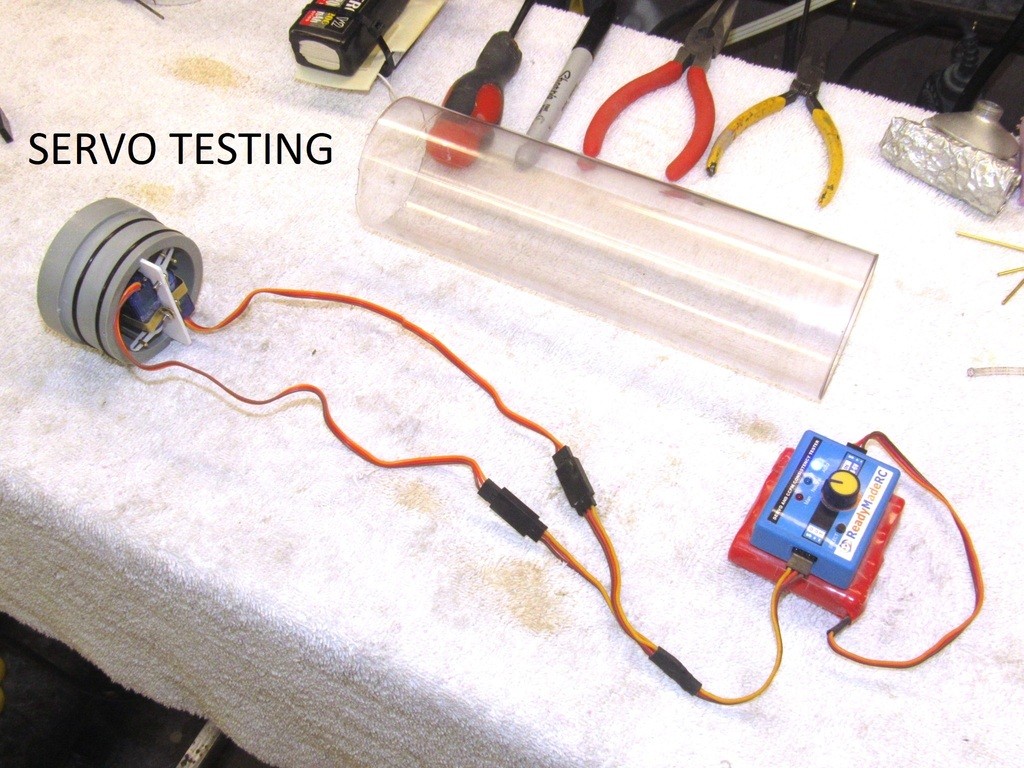
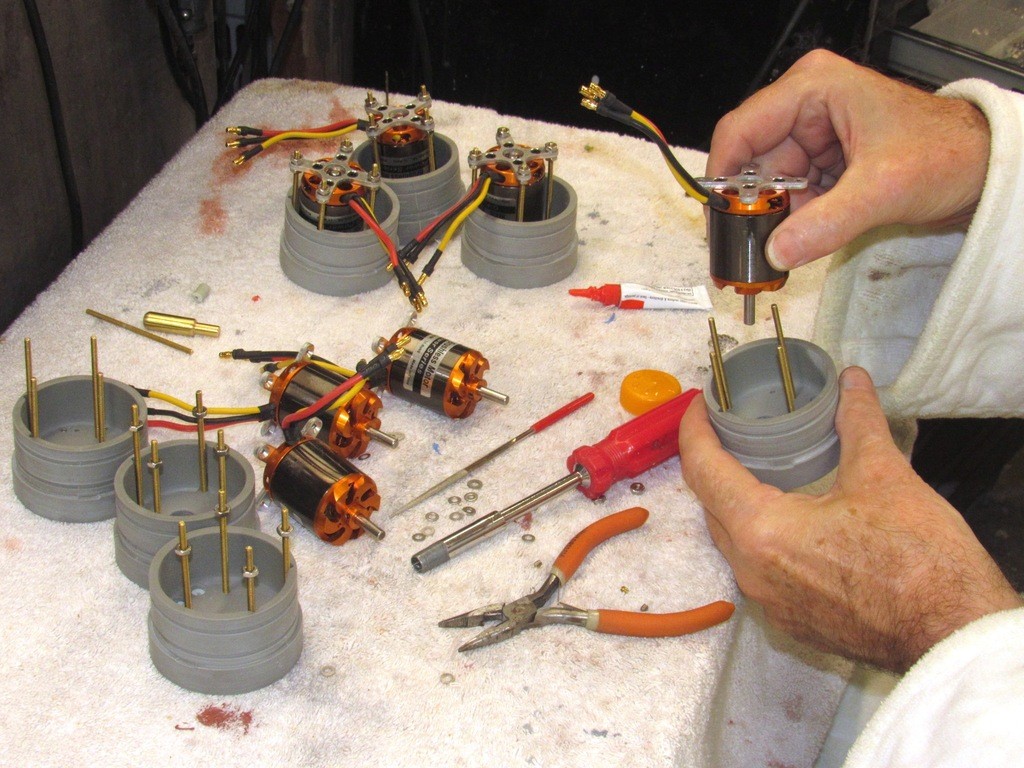
    Though all servos are tested prior to integration into the forward bulkhead, they do get a lot of handling as they are mounted upon their foundation and their pushrods made up to the pushrod seals. So, as a precaution, I test the servos for correct operation, and non-binding of the linkages, after assembly.

    today's work - Page 2 YLnqOQ

    In addition to the leak-test, the ballast section of the MSD is subjected to a ‘certification’ process. This is a test of the ballast sub-systems ability to flood and blow ballast water in and out of the tank, and to do so by either taking external air from atmosphere, through the snorkel on or near the surface; or to draw a suction from the limited amount of air within the two dry spaces of the system, which would be the case when the snorkel is submerged.

    A brief study at this schematic will give you some idea as to how air is either drawn from atmosphere or from the dry spaces within the system. Of note is the safety float-valve. Its job is to isolate the dry spaces from any water that may leak into the induction plumbing – be that leak the result of a faulty snorkel or break in the induction line between snorkel and the MSD. Not illustrated is a conduit between the two dry spaces which makes them common as to their atmosphere.

    today's work - Page 2 MAg8BZ

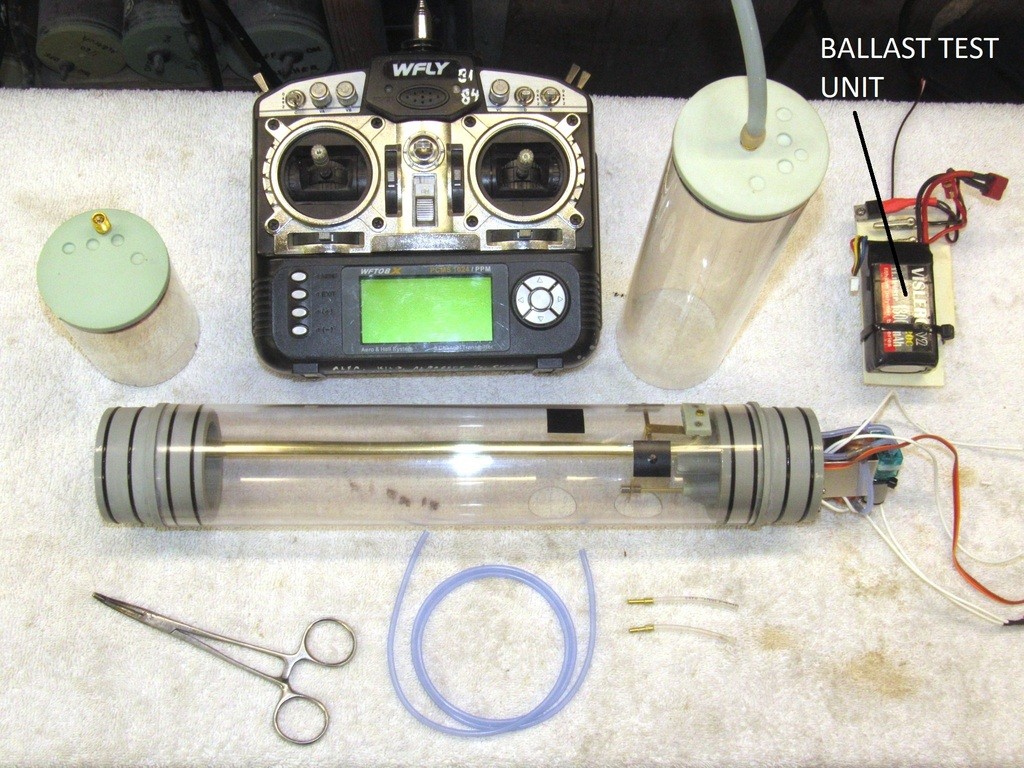
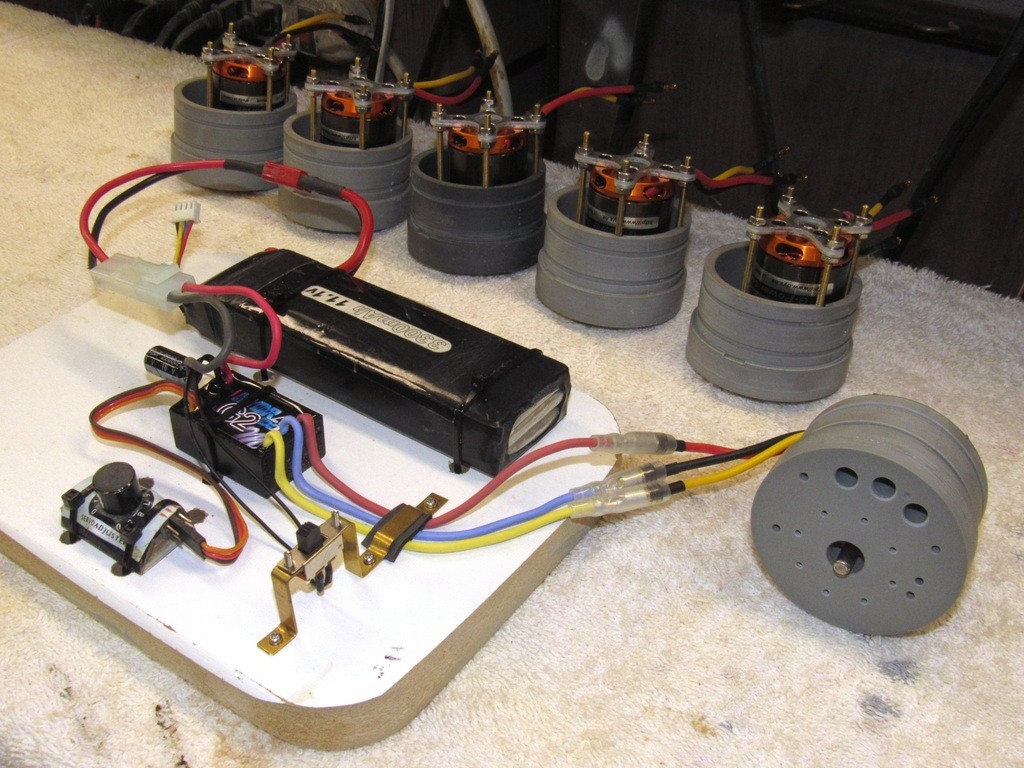
    During the certification process the forward and after dry spaces are represented by short lengths of capped Lexan cylinder, diameter dictated by the type unions used by the ballast tank. The ‘ballast test unit’ is installed within the after dry space.

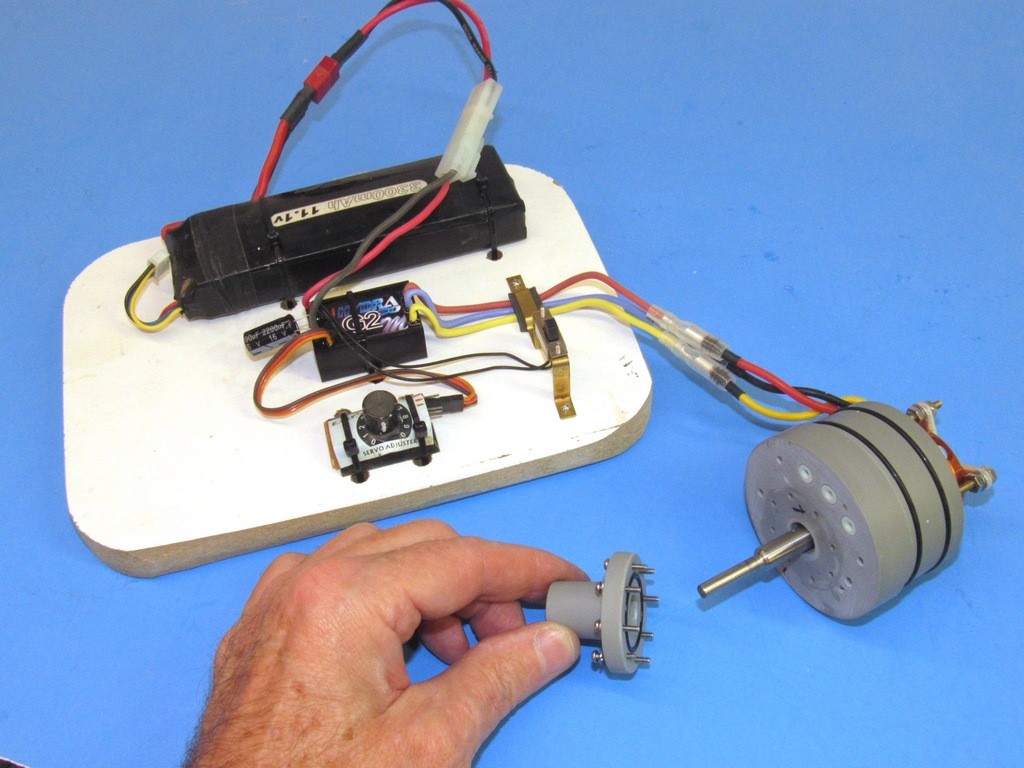
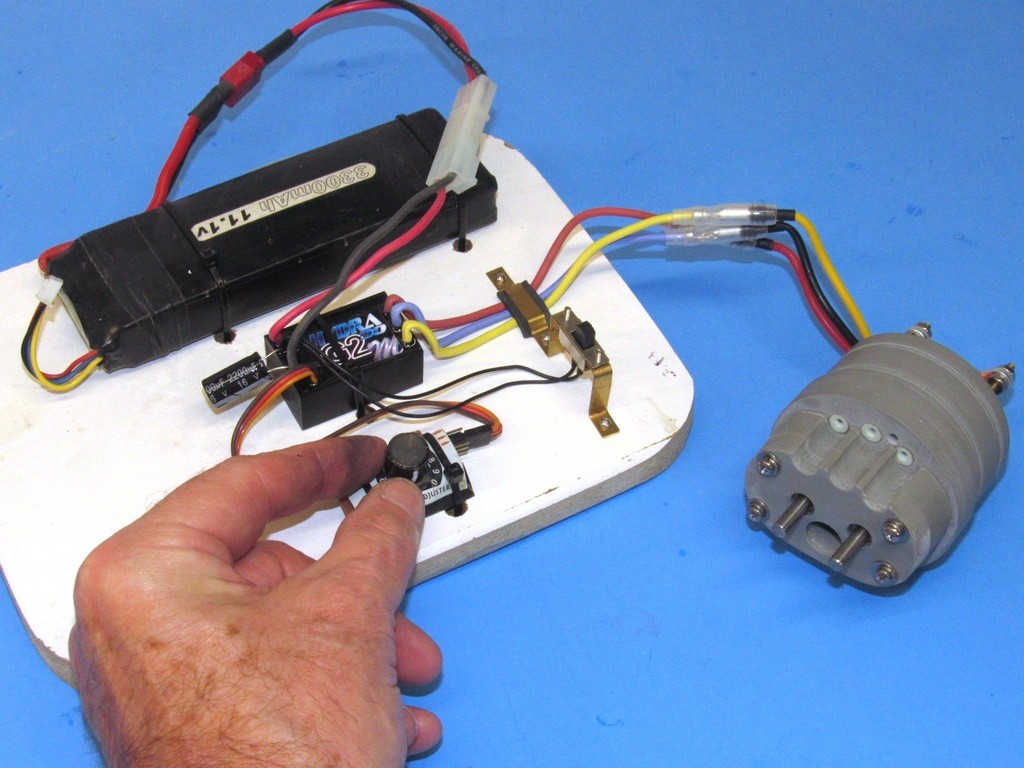
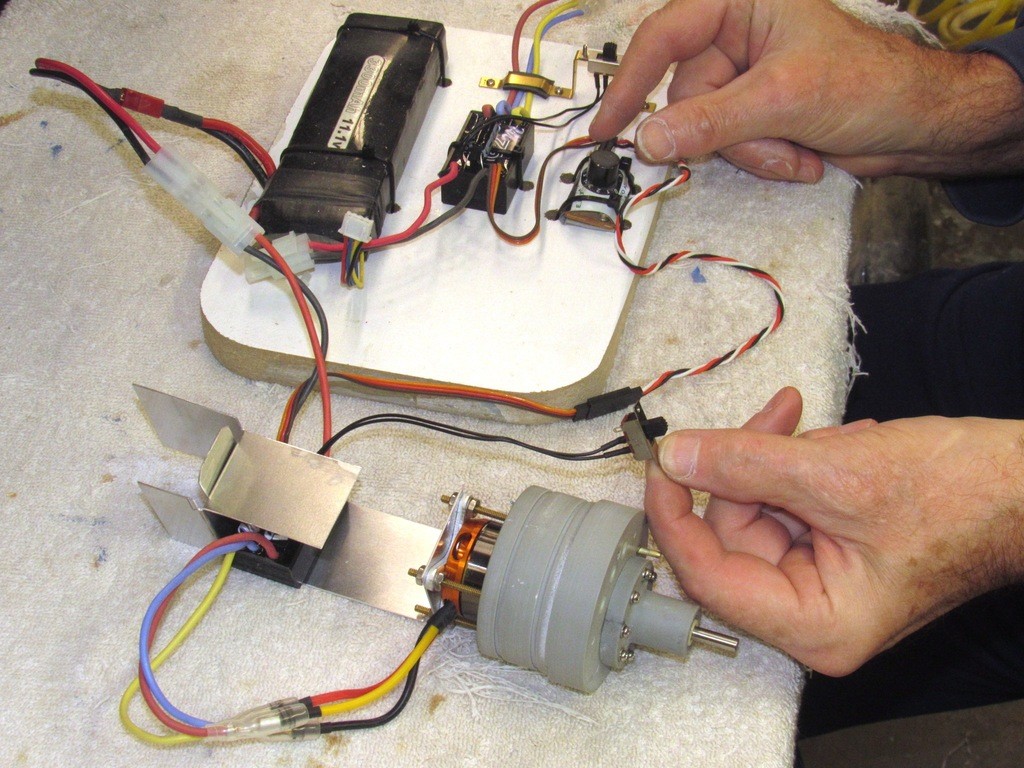
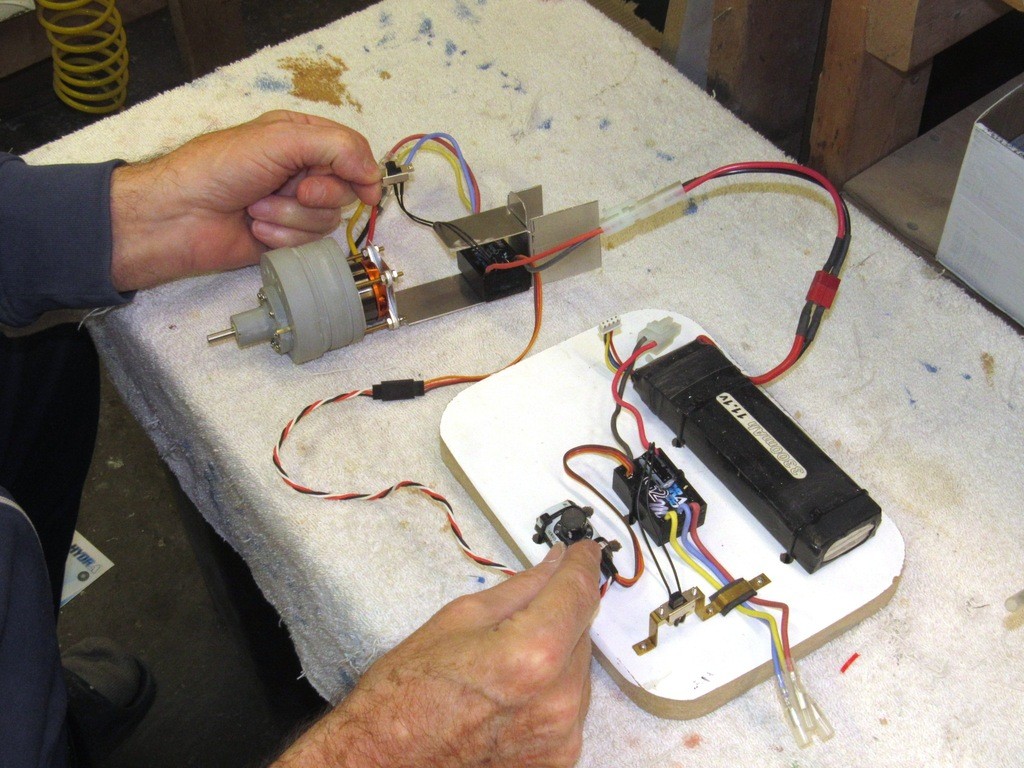
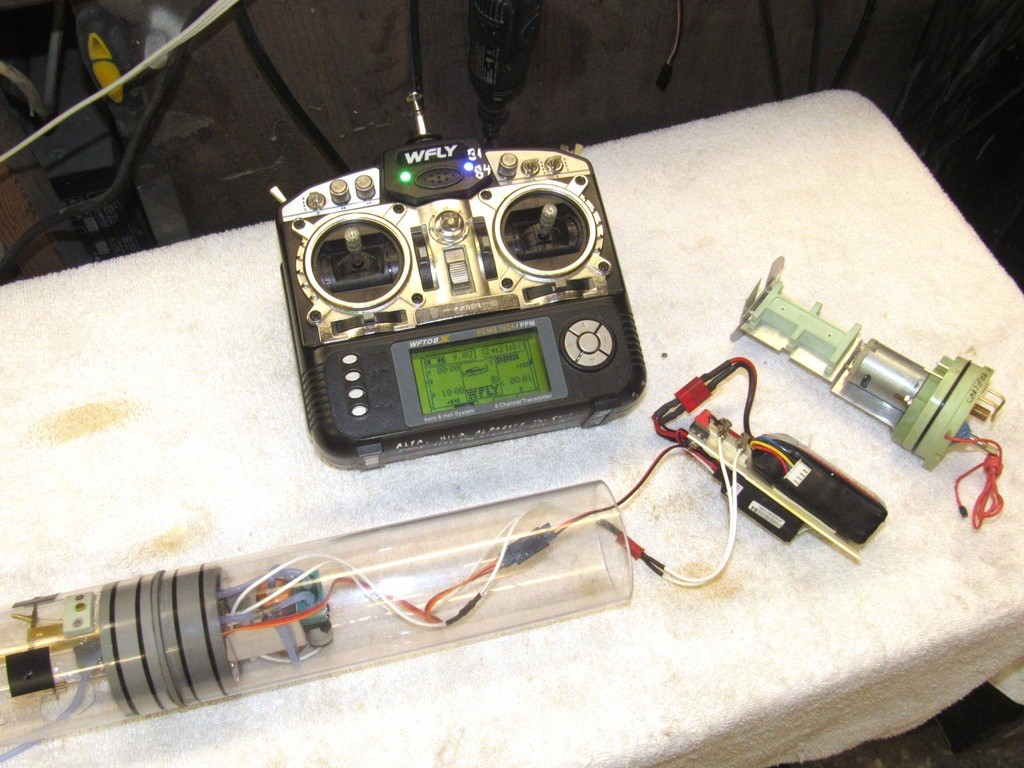
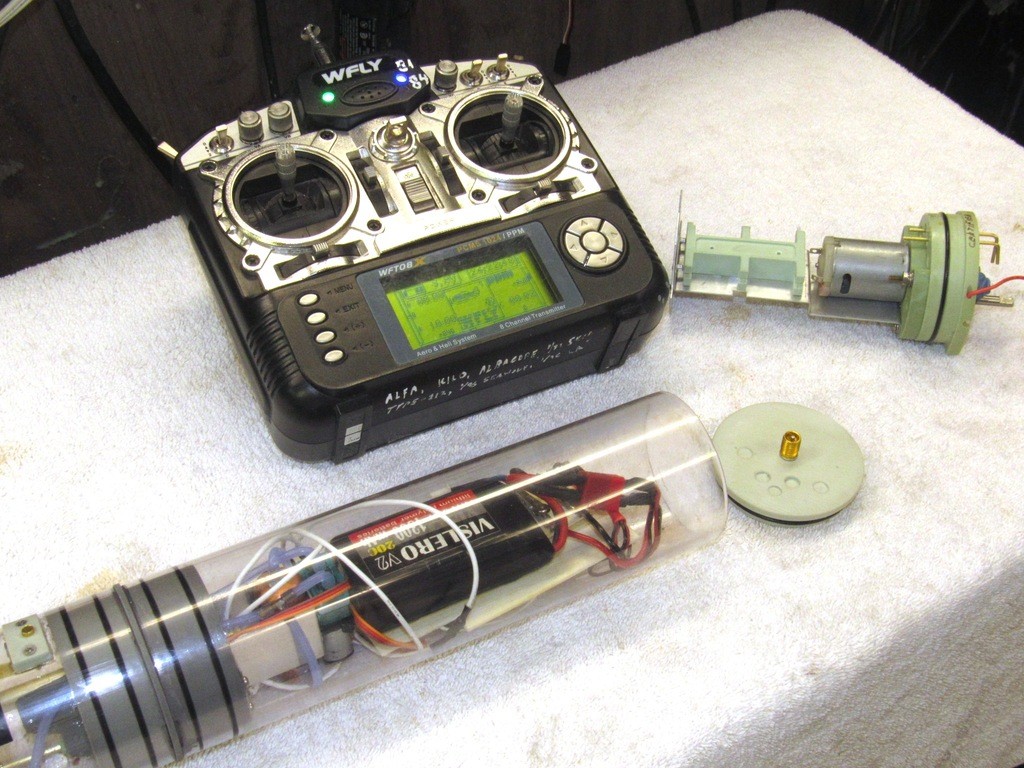
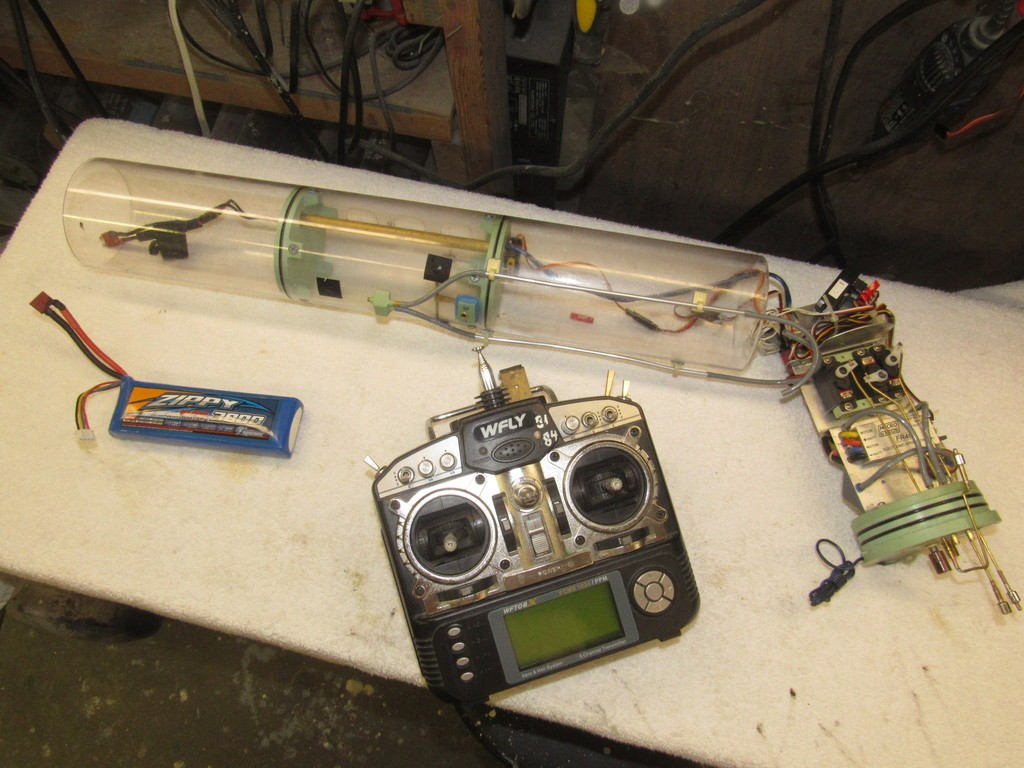
    The job of the ballast test unit is to both power and control the operation of the ballast sub-systems servo and low pressure blower (LPB), a modified two-stage diaphragm pump – this type positive displacement pump has the ability to handle both gas and liquid without damage or leakage.

    The ballast test unit is outfitted with an 11.1-volt battery, 5-volt voltage regulator (to power the receiver and receiver bus), and a pair of alligator-clips that make up to the LPB’s power leads (a voltage dropping resister establishes the 3-volts preferred by the LPB’s motor). The compact test unit fits within a short length of 2.5” diameter Lexan cylinder as the ballast sub-system is put through its paces in the test-tank.

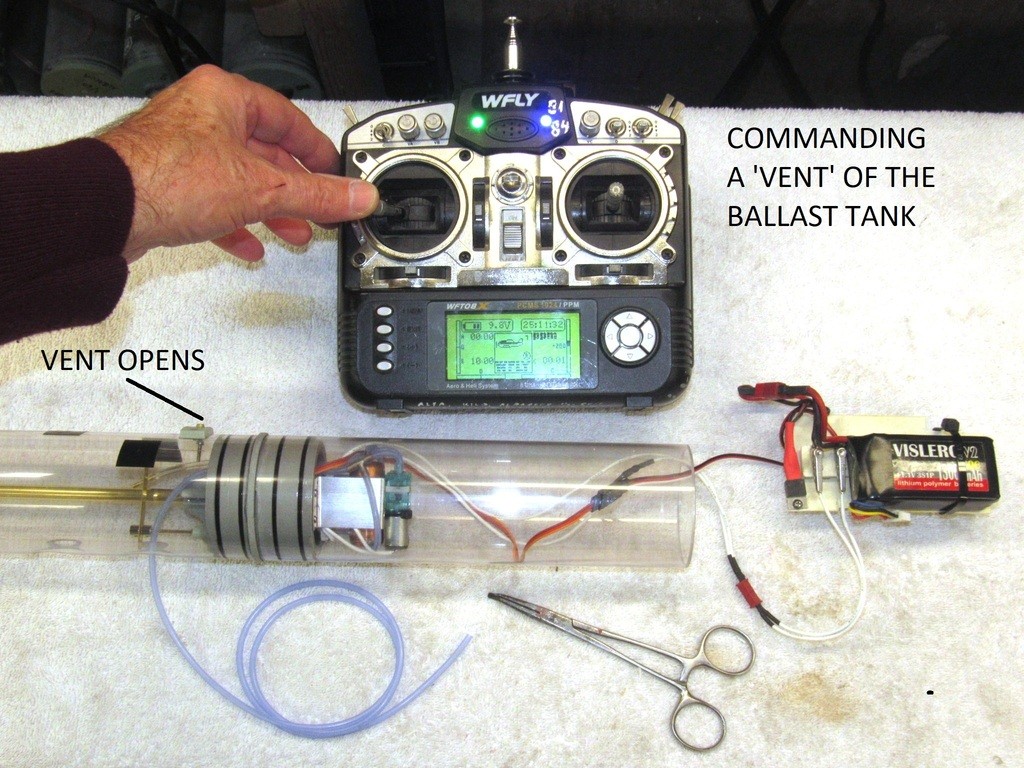
    The transmitters left stick, its left-right throws specifically, controls the ballast sub-system.

    Center-stick maintains the vent valve closes and the LPB motor off.

    Left stick and the servo positions the vent valve open and the LPB remains off – air within the ballast tank escapes and is displaced by water rushing in through the open flood-drain holes in the bottom of the ballast tank.

    Right stick and the vent valve closes and the LPB motor runs driving air (either from the surface through the snorkel induction hose or from within the MSD’s dry spaces) into the ballast tank driving the water out the flood-drain holes.

    Through calculation, practical testing, and dumb-luck the volume of the ballast tank is sized to contain a weight of water equal to the weight of the water displaced by the submerged portions of the submarine that reside above designed waterline. A dry ballast tank and the submarine floats at the designed waterline. Ballast tank full of water and the submarine submerges and assumes almost perfect neutral buoyancy. By changing the submarines weight with a ballast tank is described as ‘static diving’ -- the submarine requires no other force to hold the submarine underneath the surface.

    Before getting into the certification steps, let’s take a closer look at the MSD’s ballast tank and how it works:
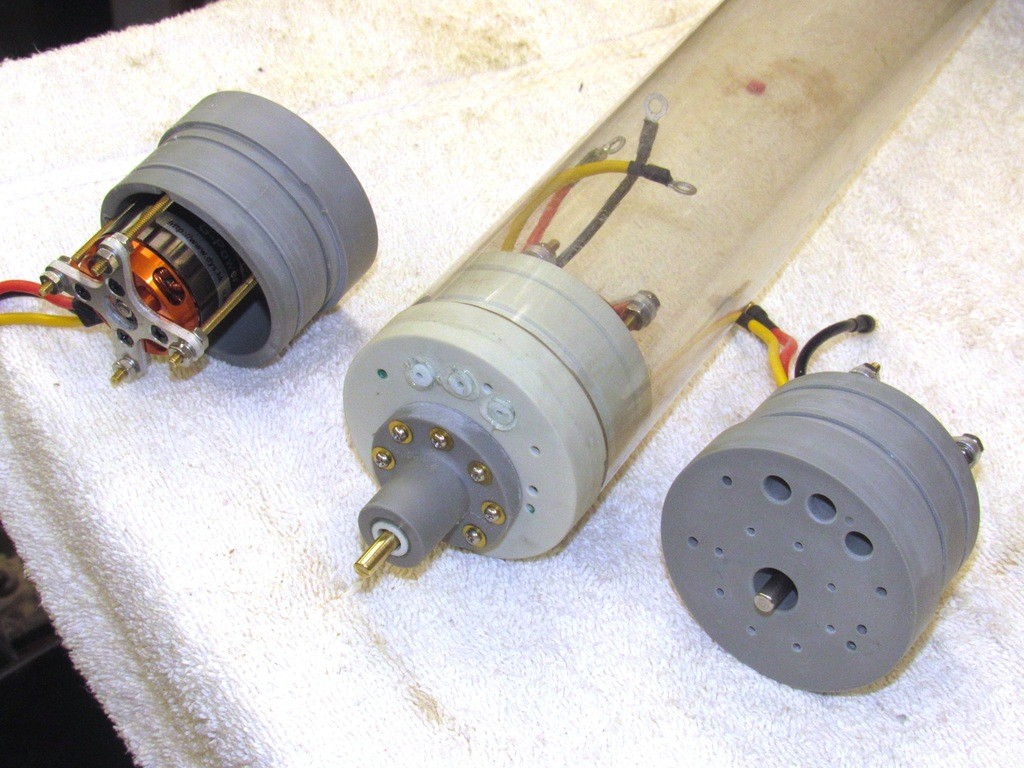
    To the right is the after ballast union piece that mounts the LPB, ballast servo, LPB limit-switch, and safety float-valve. That brass tube running the length of the ballast tank is a conduit which passes the servo and power wires between the two dry spaces, it also insures that the two dry spaces share the same atmosphere. The after face of the after ballast union is the dry side and makes up to the after dry space cylinder. To the extreme left of the ballast tank is the forward ballast union that interfaces between ballast tank and forward dry space.

    today's work - Page 2 TQnedH

    Here we’re looking at the after ‘dry’ side of the after ballast union. The ballast servo operates a pushrod that passes forward, through a watertight seal, into the wet forward face of the union. The pushrod makes up to the linkage that operates the ballast tank vent valve (mounted atop the ballast tank), and an optional emergency gas blow-valve.

    Incorporated onto the strap that holds the servo in place is a limit-switch that is actuated by the swing of the servo output bell-crank. The limit-switch closes when the servo travels about 20% to the ‘blow’ position, energizing the LPB’s motor.

    Two pass-through brass tubes serve to route snorkel induction and LPB discharge air between wet and dry spaces.

    today's work - Page 2 9RY3uy

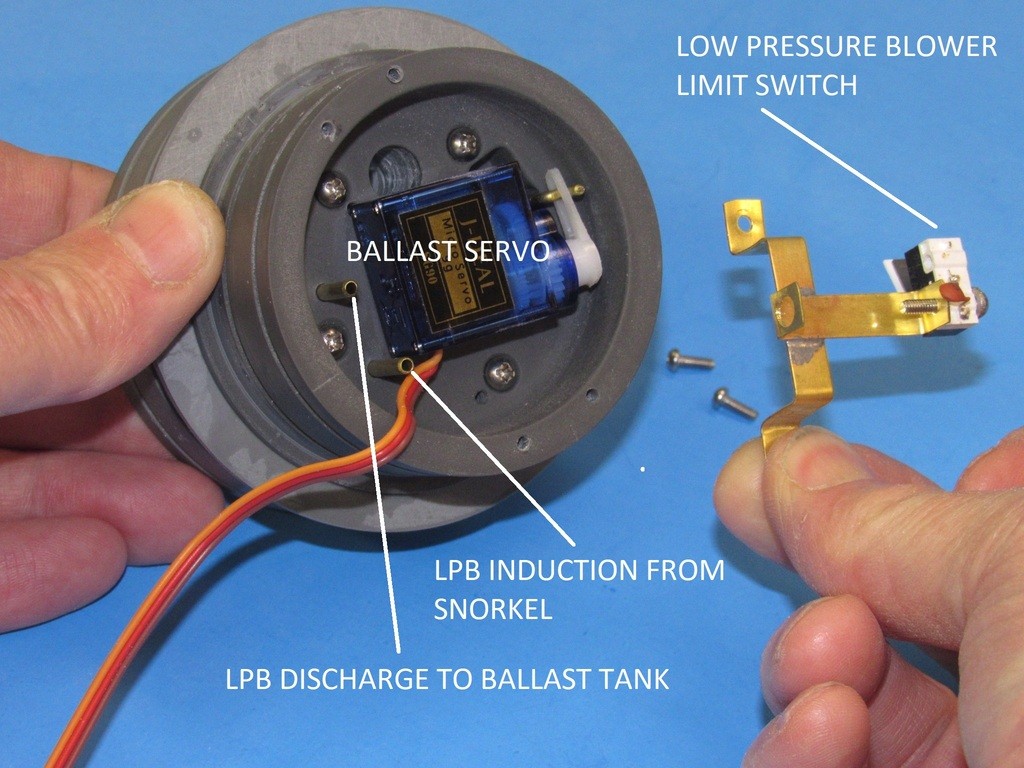
    The LPB and safety float-valve attach to an aluminum mount which in turn is secured to the radial flange of the unions dry side. Flexible hose and a T-fitting route air between LPB, safety float-valve and the two brass tubes set into the union.

    The safety float-valve permits air to pass into or out of the dry spaces through the induction line, but will close in the event any water gets into the induction side of the plumbing, this to prevent inadvertent flooding of the dry spaces should the snorkel stick open or the flexible line between snorkel and after ballast union develop a leak. Old submarine practice: TWO-VALVE PROTECTION FROM SEA!

    today's work - Page 2 CuWCRW

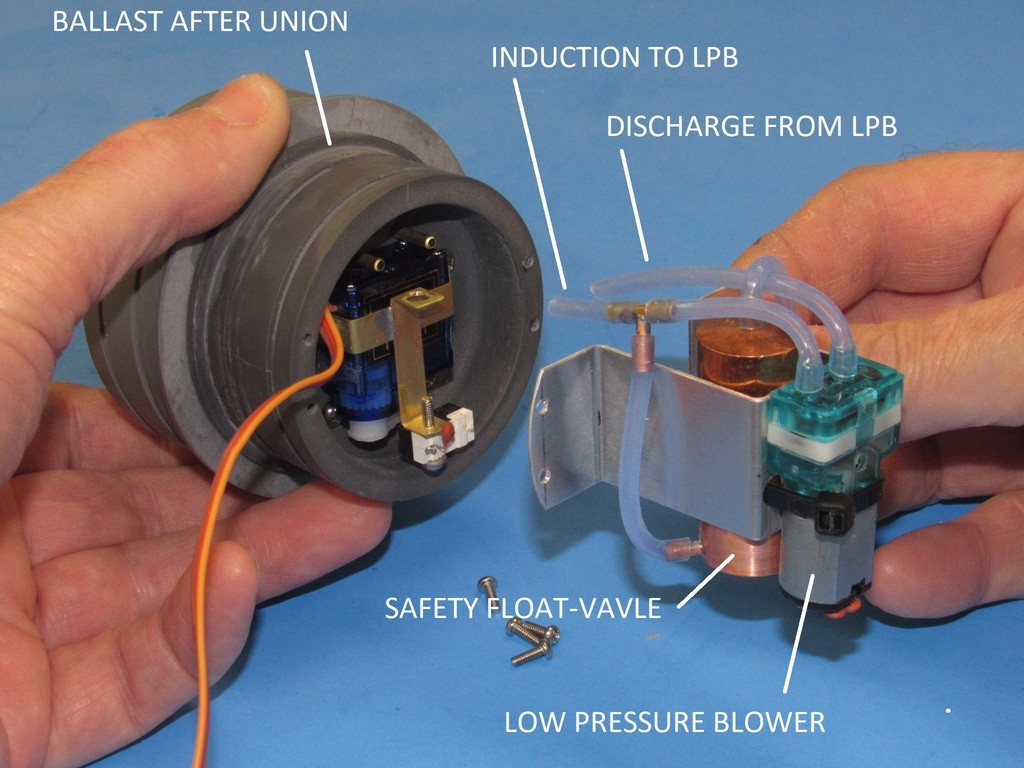
    Here you see the wet forward face of the after ballast union. Note the foundation at its center, this accepts the blow-valve of an optional gas type ballast back-up should the client elect to add that feature (recommended if the submarine is to be operated in open water, an extra measure to assure surfacing should the model get away from you).

    The brass tube induction nipple makes up to a flexible hose that runs out one of the two flood-drain holes at the bottom of the ballast tank and extends up to the snorkel valve, high up within the submarines sail. The discharge nipple pumps air into the ballast tank directly, blowing ballast water out, surfacing the boat.

    An encapsulated O-ring, positioned into the tool during the union casting process, makes the watertight seal between union and brass conduit.

    today's work - Page 2 DN0vTX

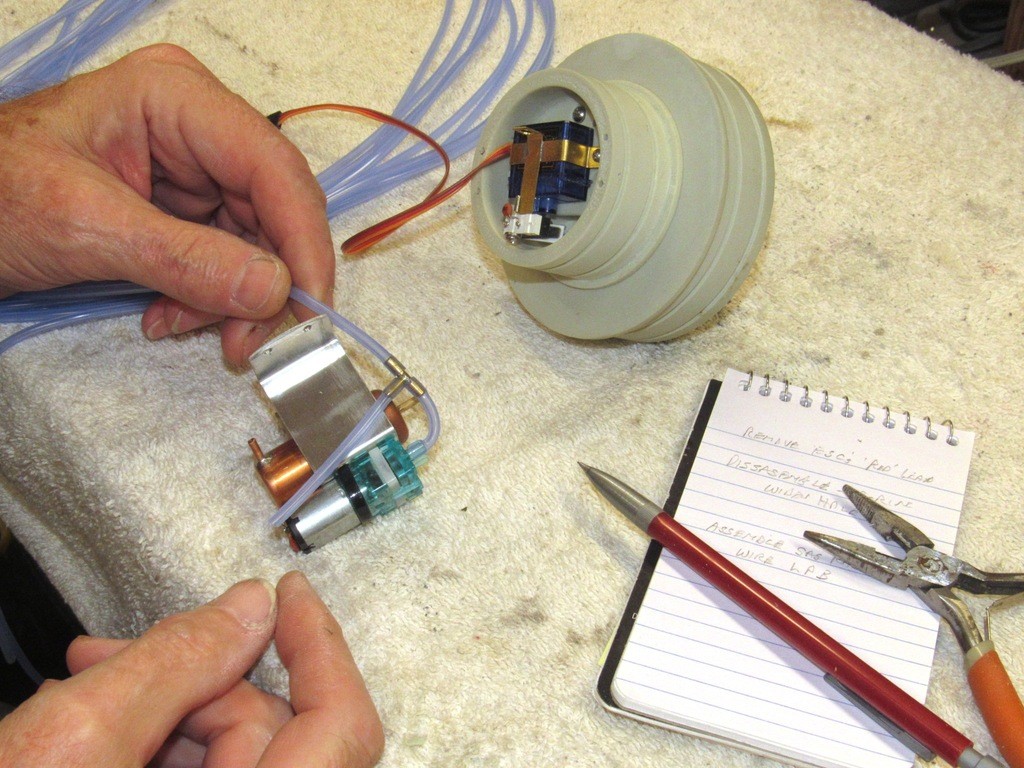
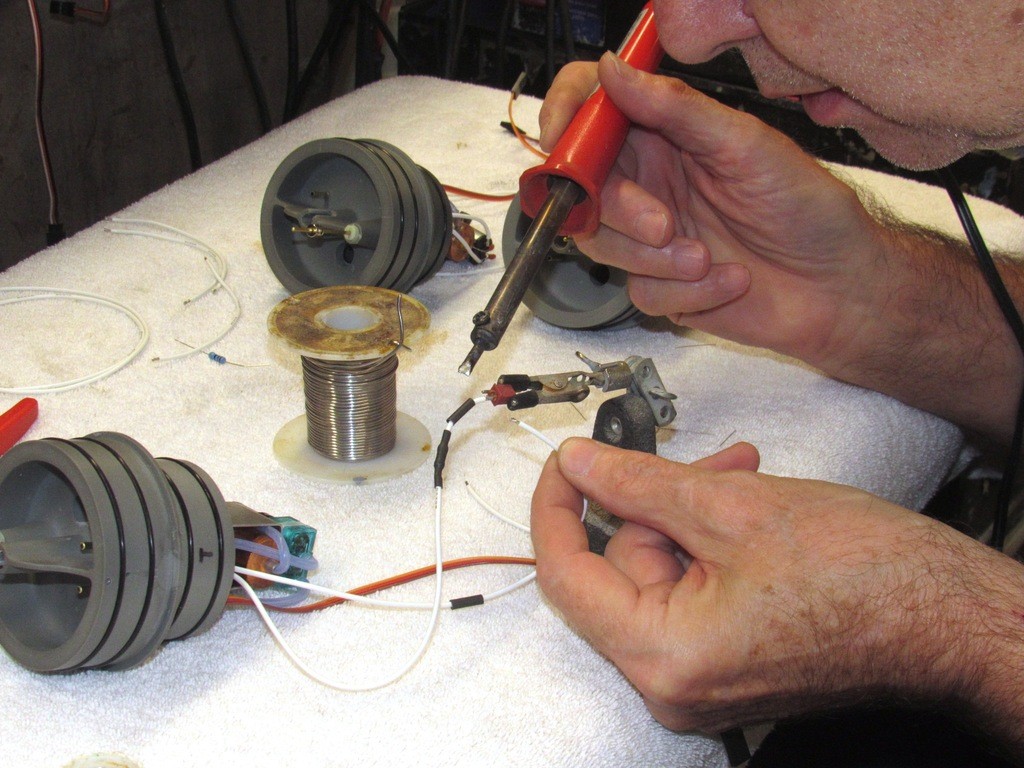
    Here I’m demonstrating operation of the SemiASperated (SAS) ballast sub-system elements, the test unit is wired up to the servo and LPB. I operate the devices remotely from the transmitter.

    This is pretty much the condition of things during the SAS certification process. For clarity I’ve left the test unit outside its cylinder.

    Left-stick – dive.

    today's work - Page 2 8LK3tn

    When the transmitter stick is shoved to the ‘blow’ position, the vent is closed and the servo bell-crank closes the limit-switch causing the LPB to pump air – from either the dry spaces of the MSD or from atmosphere through the open snorkel valve – into the ballast tank, emptying it of water. The submarine assumes surface trim and floats at the designed waterline.

    Right-stick – surface.

    today's work - Page 2 YsIioN

    SAS certification is done with the unit submerged. But before that I do one last leak check with the fully assembled system.

    today's work - Page 2 LIQx1o

    The system is held underwater in the test tank.

    First, the tank is vented, flooding it. The vent valve is checked for reliable operation and the flood rate it noted.
    I then command a blow (the induction flexible hose is out of the water so the LPB can draw air from atmosphere).
    Once the tank is blown dry I note the blow rate and check for no leakage at the vent valve.

    The ballast tank is again flooded, and the external induction line crimped off with a hemostat, simulating a closed snorkel valve. A blow is commanded, but this time the SAS is compelled to draw air from within the systems dry spaces. Typically there is enough volume within the dry spaces to achieve a blow that empties at least 1/3 of the ballast water before back-pressure builds to a point where it stalls the LPB. However, the amount of ballast water is blown overboard is enough to cause the simulated submarine to head to the surface where the snorkel would open once again taking air from atmosphere, unloading the LPB, breaking the slight vacuum created within the dry spaces, and the blow continues till the ballast tank is completely dry.

    The system is pulled out of the water and the induction hose removed, the partial vacuum within the system is broken and the system again pushed underwater. This time with the induction tube open to sea, simulating a stuck open snorkel valve and/or a leak in the induction hose. The blow command is sent and the LPB operated till it stalls as its pump is hammered by incompressible water. If the safety float-valve did its job there should be but a few drops of water within the after dry space. Once all test steps are passed the system is deemed certified and ready for packaging.

    today's work - Page 2 O8a7sd

    And that’s my story, and I’m sticking to it!

    My credentials, you may ask?

    OK.

    I barely graduated from High-School, math totally escaped me, but I devoured my shop classes. I LIVED FOR SHOP CLASS! If I had to characterize myself during my public school days: I was the Sheldon Cooper of shop-classes, and just as much a non-conforming jerk.

    I don’t play well with the other children, and never will! I learn things the hard way.

    Still a snot-nosed kid I joined the Navy. In the 60’s if you had a heart-beat they swore you in, no questions asked. I did some time in the Fleet as a Torpedoman; qualified on Submarines; and spent the last decade of my career as a salvage and ships husbandry Diver.

    I’m not school-smart. However, I can read, am clever, stubborn, tenacious, meticulous (when focused on those things that interest me), and one hell of a model builder. I started scratch-building at age-five.

    I’m an intuitive mechanic and, as with all men in my clan, I have smart hands.

    It’s genetic. To this day it takes only a whiff of burnt flux, hot green-sand, wood pitch, cutting oil, or blue-print ammonia; the sounds of a machine shop; or the sight of a meticulously blued-and-scratched sheet-metal lay-out to make me smile and nod in appreciation.

    I love this shit!

    Glad to meet ‘cha.

    today's work - Page 2 19mhxN

    today's work - Page 2 8kg41j

    today's work - Page 2 D4wdqS
    david f
    david f
    AMS Treasurer


    Posts : 2395
    Join date : 2010-11-10
    Age : 73
    Location : Cumbria

    today's work - Page 2 Empty Re: today's work

    Post  david f Mon Mar 09, 2020 8:58 am

    Great set of photos, Dave!

    (And I see that you are a "hard-hat" diver too. Respect!)

    David
    merriman
    merriman
    Guest


    Posts : 347
    Join date : 2011-10-16
    Age : 75
    Location : Virginia Beach, Virginia

    today's work - Page 2 Empty Re: today's work

    Post  merriman Mon Mar 09, 2020 11:19 am

    david f wrote:Great set of photos, Dave!

    (And I see that you are a "hard-hat" diver too. Respect!)

    David

    Air only, I never qualified for mixed-gas.

    David
    merriman
    merriman
    Guest


    Posts : 347
    Join date : 2011-10-16
    Age : 75
    Location : Virginia Beach, Virginia

    today's work - Page 2 Empty Re: today's work

    Post  merriman Thu Mar 19, 2020 2:19 am

    today's work - Page 2 NjFvZ0

    today's work - Page 2 EhAe0x

    today's work - Page 2 XpoWeP

    today's work - Page 2 RFNoAc

    today's work - Page 2 S6xh0w

    today's work - Page 2 AnXmG2

    today's work - Page 2 D3PNcD
    rwtdiver
    rwtdiver


    Posts : 2
    Join date : 2019-05-20
    Location : Gilbert, Arizona

    today's work - Page 2 Empty Re: today's work

    Post  rwtdiver Fri Mar 20, 2020 9:15 pm

    Hi David,

    I again was just looking at your WIP blog! Through it all, I have NEVER seen such perfection in anyone's workmanship!

    I for one appreciate you putting your work out on line! It certainly inspires me (as a pin headed newbie) to see what is possible if you work hard and then learn, learn, and learn some more!! study

    Thanks David!

    Rob

    "Firemen can stand the heat"
    merriman
    merriman
    Guest


    Posts : 347
    Join date : 2011-10-16
    Age : 75
    Location : Virginia Beach, Virginia

    today's work - Page 2 Empty Re: today's work

    Post  merriman Fri Mar 20, 2020 10:30 pm

    rwtdiver wrote:Hi David,

    I again was just looking at your WIP blog! Through it all, I have NEVER seen such perfection in anyone's workmanship!

    I for one appreciate you putting your work out on line! It certainly inspires me (as a pin headed newbie) to see what is possible if you work hard and then learn, learn, and learn some more!! study

    Thanks David!

    Rob

    "Firemen can stand the heat"

    Thank you, Rob. Much appreciated.

    What skills I have today I owe to the many who -- through their articles, books, seminars, workshops, WIP's, and shop-classes -- taught me.

    I stand on the shoulders of the Craftsmen who came before me; the men who took the time to expose me to the ins-and-outs of material selection, material use, machining skills, plan reading, lay-out, fabrication, finishing, display, and the 1001 other thing required to go from raw material to finished article.

    We are all morally obligated to pass-it-down; to keep the Craft alive by instructing those who will survive us the things we learned.

    David
    merriman
    merriman
    Guest


    Posts : 347
    Join date : 2011-10-16
    Age : 75
    Location : Virginia Beach, Virginia

    today's work - Page 2 Empty Re: today's work

    Post  merriman Wed Mar 25, 2020 2:14 am

    today's work - Page 2 YLV0B7

    today's work - Page 2 DGzLsa

    today's work - Page 2 Wll6VZ

    today's work - Page 2 Lxilvw

    today's work - Page 2 KgpUCg

    today's work - Page 2 CzTRAx

    today's work - Page 2 NjFvZ0

    today's work - Page 2 O99SCi

    today's work - Page 2 ElLOkE
    merriman
    merriman
    Guest


    Posts : 347
    Join date : 2011-10-16
    Age : 75
    Location : Virginia Beach, Virginia

    today's work - Page 2 Empty Re: today's work

    Post  merriman Wed Apr 01, 2020 9:23 pm

    Tom Chalfant sold his 1/72 SKIPJACK to a customer and shipped it, along with the SubDriver (SD), to me for check-out. I would then forward the tested ready-to-run r/c submarine to its final destination. That represents two opportunities for the shipping agent to crush and/or loose the contents. The job Tom and I do to prepare these items for transit is vital if things are to survive without need of a re-build.

    Tom double boxed the SD; but elected to use just one box for the submarine model itself. The double-boxed SD was protected by bubble-wrap – a layer between SD and inner box (a mailing tube), and another layer of bubble wrap between inner box and outer box. That SD survived its trip to me with no damage at all. The single-box containing the model hull, miraculously, survived its trip with just a tiny bit of shipping damage.

    I’ve been building models of one sort or another for over forty years, some of that work being shipped considerable distance to the customer. If one is to be successful in this activity you have to learn – usually through the school of hard knocks – how to effectively package the product so it will survive the not-at-all-tender hands of a government or private shipping service.

    Rule number-one in my book of packaging is to double-box the contents. Two-box protection is the minimum care you should take when packaging delicate items like models or SD’s for shipment.

    Suspending the product within the inner box often presents the special problem of working out how to arrange the packing material to bear against the products strong points. Sometimes those strong points have to be built into the model in anticipation of the demands of packaging later. You have to take into account the G loads presented through rapid and sometimes high accelerations. The packaging bearing against the item must handle multiple G’s when the box is invariably dropped, kicked, rolled, speared with fork-lift forks, and tumbled into the delivery truck by uncaring, knuckle-dragging goons; idiots who read (if they can read!) a handle with care label as, bet you can’t break this!

    Tom’s an excellent model builder and used the services of the United States Postal Service (renowned for their rough handling of fragile goods) to get the hull and SubDriver to me for assembly, service, testing, and repackaging to its new owner.

    Over the span of a few weeks I received three packages. The first was the r/c system – the receiver (two actually) and transmitter – sent to me by the guy who would eventually receive the RTR SKIPJACK model submarine.

    today's work - Page 2 Ns1CWS

    Tom mailed me the SubDriver (SD), pictured below, and the SKIPJACK hull.

    The SD is the system that propels, controls, and manages the ballast water; the means of animating the model submarine. It keeps all those devices that need to operate in a dry environment … err … dry. Tom sent me a completely outfitted SD with the delicate servo pushrods projecting from the after end – a real challenge to package in a manner that would preserve these items unbent! Note the disc shaped specialized packing used to protect those pushrods from any unwanted axial or lateral shifting of the SD within its inner box/mailing tube.

    The single piece Lexan cylinder is divided into three compartments by two internal cast resin bulkhead. The forward dry space, to the left houses the propulsion battery, the center ballast tank, and to the right the after dry space that houses the propulsion and control devices. The r/c system typically controls five functions: rudder, stern planes, bow planes, ballast, and throttle.

    today's work - Page 2 Y1bG97

    Rule of thumb is to package the contents to survive a three-foot drop. I can assure you, there are some Gorilla’s in the shipping pecking-order that regard damaging a product through deliberate miss-handling a badge of honor among their fellow troglodytes. Pack your box(s) with those thugs in mind! That’s why I double-box a model for shipping. But, Tom just went with one box for the hull. He got lucky!

    Looks can be deceiving. This Frankenstein looking box hid a very well thought out and applied packing that got an entire, fragile, polystyrene plastic model submarine of a SKIPJACK hull through the mail system with hardly any damage.

    today's work - Page 2 3bYINf

    I would have removed the removable items like the two rudders, propeller, and sail and placed them safely within the hull, but Tom elected to package everything assembled. And he got away with it! As you can see he suspended the hull at the center of wide box with the aid of foam supports, two sets that girdled the model and kept it centered within the box, rigid against transverse forces. Two foam-in-place plugs protect the model against axial forces -- one at the stern, and one at the bow.

    today's work - Page 2 WJudPr

    A statement as to the effectiveness of Tom’s packaging is the fact that neither the sail, sail planes, stern stabilizers and rudders were damaged in any way. The model remained centered in the box, secured by the two sets of foam supports and kept axially stable by the forward and after foam-in-place plugs. A well designed and executed packaging arrangement!

    today's work - Page 2 H8U8R8

    Ugly-as-sin, this ‘blob’ is a bag containing expanded foam that started life as one of those benign foam-in-place packaging aids. And that’s how Tom used this neat product – to create a rigid, conformal cushion at the bow and stern of the hull. The job of the two semi-rigid plugs is to prevent excessive axial motion of the model within its shipping box. They worked like a charm. Well, almost. The screw did get bent a bit -- more on that little hick-cup later.

    today's work - Page 2 2mmOW2

    I got to hand it to Tom. Cutting up that coffee-cup like he did to protect the propeller was a neat trick. But … Damn, Tom! How come you didn’t just take the screw off and ship it within the protective confines of the hull??!!

    Well???.... How come, Tom???!!!!!!

    today's work - Page 2 R5w5ch

    The only damage, and almost of no consequence, was one blade of the five-blade propeller was bent forward about 1/8”. A testament at how well the model submarine was suspended within the single shipping box. All kidding aside, Tom did a great job packaging this model.

    The propeller fix was easy: I mounted it on a spindle secured within the chuck of my little Taig lathe, but only doing so after unplugging the machine to insure I did not power up the chuck – in this application I’m only using the machine to rotate the propeller as I used the tip of a tool to measure the rake of each blade as I rotated the chuck by hand.

    The white metal (95% Tin, 5% Antimony) is relatively soft and very malleable, so it was an easy task to push the offending blade back into symmetry with a little finger pressure. No, not that finger! The whole fix took all of five-minutes.

    today's work - Page 2 TpKFGJ

    There is plenty of volume within the hull of the 1/72nd scale model SKIPJACK submarine. As the sail and sailplanes are removable it’s a mystery to me why Tom did not elect to remove those items from atop the hull, bubble-wrap them, and put them within the hull during the packaging process. Oh, well. What he did worked so I can’t bitch.

    Being a practical r/c submarine the hull had been outfitted with several pounds of lead weight to lower the vehicles center of gravity. This of course raised the mass of the otherwise light-weight structure considerably and added to the magnitude of inertial forces between model and packaging as things were presented with acceleration forces from all directions. But, nothing shifted significantly during shipping. Tom’s excellent packaging job prevailed.

    today's work - Page 2 JOjJFl

    Once the SD system and the hull were removed from their respective boxes and packaging I began the task of getting the SD operational – installing a new receiver and getting it to listen attentively to the transmitter – and integrating the SD with the hull.

    In a separate package, received weeks ago, came the transmitter and two receivers from the new owner. The original r/c system was retained by Tom as r/c systems using the 75mHz band have become unavailable with the nearly universal acceptance by the r/c vehicle community of gear working on the 2.4gHz band.

    Unfortunately, for some reason, I could not achieve a radio link between the transmitter and either of the two receivers sent me by the customer. I’m at a loss as to why. I even threatened these devices with the almost always persuasive, ‘three-pound tuning wand’ but, to no avail.

    today's work - Page 2 2rzIWN

    Tom was careful to provide with the SD the documentation relating to the three devices used to propel, autonomously maintain a proper pitch angle, and produce a ‘blow’ command should either the transmitted signal be lost or the battery voltage drop below a pre-set value.

    I’m loath to, ‘read the instructions’. Gee… thanks, Tom!

    today's work - Page 2 NLEwcc
    david f
    david f
    AMS Treasurer


    Posts : 2395
    Join date : 2010-11-10
    Age : 73
    Location : Cumbria

    today's work - Page 2 Empty Re: today's work

    Post  david f Thu Apr 02, 2020 10:50 am

    Some very good advice on shipping - double boxing it is.

    I suspect that we are going to have to get quite good at packing things for the post over the next few months.

    Removing small, fragile items has to be good too. Maybe be careful to make them visible. Following several international moves, I still regret losing some small things, "Thrown out with the packing!"


    merriman
    merriman
    Guest


    Posts : 347
    Join date : 2011-10-16
    Age : 75
    Location : Virginia Beach, Virginia

    today's work - Page 2 Empty Re: today's work

    Post  merriman Sat Apr 04, 2020 3:15 am

    today's work - Page 2 RlJTGK

    today's work - Page 2 GUuMqX

    today's work - Page 2 TtcRCp

    today's work - Page 2 Zygqx2

    today's work - Page 2 CisWKY

    today's work - Page 2 K3uHr9

    today's work - Page 2 1WjQT1

    today's work - Page 2 00fkcq

    today's work - Page 2 RqVmi5

    today's work - Page 2 N4oXrr

    today's work - Page 2 Yjc7lU

    today's work - Page 2 NbeBCG

    today's work - Page 2 7DXSnI

    today's work - Page 2 CempBO

    today's work - Page 2 WDWnAs

    today's work - Page 2 XB0TDt

    today's work - Page 2 32SPvv
    merriman
    merriman
    Guest


    Posts : 347
    Join date : 2011-10-16
    Age : 75
    Location : Virginia Beach, Virginia

    today's work - Page 2 Empty Re: today's work

    Post  merriman Mon Apr 06, 2020 3:09 am

    today's work - Page 2 Xbg0e9

    today's work - Page 2 FVDmU4

    today's work - Page 2 DTuj07

    today's work - Page 2 PXcTEu

    today's work - Page 2 MYK1Tt

    today's work - Page 2 GzjbuE

    today's work - Page 2 IWDFnX

    today's work - Page 2 2bgBT1

      Current date/time is Tue Mar 19, 2024 2:15 am