The Association of Model Submariners.

Would you like to react to this message? Create an account in a few clicks or log in to continue.

* THE FORUM FOR ALL THOSE INTERESTED IN BUILDING AND OPERATING MODEL SUBMARINES *


Join the AMS - Registered Forum users can become members of the AMS and it's free ...... To join send an email with your name , address and phone number to amstreasure@googlemail.com


For a guide to past events see the "Shows and Events" section.

Papplewick Pumping Station SUBMARINE Day. 31st March - 1st April 2024.

$$$

&&&

::::

Who is online?

In total there are 5 users online :: 0 Registered, 0 Hidden and 5 Guests

None


Most users ever online was 180 on Tue Nov 05, 2019 6:03 am

Latest topics

» Newbie needs advice!
Not the hobby I expected :) - Page 5 EmptyYesterday at 1:58 pm by david f

» Modulated electric fields for submarine communication in a "heads up" from Harry!
Not the hobby I expected :) - Page 5 EmptySun Apr 21, 2024 6:09 am by geofrancis

» 868/915 Mhz as a viable frequency for submarines.
Not the hobby I expected :) - Page 5 EmptyWed Apr 10, 2024 5:48 am by tsenecal

» Laser cut Robbe U47 conversion
Not the hobby I expected :) - Page 5 EmptyTue Apr 09, 2024 3:40 pm by david f

» ExpressLRS - 868/915 Mhz equipment
Not the hobby I expected :) - Page 5 EmptyTue Apr 02, 2024 3:27 pm by tsenecal

» Information on camouflage patterns for German seahund
Not the hobby I expected :) - Page 5 EmptyFri Mar 15, 2024 4:36 pm by david f

» WW2 mini sub build
Not the hobby I expected :) - Page 5 EmptyTue Mar 12, 2024 1:56 pm by geofrancis

» Not the hobby I expected :)
Not the hobby I expected :) - Page 5 EmptySun Mar 10, 2024 6:30 pm by cat

» Sheerline gasket material
Not the hobby I expected :) - Page 5 EmptyMon Feb 19, 2024 9:24 pm by Michaelc

Statistics

Our users have posted a total of 12449 messages in 1981 subjects

We have 1010 registered users

The newest registered user is Chris Shelley

Similar topics

    +4
    SimonH
    maxx78
    Tom(ADMIN)
    david f
    8 posters

      Not the hobby I expected :)

      cat
      cat


      Posts : 65
      Join date : 2022-03-21

      Not the hobby I expected :) - Page 5 Empty Re: Not the hobby I expected :)

      Post  cat Tue Sep 26, 2023 10:01 am

      A progress.

      I had to rip the plastic end caps off the battery and re-seal it with tape but it's IN; and I've got the electronics stuck down and partially wired in.

      I need to split the power to get it to the dive pump as well as the speed controller but it's all 'in' the tube at least.

      Not the hobby I expected :) - Page 5 53214975349_780f58faf0_c

      david f and SimonH like this post

      cat
      cat


      Posts : 65
      Join date : 2022-03-21

      Not the hobby I expected :) - Page 5 Empty Re: Not the hobby I expected :)

      Post  cat Sun Oct 01, 2023 5:50 pm

      Still very learning lathe, I've done a bit of facing, turning and a little bit of knurling, but I've not done a thread yet and an experiment in cutting an o-ring groove failed spectacularly. The mystery plastic I was messing with didn't want to cut a nice flat bottom in the groove despite the same tool turning an acceptable outside diameter. It's all learning and I will get round to casting some endcaps and giving grooving a go on resin in due course.

      Meanwhile I've been mucking about with some actual sub building and radio fettling.

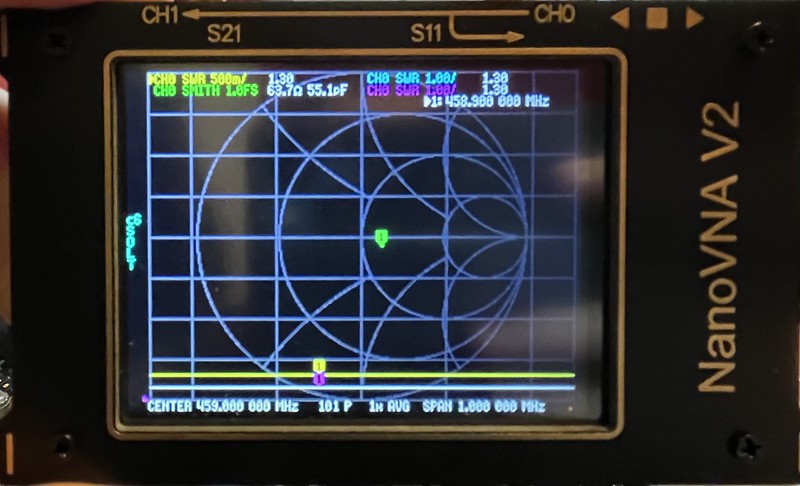
      One of my good friends loaned me one of whatever these things are and I've been batting my SWR numbers on antennas as close to 1 as I can get for a center frequency of 459Mhz (band being 458.5 - 459.5 so sayeth ofcom

      Not the hobby I expected :) - Page 5 53226179399_0b6033e184_c

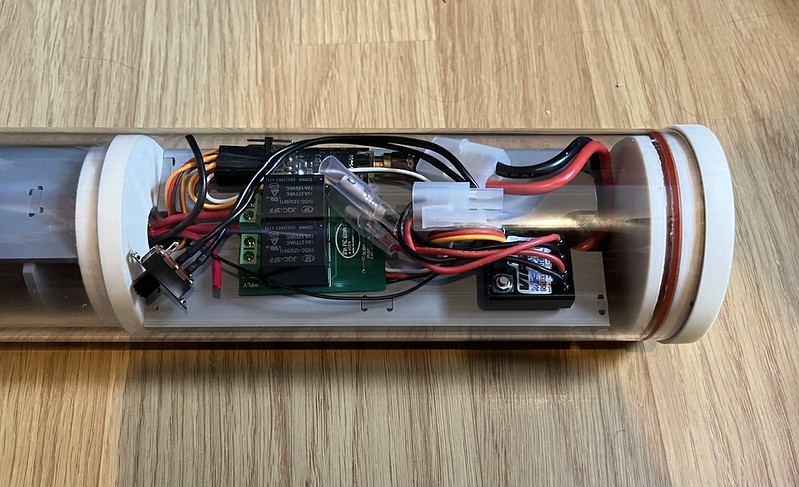
      Submarine wise, I've cut holes in the bulkheads for air and water to circulate, glued in the rubber band rings that support the tube center it, I've got the rear prop fin things installed with the prop bearing inside, the cylinder end prop support and control surface control arm whatsit is glued in and shimmed so that the prop shaft turns freely.

      I've drilled all the holes for the control surfaces at the back end of the sub and I'm working out how the control wires need to be bent, at the moment they want to bind for down dive plane so some bending must be required to make them sit and run right, I might drag the thing down to my boat club to get some practical advice from real life model makers.

      Still loads to do, but the list of stuff is getting gradually shorter!
      Not the hobby I expected :) - Page 5 53225570987_7c548661fd_c

      david f, SimonH and geofrancis like this post

      avatar
      SimonH


      Posts : 91
      Join date : 2020-09-29
      Location : Nottingham, UK

      Not the hobby I expected :) - Page 5 Empty Re: Not the hobby I expected :)

      Post  SimonH Mon Oct 02, 2023 1:29 pm

      I use a parting tool to cut my O-ring grooves, probably not the proper way of doing it, but in polyacrbonate its seems OK with a slow rotation.
      Youre not removing too much material, and the parting tool is thin and square ended.
      Don't go sideways, do repeated cuts straight in, then come out and move sideways bit by bit to give the right width.
      If its any 'encouragement' I foung cutting the O-ring grooves the most tricky bit of building a WTC.

      david f, cat and Leogtleo* like this post

      cat
      cat


      Posts : 65
      Join date : 2022-03-21

      Not the hobby I expected :) - Page 5 Empty Re: Not the hobby I expected :)

      Post  cat Mon Oct 02, 2023 5:53 pm

      Because there's something wrong with me, I've made a start on the astute. sob.

      Not the hobby I expected :) - Page 5 53228281027_a2bec1fc6e_c

      Leogtleo* likes this post

      cat
      cat


      Posts : 65
      Join date : 2022-03-21

      Not the hobby I expected :) - Page 5 Empty Re: Not the hobby I expected :)

      Post  cat Thu Oct 05, 2023 4:36 pm

      I've done some wiring. The boat can now switch on and off from the pushy button through the endcap, wiggle its servos, switch the dive controller on and off in both directions but it can't yet power the motor because it needs a power feed from the battery yet.
      I have spun the drive motor in both directions.

      I 'just' need to build a tiny loom to go between the battery pack and the speed controller to split power to the dive pump and to also incorporate a main fuse (yet to be aquired)

      Eek we're getting scarily close to being able to shove something in the bath and see where it leaks!

      david f likes this post

      cat
      cat


      Posts : 65
      Join date : 2022-03-21

      Not the hobby I expected :) - Page 5 Empty Re: Not the hobby I expected :)

      Post  cat Sat Oct 07, 2023 7:31 pm

      Playing with the lathe, I've made my first 'part' so to speak.

      I chopped down a big bit of aluminum to 50mm to match the OD of my astute tube

      and I'm *slightly* proud of my accuracy.

      I didn't do QUITE so well on the actually more important inner diameter, but that doesn't actually want to be an interference fit because that's what the o-ring does for us.
      It goes in the tube nice anyway


      No o-ring groove cut because I'm going to mold this in silicone and make resin copies of it and groove them instead. That should give me multiple chances to cheaplyish get things wrong.

      Anything to avoid actually finishing the seawolf, right?


      What kind of main fuses do you lot use? I need to find one to pop in my loom.

      david f and Leogtleo* like this post

      david f
      david f
      AMS Treasurer


      Posts : 2398
      Join date : 2010-11-10
      Age : 73
      Location : Cumbria

      Not the hobby I expected :) - Page 5 Empty Re: Not the hobby I expected :)

      Post  david f Mon Oct 09, 2023 8:15 am

      I use 15a auto fuses (the blue ones)

      https://www.ebay.co.uk/itm/261130867103?hash=item3ccc9cd19f:g:fJUAAMXQY8JRf-6q&amdata=enc%3AAQAIAAAA4FBawmPvSew%2BQtkaQXwzCgVfnThY5CoYJQuWJQg5R4zTloSEuANujB9od3NgYH4%2Bkw%2Bj6QFpdAykX6vMrEZxDQ47A9pZApvwX%2FOBz9W2uX%2F5jXC7XahvtHeIDWjq82%2BxTX5td%2B6URvh2drWiuzeMJqpOv62DuiKmYa2S5IkfEFgXwve38FxU6O4Ndq2jwRJSMQPkvDCwPErS3uH85yHxptTq%2BAjJtXy%2BNYAiCPaKycJiKEUUmpsl2qDlN5uAnzG3%2Fpw9hc%2BSSuZa70AGapRpBUW0hrGzkW5RWKImCbKt8leq%7Ctkp%3ABk9SR46Fw7TiYg

      Other suppliers are available!

      David

      Nice bit of turning, by the way.

      cat likes this post

      Leogtleo*
      Leogtleo*


      Posts : 3
      Join date : 2023-07-15

      Not the hobby I expected :) - Page 5 Empty O-Ring gland size

      Post  Leogtleo* Mon Feb 05, 2024 6:15 am

      Hi,
      I am relatively new to building RC submarines and am eager to learn from experienced hobbyists. Could anyone kindly assist me in determining the optimal method for designing end caps for my watertight cylinder? I am specifically seeking advice on establishing the appropriate O-Ring gland size. Your expertise would be greatly appreciated.
      Note: I’m using a 3D printer to print all the parts.

      Thank you,
      david f
      david f
      AMS Treasurer


      Posts : 2398
      Join date : 2010-11-10
      Age : 73
      Location : Cumbria

      Not the hobby I expected :) - Page 5 Empty Re: Not the hobby I expected :)

      Post  david f Mon Feb 05, 2024 12:37 pm

      Hi,

      Welcome and I hope you don't mind that I have deleted a duplicate post.

      I always turn WTC end caps from polycarbonate on a small Taig/Peatol lathe - so I'm not really the one to answer this question.

      But my worries are with a 3d printed end cap that it would be porous??

      Online O ring sizing guides are quite useful e.g:

      https://eriks.com/en/know-how-hub/blogs/o-ring-sizes/

      But again I would worry that I always find a bit of trial and error is needed with the final fit. (We need to be able to close quite a large joint by hand pushing.)
      I am not sure that with 3d printing you could easily do the equivalent of "shaving  a whisker off". It sometimes also helps to drop the O ring size to stretch it more - trial and error again.

      Some more thoughts on this thread but I hope someone who has successfully printed end caps will answer this one.

      https://www.theassociationofmodelsubmariners.com/t1306-first-attempt-at-end-covers?highlight=O+ring

      David

      Leogtleo* likes this post

      cat
      cat


      Posts : 65
      Join date : 2022-03-21

      Not the hobby I expected :) - Page 5 Empty Re: Not the hobby I expected :)

      Post  cat Mon Feb 05, 2024 1:00 pm

      I tried printing in pla and abs and the latter was water tight at moderate pressure, but NOT gas tight so the air would leave the sub.

      the other problem is that o-rings like a REALLY flat land to seal on, and 3d printing ridges are not that.

      I gave up and bought a small lathe, I'm currently lathing metal caps, moulding them in silicone and pouring resin copies of them.

      I think you may have more luck with resin printers, but I wasn't keen on the mess or smells of them, also it happens that lathes are REALLY good fun.

      david f and Leogtleo* like this post

      Leogtleo*
      Leogtleo*


      Posts : 3
      Join date : 2023-07-15

      Not the hobby I expected :) - Page 5 Empty Thanks

      Post  Leogtleo* Mon Feb 05, 2024 4:51 pm

      david f wrote:Hi,

      Welcome and I hope you don't mind that I have deleted a duplicate post.

      I always turn WTC end caps from polycarbonate on a small Taig/Peatol lathe - so I'm not really the one to answer this question.

      But my worries are with a 3d printed end cap that it would be porous??

      Online O ring sizing guides are quite useful e.g:

      https://eriks.com/en/know-how-hub/blogs/o-ring-sizes/

      But again I would worry that I always find a bit of trial and error is needed with the final fit. (We need to be able to close quite a large joint by hand pushing.)
      I am not sure that with 3d printing you could easily do the equivalent of "shaving  a whisker off". It sometimes also helps to drop the O ring size to stretch it more - trial and error again.

      Some more thoughts on this thread but I hope someone who has successfully printed end caps will answer this one.

      https://www.theassociationofmodelsubmariners.com/t1306-first-attempt-at-end-covers?highlight=O+ring

      David
      Thank you for your thoughtful reply and valuable advice. I appreciate your input.

      david f and cat like this post

      Leogtleo*
      Leogtleo*


      Posts : 3
      Join date : 2023-07-15

      Not the hobby I expected :) - Page 5 Empty Re: Not the hobby I expected :)

      Post  Leogtleo* Mon Feb 05, 2024 4:57 pm

      cat wrote:I tried printing in pla and abs and the latter was water tight at moderate pressure, but NOT gas tight so the air would leave the sub.

      the other problem is that o-rings like a REALLY flat land to seal on, and 3d printing ridges are not that.

      I gave up and bought a small lathe, I'm currently lathing metal caps, moulding them in silicone and pouring resin copies of them.

      I think you may have more luck with resin printers, but I wasn't keen on the mess or smells of them, also it happens that lathes are REALLY good fun.
      I’m going to use PVC to make the end caps; it will be much better, and I won’t waste my time and money. Thank you.

      david f and cat like this post

      avatar
      tsenecal
      Guest


      Posts : 311
      Join date : 2015-04-01

      Not the hobby I expected :) - Page 5 Empty Re: Not the hobby I expected :)

      Post  tsenecal Mon Feb 05, 2024 8:08 pm

      so far, the only thing i have not tried for endcaps is FDM 3d printing...

      first endcaps where lathe made PVC.  i am guessing that 8 endcaps were made that way.

      second round of endcaps were pulled from rubber molds made from the PVC masters.  i am guessing 24 endcaps were made that way.

      latest round of endcaps were 3d resin prints, using the elegoo ABS style resin.  so far, i think 6 endcaps have been made that way.

      in all cases, the o-ring grooves were cleaned up to final tolerances using the lathe.


      3d resin printed parts are no more messy than using casting resin and rubber molds.


      i have made a few parts with FDM 3d printing, but no endcaps.  i would assume that finishing the FDM part and using that as a master for rubber molds would be the best use of that technology.

      david f, SimonH and Leogtleo* like this post

      david f
      david f
      AMS Treasurer


      Posts : 2398
      Join date : 2010-11-10
      Age : 73
      Location : Cumbria

      Not the hobby I expected :) - Page 5 Empty Re: Not the hobby I expected :)

      Post  david f Thu Feb 08, 2024 1:58 pm

      Just thinking about your end caps. I realize that in my last 2 projects I didn't use them at all and went for bayonet fittings from Engel. (Not incredibly cheap at about £80 but rapid delivery from Germany to the UK and they work really well - makes opening and closing the WTC really easy:

      https://engel-modellbau.eu/shop/en/Sub-Components/Bayonet-Lock-Rings/Bayonet-Lock-Ring-99-87-mm.html

      Just make sure that they don't untwist when you are sailing - a rapid sinking results! (I have seen it happen.)


      David

      Leogtleo* likes this post

      cat
      cat


      Posts : 65
      Join date : 2022-03-21

      Not the hobby I expected :) - Page 5 Empty Re: Not the hobby I expected :)

      Post  cat Sun Mar 10, 2024 6:30 pm

      I've been struggling for any shaped tuits let alone any round ones, so I've been failing to get *anything* done for a while beyond trying to save up to get retired.

      Still I've tried to get a bit motivated this weekend and a pal brought round some of this, which despite not being galvanised has galvanised ME into some action:
      Not the hobby I expected :) - Page 5 53579591210_eb458dd377_c

      I'm going to have a go at casting that into some submarine shaped slugs for if i ever get far enough to need to trim a sub.

      To help with my paranoia about committing to the fit out of the rear of the sub i've been working out how to make conical things in freecad and have been refining this this afternoon:
      Not the hobby I expected :) - Page 5 53579361473_c254f1e6a2_c

      It's a combined vertical spacer and shaft stabiliser, since the outer skin is so slender, it provides a bit more support to the rudder and spaces up the rudder clevis dingle whatever it's called so it's central about the shaft for maximum clearances. Just need to work out what's best to glue petg to abs.

      I would like to have a float this summer if I can get this can working.

      david f likes this post

        Similar topics

        -

        Current date/time is Sat Apr 27, 2024 12:43 pm